
User Manual
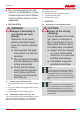

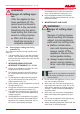
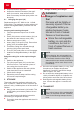
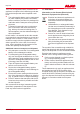


Table Of Contents
- Titelseite
- Inhaltsverzeichnis
- Bildteil GT4030
- Original-Betriebsanleitung
- 1 Zu dieser Betriebsanleitung
- 2 Produktbeschreibung
- 3 Sicherheit
- 4 Montage
- 5 Inbetriebnahme
- 6 Bedienung
- 7 Arbeitsverhalten und Arbeitstechnik (11, 12, 14)
- 8 Wartung und Pflege
- 9 Lagerung
- 10 Transport
- 11 Entsorgung
- 12 Kundendienst/Service
- 13 Hilfe bei Störungen
- 14 Garantie
- 15 EG-Konformitätserklärung
- Translation of the original instructions for use
- 1 About these operating instructions
- 2 Product description
- 3 Safety
- 4 Installation
- 5 Start-up
- 6 Operation
- 7 Working behaviour and working technique (11, 12, 14)
- 8 Maintenance and care
- 9 Storage
- 10 Transport
- 11 Disposal
- 12 After-Sales / Service
- 13 Help in case of malfunction
- 14 Guarantee
- 15 EU declaration of conformity
- Vertaling van de originele gebruikershandleiding
- 1 Over deze gebruikershandleiding
- 2 Productomschrijving
- 3 Veiligheid
- 4 Montage
- 5 Ingebruikname
- 6 Bediening
- 7 Werkwijze en werkmethode (11, 12, 14)
- 8 Onderhoud en verzorging
- 9 Opslag
- 10 Transport
- 11 Verwijderen
- 12 Klantenservice/service centre
- 13 Hulp bij storingen
- 14 Garantie
- 15 EG-verklaring van overeenstemming
- Traduction de la notice d’utilisation originale
- 1 À propos de cette notice
- 2 Description du produit
- 3 Sécurité
- 4 Montage
- 5 Mise en service
- 6 Utilisation
- 7 Comportement au travail et technique de travail (11, 12, 14)
- 8 Maintenance et entretien
- 9 Stockage
- 10 Transport
- 11 Élimination
- 12 Service clients/après-vente
- 13 Aide en cas de pannes
- 14 Garantie
- 15 Déclaration de conformité CE
- Traducción del manual original de instrucciones
- 1 Acerca de este manual de instrucciones
- 2 Descripción del producto
- 3 Seguridad
- 4 Montaje
- 5 Puesta en funcionamiento
- 6 Funcionamiento
- 7 Modo y técnica de trabajo (11, 12, 14)
- 8 Mantenimiento y limpieza
- 9 Almacenamiento
- 10 Transporte
- 11 Eliminación del producto
- 12 Servicio de atención al cliente/servicio técnico
- 13 Ayuda en caso de avería
- 14 Garantía
- 15 Declaración CE de conformidad
- Traduzione del manuale per l'uso originale
- 1 Istruzioni per l'uso
- 2 Descrizione del prodotto
- 3 Sicurezza
- 4 Montaggio
- 5 Messa in funzione
- 6 Utilizzo
- 7 Comportamento e tecnica di lavoro (11, 12, 14)
- 8 Manutenzione e cura
- 9 Conservazione
- 10 Trasporto
- 11 Smaltimento
- 12 Servizio clienti/Assistenza
- 13 Supporto in caso di anomalie
- 14 Garanzia
- 15 Dichiarazione di conformità CE
- Prevod originalnih navodil
- 1 K tem navodilom za uporabo
- 2 Opis izdelka
- 3 Varnost
- 4 Montaža
- 5 Zagon
- 6 Upravljanje
- 7 Obnašanje pri delu in delovna tehnika (11, 12, 14)
- 8 Vzdrževanje in nega
- 9 Skladiščenje
- 10 Transport
- 11 Odstranjevanje
- 12 Servisna služba/servis
- 13 Pomoč pri motnjah
- 14 Garancija
- 15 Izjava ES o skladnosti
- Prijevod originalnih uputa za uporabu
- 1 Informacije o Uputama za uporabu
- 2 Opis proizvoda
- 3 Sigurnost
- 4 Montaža
- 5 Puštanje u rad
- 6 Rukovanje
- 7 Način i tehnika rada (11, 12, 14)
- 8 Održavanje i njega
- 9 Skladištenje
- 10 Transport
- 11 Zbrinjavanje
- 12 Korisnička služba/Servis
- 13 Pomoć u slučaju smetnji
- 14 Jamstvo
- 15 Izjava o sukladnosti EZ-a
- Tłumaczenie oryginalnej instrukcji obsługi
- 1 Informacje dotyczące niniejszej instrukcji obsługi
- 2 Opis produktu
- 3 Bezpieczeństwo
- 4 Montaż
- 5 Uruchomienie
- 6 Obsługa
- 7 Nawyki i technika pracy (11, 12, 14)
- 8 Konserwacja i pielęgnacja
- 9 Przechowywanie
- 10 Transport
- 11 Utylizacja
- 12 Obsługa klienta/Serwis
- 13 Pomoc w przypadku usterek
- 14 Gwarancja
- 15 Deklaracja zgodności WE
- Překlad originálního návodu k použití
- 1 K tomuto návodu k použití
- 2 Popis výrobku
- 3 Bezpečnost
- 4 Montáž
- 5 Uvedení do provozu
- 6 Obsluha
- 7 Chování při práci a pracovní technika (11, 12, 14)
- 8 Údržba a péče
- 9 Skladování
- 10 Přeprava
- 11 Likvidace
- 12 Zákaznický servis/servis
- 13 Pomoc při poruchách
- 14 Záruka
- 15 Prohlášení o shodě EC
- Preklad originálneho návodu na použitie
- 1 O tomto návode na použitie
- 2 Popis výrobku
- 3 Bezpečnosť
- 4 Montáž
- 5 Uvedenie do prevádzky
- 6 Obsluha
- 7 Správanie pri práci a technika práce (11, 12, 14)
- 8 Údržba a starostlivosť
- 9 Skladovanie
- 10 Preprava
- 11 Likvidácia
- 12 Zákaznícky servis
- 13 Pomoc pri poruchách
- 14 Záruka
- 15 Vyhlásenie o zhode ES
- Az eredeti kezelési útmutató fordítása
- 1 Ehhez a kezelési útmutatóhoz
- 2 Termékleírás
- 3 Biztonság
- 4 Összeszerelés
- 5 Üzembe helyezés
- 6 Kezelés
- 7 Munkamagatartás és munkatechnika (11, 12, 14)
- 8 Karbantartás és ápolás
- 9 Tárolás
- 10 Szállítás
- 11 Ártalmatlanítás
- 12 Ügyfélszolgálat/Szerviz
- 13 Hibaelhárítás
- 14 Garancia
- 15 EK megfelelőségi nyilatkozat
- Oversættelse af den originale brugsanvisning
- 1 Om denne brugsanvisning
- 2 Produktbeskrivelse
- 3 Sikkerhed
- 4 Montering
- 5 Ibrugtagning
- 6 Betjening
- 7 Arbejdsmåde og arbejdsteknik (11, 12, 14)
- 8 Service og vedligeholdelse
- 9 Opbevaring
- 10 Transport
- 11 Bortskaffelse
- 12 Kundeservice/service
- 13 Hjælp ved forstyrrelser
- 14 Garanti
- 15 EF-overensstemmelseserklæring
- Översättning av originalbruksanvisning
- 1 Om denna bruksanvisning
- 2 Produktbeskrivning
- 3 Säkerhet
- 4 Montering
- 5 Start
- 6 Användning
- 7 Arbetsbeteende och arbetsteknik (11, 12, 14)
- 8 Underhåll och skötsel
- 9 Förvaring
- 10 Transport
- 11 Återvinning
- 12 Kundtjänst/service
- 13 Felavhjälpning
- 14 Garanti
- 15 EG-försäkran om överensstämmelse
- Oversettelse av den originale bruksanvisningen
- 1 Om denne bruksanvisningen
- 2 Produktbeskrivelse
- 3 Sikkerhet
- 4 Montering
- 5 Igangsetting
- 6 Betjening
- 7 Arbeidsmåte og arbeidsteknikk (11, 12, 14)
- 8 Vedlikehold og pleie
- 9 Oppbevaring
- 10 Transport
- 11 Avfallshåndtering
- 12 Kundeservice/service
- 13 Feilsøking
- 14 Garanti
- 15 EC-samsvarserklæring
- Käännös alkuperäisestä käyttöohjeesta
- 1 Tietoa käyttöohjeesta
- 2 Tuotekuvaus
- 3 Turvallisuus
- 4 Asennus
- 5 Käyttöönotto
- 6 Käyttö
- 7 Työskentelytapa ja ‑tekniikka (11, 12, 14)
- 8 Huolto ja hoito
- 9 Säilytys
- 10 Kuljetus
- 11 Hävittäminen
- 12 Asiakaspalvelu ja huolto
- 13 Ohjeet häiriötilanteissa
- 14 Takuu ja tuotevastuu
- 15 EY-vaatimustenmukaisuusvakuutus
- Originalios naudojimo instrukcijos vertimas
- 1 Apie šią naudojimo instrukciją
- 2 Gaminio aprašymas
- 3 Sauga
- 4 Montavimas
- 5 Paleidimas
- 6 Valdymas
- 7 Darbinė elgsena ir darbo metodika (11, 12, 14)
- 8 Techninė priežiūra
- 9 Sandėliavimas
- 10 Transportavimas
- 11 Išmetimas
- 12 Klientų aptarnavimo tarnyba / techninės priežiūros punktas
- 13 Pagalba atsiradus sutrikimų
- 14 Garantija
- 15 EB atitikties deklaracija
- Oriģinālās lietošanas instrukcijas tulkojums
- 1 Par šo lietošanas instrukciju
- 2 Izstrādājuma apraksts
- 3 Drošība
- 4 Montāža
- 5 Ekspluatācijas sākšana
- 6 Lietošana
- 7 Rīcība darba laikā un darba paņēmieni (11, 12, 14)
- 8 Tehniskā apkope un tīrīšana
- 9 Uzglabāšana
- 10 Transportēšana
- 11 Utilizācija
- 12 Klientu apkalpošanas dienests/serviss
- 13 Palīdzība traucējumu gadījumā
- 14 Garantija
- 15 EK atbilstības deklarācija
- Перевод оригинального руководства по эксплуатации
- 1 Информация о руководстве по эксплуатации
- 2 Описание продукта
- 3 Правила безопасности
- 4 Установка
- 5 Ввод в эксплуатацию
- 6 Управление
- 7 Указания по использованию устройства (11, 12, 14)
- 8 Техобслуживание и уход
- 9 Хранение
- 10 Транспортировка
- 11 Утилизация
- 12 Сервисное обслуживание
- 13 Устранение неисправностей
- 14 Гарантия
- 15 Заявление о соответствии ЕС
- Переклад оригіналу посібника з експлуатації
- 1 Інформація про посібник із експлуатації
- 2 Опис пристрою
- 3 Правила безпеки
- 4 Складання
- 5 Введення в експлуатацію
- 6 Експлуатація
- 7 Вказівки щодо використання (11, 12, 14)
- 8 Технічне обслуговування та догляд
- 9 Зберігання
- 10 Транспортування
- 11 Утилізація
- 12 Сервісне обслуговування
- 13 Усунення несправностей
- 14 Гарантія
- 15 Декларація про відповідність стандартам ЄС

GB
42 GT 4030
Operation
The temperature range for charging should be
between 5°C and +45°C. The charging time for
full charging is max. 120 minutes. If the operating
time of the rechargeable battery is reduced in
spite of it being fully charged, the rechargeable
battery is at the end of its service life and must be
replaced by a new original rechargeable battery.
For more information about charging the battery,
refer to the separate instructions for the battery
and the charger.
5.2 Removing transport guard from line
cutter
Remove the transport guard from the line cutter
before putting the appliance into operation for the
first time.
6 OPERATION
WARNING!
Risk of injury due to de-
taching appliance parts
Appliance parts detaching
during operation can lead
to serious injury.
■
Before turning the appli-
ance on, check that all
the parts of the appli-
ance are firmly
tightened.
■
Attach cutting tools so
that they cannot detach
during operation.
6.1 Inserting and removing rechargeable
battery (04, 05)
Inserting rechargeable battery (04)
1. Push rechargeable battery (04/2) into battery
slot (04/1) until it engages (04/a).
Removing rechargeable battery (05)
1. Press (05/a) and hold unlock button (05/1).
2. Pull out (05/b) rechargeable battery (05/2).
6.2 Adjusting telescopic handle (06)
1. Turn upper locking sleeve (06/1) to the right
(06/a) to release.
2. Adjust telescopic handle (06/2) individually to
a comfortable height. The telescopic handle
can be extended by approx. 10cm (06/b).
3. Screw locking sleeve tight (06/c).
6.3 Swivelling cutter head (07, 08)
For trimming lawn edges, for example, it is pos-
sible to swivel the cutter head through 180° (07,
08).
1. Pull telescopic handle (07/1) slightly upwards
(07/a).
2. At the same time, turn cutter head (07/2)
through 180° (07/b) until it engages.
3. Allow the telescopic handle to slide down and
engage (07/a).
6.4 Tilting cutter head (09)
By changing the pivot angle, it is also possible to
trim areas that are difficult to access, e.g. under
benches, overhangs, etc.
1. Press (09/a) locking button (09/1).
2. Allow cutter head (09/2) to engage at the de-
sired angle (09/b).
3. Release the locking button.
6.5 Starting lawn trimmer (01)
1. Stand securely.
2. Hold the appliance with both hands. Do not
rest the cutter head on the ground when do-
ing this.
3. Hold auxiliary handle (01/5) in one hand and
upper grip (01/1) in the other hand.
4. Press unlock button (01/2).
5. Press and hold ON/OFF switch (01/2). The
appliance starts.
6. Allow the lawn trimmer to run at idling speed
for a few moments. This causes the cutting
line to be cut off to the correct length.
7. The appliance switches off when the ON/OFF
switch is released.