Contents Introduction...................................................................................... 3 Specifications ................................................................................................................ 3 Precautions.................................................................................................................... 4 System Requirements.................................................................................................. 4 Package Content ......
2.2.3.2 Jpeg File Preview Setup ...............................................................................22 2.2.3.3 Language Selection Setup............................................................................22 2.2.3.4 Check Firmware Version...............................................................................22 2.3 Basic Screen Menu ..................................................................................23 2.3.1 Media Type Selection ........................................
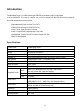
Introduction Portable Mpeg4 Player is 2.5” HDD interface type of MPEG4 player based on USB 2.0 High Speed. It can be connected to TV in home or a monitor. It is not only an external USB HDD but also the best portable AV device that displays Music, Movie and photo. ¾ Digital Multimedia Player via Home TV or Car TV ¾ USB 2.0 External Storage via PC(NTFS, FAT32) ¾ Audio - Stereo, Digital Coaxial 5.1ch.
Precautions ▪ We strongly recommend you to back up the data to another safe media. We are not responsible for data damage or loss in built-in HDD. ▪ It’s better unplug the power adaptor when you do not use for a long time. ▪ The Mpeg4 Player does not support the DivX, XviD codec of video files that has GMC, Qpel option. ▪ The Mpeg4 Player supports only “Pass-Through” for DTS Audio codec. ▪ Don’t power off while a file is playing.
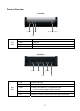
Product Overview - Front View - ① Power ③ IR ④ IR Receiving Area ② HDD ① Power Power LED Front ② HDD HDD LED View ③ IR IR LED ④ IR Receiving Area IR receiving area for remote signals - Back View - ① USB ② 5V ④ SD/HD ③ IR/5.1 ① USB Back ⑤ AV Connect USB cable ② 5V Connect power Cable ③ IR/5.1 Connect coaxial cable for 5.1 ch.
1. Use as External USB HDD 1.1 Insert Hard Disk 9 Use 2.5” IDE Hard Disk for Laptop(or Notebook) PC. 9 Hard Disk should be “Master”. However, if the Hard Disk supports “Single” mode, you need to try to set “Single “mode. ① Grip the hasp and pull back ② Pull the PCB out. ③ Grip HDD and insert it into the front panel, and then open the pins of PCB (be sure to the top cover. match the 44 pins) ④ Screw HDD on PCB by using ⑤ Insert the PCB into the case, the supplied screws.
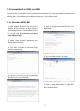
1.2 Format Built-in HDD via USB If the built-in HDD is not formatted, PC can not detect the hard disk drive. If so, format the hard disk first referring to the following guide. * If the hard disk drive is already formatted, see “1.3 Copy Data via USB”. 1.2.1 Windows 98SE, ME 1) Install Windows 98 Driver. Find the driver at 5) Select “5. Change current fixed disk drive” and Windows 98 CD→Windows 98 Driver Directory. press [Enter]. After finishing installation, Connect Mpeg4 Player to PC via USB cable.
8) Select “ 1. Create Primary DOS Partition ” and 11) Type the capacity or % which you want to use and press [Enter]. press [Enter]. 12) Drive integrity verification will start again. After finishing that, press [ESC] key when the “Primary DOS Partition created, drive letters changed or added” message displays. 9) Wait until finishing verifying the drive integrity. 13) Press [ESC] key again. “ Shut down Windows before restarting” message will be displayed. Press [ESC] key finally for exiting FDISK.
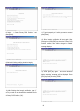
14) Type “ exit ” command at “ C:\WINDOWS> ” and press [Enter] for returning to windows screen. 15) Unplug the Mpeg4 Player and plug again. New volume will be appeared at [My Computer]. Click mouse right button at the new volume and select [Format]. 1.2.2 Windows 2000 1) Connect Mpeg4 Player to PC via USB cable. 3) If the [Disk Signature and Upgrade Disk Wizard] is (If not detected, plug power cable of Mpeg4 Player) started, click Next to progress for finishing the wizard.
5) Click [Next] at the Create Partition Wizard Windows. 9) Choose FAT32 or NTFS at File system to use and click [Next]. 6) Check [Primary Partition] and click [Next]. 9 FAT 32 system is available on windows 98SE/ME/2000/XP, but NTFS system is available on 7) Type number that you want to use and click [Next]. windows 2000/XP only. 9 If you choose FAT32 system on Windows 2000/XP, one drive letter’s maximum size will be limited to 32GB.
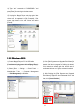
1.2.3 Windows XP 1) Connect Mpeg4 Player to PC via USB cable. 6) Check [Primary Partition] and click [Next]. (If not detected, plug the power cable of Mpeg4 Player) 2) Click [Settings→Control Panel→ Administrative Tools→Computer Management→Disk Management] on Windows. If you can not find Administrative Tools at Control Panel, click “ switch to classic view” in left – up corner on screen. 3) If the [Disk Signature and Upgrade Disk Wizard] starts, click [Next] to progress for finishing the wizard.
9) Choose FAT32 or NTFS at File system to use and click [Next]. 9 FAT 32 system is available on windows 98SE/ME/2000/XP, but NTFS system is available on windows 2000/XP only. 9 If you choose FAT32 system on Windows 2000/XP, one drive letter’s maximum size will be limited to 32GB. If you want to use one drive letter of 32GB more, you have to format on windows 98SE/ME.
1.3 Copy Data via USB It is possible to use as a external USB hard disk drive.. You can copy data from your PC to built-in HDD of Mpeg4 Player via USB. It is possible to play media files at the hard disk on TV set. * If not detected when connecting PC, recommend to connect power cable of Mpeg4 Player. 1.3.1 Windows 98SE 9First, you have to install Windows 98 Driver before connecting PC. Find the driver at Windows 98 driver CD > Windows 98 Driver Directory.
1.3.2 Windows ME 1) After connecting Mpeg4 Player, windows itself will 3) After copying data, remove Mpeg4 Player with install driver automatically. And then, check the driver using remove icon installation at Windows [Start > Settings > Control corner. If you don’t follow this procedure, data and Panel > (view all Control Panel options) > System > Mpeg4 Player may have damage.
1.3.3 Windows 2000, XP 1) After connecting Mpeg4 Player, windows itself will 3) After copying data, remove Mpeg4 Player with install driver automatically. And then, check the driver using remove icon installation at Windows [Start > Settings > Control corner. If you don’t follow this procedure, data and panel > (switch to classic View on Windows XP) > Mpeg4 Player may have damage.
1.3.4 Linux 9It can be available on Linux 2.4 higher. [Automatic Mount] After booting, do log-in. Connect Mpeg4 Player -> Power On Mpeg4 Player -> Check the detection with [fdisk] -> make Mount Pointer (ex. mediatest) at Folder Mount(/mnt) -> Edit [/etc/fstab] -> add the following; /dev/sda /mnt/mediatest vfat noauto, user 0 0 (in case of FAT32 HDD) /dev/sda /mnt/mediatest ntfs noauto, user 0 0 (in case of NTFS HDD) Do Log-in again.
2. Use as Multimedia Player 2.1 Connect to External AV Device 2.1.1 Connect Video Cable Mpeg4 Player supports 2 type of video output; “Composite, Component”. Use video connection that your TV supports. Normally, TV supports composite video connection. Do not connect USB cable when connecting TV. •Component Y, Pb, Pr • •Composite• : Connect to SD/HD jack of Mpeg4 Player. : Connect to AV jack of Mpeg4 Player. Supplied Component Cable Supplied AV Cable Blue [Blue]Connect to Pb jack of TV.
2.1.2 Connect Audio Cable Mpeg4 Player supports 2 type of audio output; “Stereo, Coaxial”. Use audio connection that your TV or Audio set supports. Do not connect USB cable when connecting TV. •Coaxial: Digital 5.1 Ch. • •Stereo• : Connect to IR/5.1 jack of Mpeg4 Player. : Connect to AV jack of Mpeg4 Player. Supplied AV Cable Supplied Coaxial Cable Connect to Coaxial jack of Amplifier or Receiver.
2.2 Basic Setup 2.2.1 Video Setup This is guide for setting video output of Mpeg4 Player. You have to setup Mpeg4 Player’s video output mode same as TV set’s video input mode. 9When you can not see normal screen after connecting video cable, check followings, 1. “TV “– Switch to Video Input Mode: Turn on TV, and switch to video input mode same as video connection. See TV user manual. 2. “Mpeg4 Player” – Switch to Video Output Mode: Press [VIDEO] button repeatedly.
< Setup Procedure> ① Turn on Mpeg4 Player and press [SETUP] on MediaType Selection screen. ② Move to ‘Video Setup’ icon and press [ENTER]. ③ Move to Video Output Mode that you want and press [ENTER]. ④ Finally, press [SETUP] again for saving configurations. Example of component video output settings.
2.2.2 Audio Setup This is guide for setting audio output of Mpeg4 Player. You can use Stereo or Digital 5.1 ch.. 9Analogue/DCPM: Select when you connect the supplied AV cables (Red / White) to TV or Audio set directly. 9Encoded Digital: Select when you want to listen through 5.1Ch by connecting receiver (or amplifier) with supplied coaxial cable. ① Turn on Mpeg4 Player and press [SETUP] in ② Move to ‘Audio Setup’ icon and press MediaType Selection screen. [ENTER].
2.2.3 Other Setup This is guide for setting TV Type, JPEG File Preview, Language Selection. In addition, current firmware version shows. ① Turn on Mpeg4 Player and press [SETUP] in MediaType Selection Screen. ② Move to ‘Other Setup’ icon and press [ENTER]. ③ Move to settings that you want and press [ENTER]. ④ Finally, press [SETUP] again for saving configurations. 2.2.3.1 TV Type Setup Select one among 4:3 Letter Box, 4:3 Pan Scan, or 16:9. 2.2.3.
2.3 Basic Screen Menu 2.3.1 Media Type Selection After turning on Mpeg4 Player, you can see MediaType Selection screen. In this screen, you can select “Video”, “Audio”, Photo” or make “Play-List” with ◀▶ arrow button. Press [ENTER]. Select one media type that you want to play. 2.3.2 File Selection After selecting a Media type, ‘File Selection’ screen will be displayed. Move to a file that you want to play and press [ENTER] or [PLAY/PAUSE]. ☞ [ENTER] button Play one file that you select.
2.4 Play Video Files It is possible to play video files like AVI, MPG, MPEG, DAT, M2V, and VOB. Select ‘Video’ icon in Media Type Selection screen. Video file list will be displayed. Just move to a file and press [ENTER] or [PLAY/PAUSE] button. Select ‘Video’ icon in Media Type Selection screen. Move to a file and press [ENTER] or [PLAY/PAUSE] button. Press [ENTER] for playing just the file or [PLAY/PAUSE] for playing all files from the selected file.
It is possible to switch each subtitle language when the Subtitle Language Select subtitle is dual language format, for example, including a local language and English. * When selecting ‘Discriminating subtitle language’, first subtitle language will be displayed. Subtitle Sync. 4, 5, 6 Subtitle Number Button Color Change Zoom Vertical Zoom Full Scr. SIZE It is possible to set the subtitle sync. with ◀▶(one second) ▼▲(60 second) when motion and subtitle sync is not matched.
PLAY / PAUSE Playback ▶II Next All Files PLAY / PAUSE ▶II Pause After the file that you select, play next all files continuously. It is same as [PLAY/PAUSE] button. Pause playback, if pressing this button when a file is being played. In order to play again, press this button again. Play a previous file before a current playback file. If you used PREV Playback [ENTER] for playback, you can not use this function.
2.5 Play DVD Files DVD manager function support to play DVD Ripping File same as original DVD. Make a folder and then save all ripping files into the folder. After connecting TV(or Monitor), select VIDEO_TS.IFO file at the folder. Make sure that all the ripping files including VIDEO_TS.IFO from one DVD title will be located at one folder. 9If you can not find VIDEO_TS.IFO file among all the ripping files from an original DVD title, DVD manager function will not work.
A-B REPEAT A-B repeat TITLE Go to Title Menu ANGLE FILE INFO TIME SEARCH CANCEL Brt. CONT Angle Show the file information which is being played. In order to Information hide the information, press this button again.
2.6 Play Music Files It is possible to play music files like MP3, OGG, WAV, WMA. Select Audio icon in Media Type Selection screen. Music file list will be displayed. Just move to a file and press [ENTER] or [PLAY/PAUSE] button. Select ‘Audio’ icon in Media Type Selection screen. Move to a file and press [ENTER] or [PLAY/PAUSE] button. Press [ENTER] for playing just the file or [PLAY/PAUSE] for playing all files from the selected file.
Play a next file after a current playback file. If you used NEXT Playback [ENTER] for playback, you can not use this function. This is ▶▶I Next File available in playing all files as using [PLAY/PAUSE] button or FF Go to 10 Sec. in ▶▶ Forward 'Play All' icon. REW Go to 10 Sec. in ◀◀ Backward ENTER Playback a File PLAY / PAUSE Playback ▶II Next All Files PLAY / PAUSE ▶II Pause VOLUME + Volume Up VOLUME - Volume Down MUTE Sound Off Go to 10 sec.
2.7 Play Photo Files It is possible to play photo files like JPG(JPEG). Select Photo icon in Media Type Selection screen. Photo file list will be displayed. Just move to a file and press [ENTER] or [PLAY/PAUSE] button. Select Picture icon in Media Type Selection screen. Move to a file and press [ENTER] or [PLAY/PAUSE] button. Press [ENTER] for playing just the file or [PLAY/PAUSE] for playing all files from the selected file.
PLAY / PAUSE Playback ▶II Next All Files PLAY / PAUSE ▶II FF ▶▶ REW ◀◀ ANGLE 방향키 ▲▼◀▶ ENTER Brt. CONT Pause After the file that you select, play next all files continuously. It is same as [PLAY/PAUSE] button. Pause playback, if pressing this button when a file is being played. In order to play again, press this button again. Zoom In Enlarge a photo. Zoom Out Reduce a photo. Rotation Rotate a photo. Panning Move the position of photo.
2.8 Make a Play-List User can register all media type of files like video, music, and photo to play-list. The registered media files to play-list will be played without discriminating media type. 9It is not possible to play each registered files independently. Use 'Play All, Random Play' icon or [PLAY/PAUSE] button. Additionally, registered play-list will be deleted after rebooting. ① Select Play List icon in Media Type Selection screen. ② Move to a file and press [ENTER] for adding to PlayList.
2.9 Remote Controls This is guide for basic use of remote control. For more details, ‘2.3 Basic Screen Menu’, ‘2.4 Play Video Files’, ‘2.5 Play DVD Files’, ‘2.6 Play Music Files’, ‘2.7 Play Photo Files’, ‘2.8 Make a Play-List’. POWER Turn On / Off SETUP Go to Setup Screen.
2.10 Others 2.10.1 Music Slide Show Make a 'music' folder (in a small letter not a capital letter) at root directory of built-in HDD and save MP3 files at the folder. If the HDD is divided into two or more partitions, make a 'music' folder at first partition. When you play one or all photo files, you can listen mp3 and see photo slide show together. 2.10.2 MP3 Quick Play This is for listening MP3 files without TV set.