ALL1000 INSTALLATION INSTRUCTIONS Aladdin Light Lift, Inc. (256) 429-9700 61 Shields Road (877) 287-4601 Huntsville, AL 35811 www.aladdinlightlift.com Patent #5105349 WARNING: Disconnect power source before servicing to avoid electrical shock CAUTION: To Reduce the Risk of Electric Shock or Injury, Use Indoors Only. Light and motor circuits are rated at AC 110V Pour usage seulement dans un endroit Avec acces au dessus du plafonds Model Number:ALL1000(1000lb.
Read the following guidelines prior to installing the ALL1000: I. The ALL1000 must be installed by a licensed, bonded and insured electrician. II. The ALL1000 must be installed level, in an accessible location and directly above the chandelier. III. Thoroughly read, understand and follow each step and safety warning in the ALL1000 installation instructions and orange safety precautions supplement. IV. During installation of the ALL1000, take one step at a time and check off each step upon completion. V.
STEP 1 Determine where ALL1000 will mount on ceiling joists. ALL1000 must be installed level, in an accessible location directly above chandelier. Never mount the ALL1000 off plane or unlevel in a standard installation. This could cause the chandelier to fall, which could cause death, personal injury, and/or property damage. The winch cable must hang plumb through the center of the top contact plate on the ceiling box.
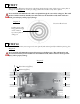
STEP 5 Attach the 1/2” conduit connector on ceiling box to bottom of conduit assembly. Once completely inserted, tighten set screw on conduit connector. See Diagram B. Never attach or adjust the conduit assembly improperly. This could interfere with the automatic shutoff system and could cause the chandelier to fall, which could cause death, personal injury, and/or property damage. Diagram B 1/2” Conduit Connector STEP 6 Tighten temporary five pound weight to fixure coupler on bottom contact plate.
STEP 7 Position ALL1000 where ceiling box will be centered in ceiling hole. Weight and bottom contact plate assembly should hang down through ceiling hole. Adjustments can be made loosening 3/8” channel strut bolts that hold ALL1000 to channel struts. Retighten channel strut bolts after adjustments are made. Confirm channel strut nuts are seated properly. See Diagram C. Never adjust the channel struts improperly.
STEP 9 Shim and adjust ALL1000 so that winch cable hangs plumb through center of hole in top contact plate on ceiling box. See Diagram E. Look up at ceiling box from floor level to verify cable is plumb. Never install the ALL1000 where the cable is not plumb through the center of the ceiling box. This could interfere with the automatic shutoff system and could cause the chandelier to fall, which could cause death, personal injury, and/or property damage.
STEP 11 Turn off supply power before wiring ALL1000. Turn off motor switch in square box. Wire motor switch with 110V wiring. The 110V motor feed must be kept separate from 110V light switch leg. Keep motor and light neutrals separate. The motor neutral is white and 14 gauge. See Diagram G. Never wire the ALL1000 improperly. Make sure electricity is turned off when installing and/or performing maintenance on the ALL1000.
STEP 13 Remove dust cover and remove paper tape from winch drum while keeping tension on winch cable. Never operate the ALL1000 without tension on the cable. Never remove or tamper with the cable safety device. Never install an ALL1000 that has the cable safety device removed or tampered with. The cable safety device consists of the limit switch and small gauge rectangular wire. It is located directly in front of the winch drum.
STEP 20 Fully thread screw collar loop or threaded stem that was supplied with chandelier to 3/8 IPS fixture coupler. If chandelier was supplied with a 1/2 IPS screw collar loop, obtain 3/8 IPS x 1/2 IPS fixture coupler included in parts bag. If chandelier was supplied with a 1/4 IPS screw collar loop or threaded stem, contact Aladdin Light Lift (877) 287-4601 to obtain proper coupler. See Diagram H. Never install a chandelier on an ALL1000 using metric threaded fittings.
STEP 23 Adjust canopy and telescopic conduit assembly so contact plates meet before the canopy touches the ceiling. See Diagram I. Never allow the chandelier canopy to make contact with the ceiling before the contact plates meet. This could interfere with the automatic shutoff system and could cause the chandelier to fall, which could cause death, personal injury, and/or property damage. STEP 24 Loosen bottom screw collar ring to allow easy wire access. See Diagram I.
STEP 27 Tighten fixture coupler set screws using supplied 3/32” Allen wrench. Fixture coupler set screws have thread lock already applied at factory. See Diagram K. STEP 28 Apply supplied liquid thread lock (part D) to all fittings including fixture coupler and screw collar loop fittings. Never attach the chandelier to the ALL1000 improperly.
ALL1000 TROUBLESHOOTING GUIDE TECH SUPPORT: (877) 287-4601 Monday through Friday 8:00am to 4:00pm CST I. Troubleshooting and installation must be performed by a licensed, bonded, and insured electrician. Electricity can cause death, personal injury, and/or property damage. II. To perform most troubleshooting procedures, the following tools will be needed: a. 5/16” nut driver or 5/16” socket and ratchet b. Volt Meter c. 14 AWG jumper wire III.
ALL1000 TROUBLESHOOTING GUIDE cont. 1. Confirm ALL1000 is at the CEILING POSITION. If not, use the controller to operate the ALL1000 to the CEILING POSITION. Chandelier will only light at the CEILING POSITION. If operated to the CEILING POSITION and the chandelier will still not light, proceed to step 2. 2. Confirm light switch in the square box is turned on. The square box is mounted on the chassis plate of the ALL1000, right in front of the control board.
Warranty Agreement Aladdin Light Lift, Inc. warrants its chandelier light lift unit for one year from the date of purchase. The warranty includes all parts provided the unit is installed properly by a licensed electrician. Labor charges will be the responsibility of the purchaser. If the unit does not operate properly, the purchaser must contact a factory authorized service technician approved by Aladdin Light Lift, Inc. to determine if the unit was installed properly.