Tectalk(FM) USER MANUAL 2-WAY PORTABLE PMR 446 RADIO WITH FM BROADCAST RECEIVER ALAN Electronics GmbH
CONTENT 1. GENERAL 1.1 General 1.2 Characteristic 1.3 Composition 2. SPECIFICATION 2.1 General Specification 2.2 Electrical Specification 3. OPERATION 3.1 Drawings of the radio 3.2 ICONS on LCD 3.3 Key Functions 3.4 Setting and Operation 4.
1. GENERAL 1.1 GENERAL This equipment, Tectalk(FM) is called 2 way PMR 446 portable handheld radios. The frequency range is 446.00625 ~ 446.09375MHz, UHF operating Channels for European PMR 446 2 way portable radios. Also, this unit have built-in FM Radio which receives FM Broadcast Radio frequencies in the 87.5 ~ 108MHz band. 1.2 CHARACTERISTIC a) All active device in this radio is composed of semiconductor and high density IC.
2.2 ELECTRICAL SPECIFICATION a) TRANSMITTER 1) Output power : Max. 0.5 W 2) Frequency Stability : +/- 5 ppm(-20°C to +55°C) 3) Modulation Method : FM 4) Oscillation Method : PLL SYNTHESIZER 5) Max. Frequency Deviation : < +/- 2.5 KHz (with tone) 6) Cooling Method : air-cooling Method 7) Spurious Emission TX: < -36dBm 8) FM Hum/Noise : > 40dB(1kHz 60% modulation) 9) Distortion : < 5% (1kHz 60% modulation) 10) Tx Audio Response : 6dB /OCT +/- 3dB preemphasis (300Hz to 2.
3. OPERATION 3.
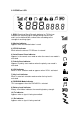
3.2 ICONS on LCD 1. RSSI (Receiving Signal Strength Indicator) or TX Bar Icon Indicates the receiving signal strength during transmission and it can be indicated the number of bar according to the strength of receiving signal. 2) Monitor Indicator Appears when the monitor button is used. 3) CTCSS Indicator Blinks when the correct CTCSS tone is entered. 4) Auto Channel Scan Indicator Appears in the normal scan mode or when the normal scan mode is activated.
12) Large Segment Display Indicates the channel number in use at the normal mode. When the Function Button is pressed, it Displays the function menu in sequence: Ch / rdo / Sc / Uo / H00 / Sub / CAL / bEP / rog / tAL / [1] / [2] / [3] / P1 / P2 / P3 / P4 / P5 13) Small Segment Display Displays the FM frequency at the FM mode. Displays the SUBMENU of each MENU in the function mode. 13.
3.3-2 FUNCTION BUTTON (#12) 1) Short Touch - Press this button briefly to enter function edit mode in standby mode. 2) Long Touch - Press for longer than 1.5 seconds to activate the KEY LOCK in the standby mode. Please note all buttons will be disabled except the Monitor Button (#2) and PTT Button (#4) will remain fully operational. 3.3-3 UP BUTTON (#10) 1) Short Touch - In the standby mode, press this button briefly to move to the next higher main volume level.
2-Way Call Ringer Press the PTT Button twice quickly to call another party on the same channel and pressing the button once during and pressing the button once during a calling stops the calling and then returns to the standby mode. The user selected call ringer melody will play. 3.3-6 MONITOR BUTTON (#2) - Press it to check activity on the current channel before you try to transmit. - Adjust the Volume Control (#10, #11) if necessary.
2) CTCSS (Coded Tone Controlled Squelch System) SUB-CHANNEL SELECTION MODE This feature allows you to utilize a less used channel range (00-38) within a main channel. This enables you to communicate with another party on the same main channel using the same subcode. This helps to avoid congestion on the main channel and filters out unwanted noise and static. There are 38 CTCSS sub-channels for each main channel.
3.4-3 CHANNEL SCAN MODE 1) NORMAL SCAN MODE This feature allows you to scan for an active channel and communicate with the party transmitting. The power saver is disabled in this mode. To access the Auto Channel Scan menu, Press the Function Button (#12) until the word “SC” appears in the LCD. - Press the Down Button (#11) or the Up Button (#10) to choose “nr”. - Press the Monitor Button (#2) to confirm your selection. The unit will begin scanning for an active main channel.
3.4-4 VOX & VOX RECOVERY TIME SELECTION MODE 1) VOX SELECTION MODE The Voice Activated Transmission (VOX) function allows your voice to activate transmission automatically when the TECTALK FM is used with the optional Handsfree MIC/headset. It also allows Handsfree use when a MIC/headset is not being used without having to use the PTT Button (#4). To access the VOX Selection menu, - Press the Function Button (#12) until the word “UO” appears in the LCD Panel (#8).
3.4-6 SUB OPTION SELECTION MODE This mode allows you to enter the sub option selection mode. -Press the Function Button (#12) until the word “Sub” appears in the LCD. You can now select between “yes” or “No”. -If you press the Function Button (#12) when “yes” blinks on the LCD Panel (#8), you enter into the Sub Function edit menu. - Pressing the Function Button (#12) when, “no” blinks, returns to standby.
- Press Function Button (#12) at the CTCSS display option mode, You can select On or Off with Up(#10) or Down(#11) button. - When you press Enter Button (#13) or not press any key in 5 seconds, it returns back Stand-by mode with back beep sound after installation squelch tail elimination option its setting. 5) PMR MEMORY CHANNELS SELECTION MODE This feature allows you to preset the frequency and sub code. You can preset the frequencies and sub codes you use frequently. Max. 3 memory channels are possible.
CTCSS (Continuous Tone Coded Squelch System) Frequency List Sub Channel Tone Frequency Sub Channel Tone Frequency 1 67.0 Hz 21 136.5 Hz 2 71.9 Hz 22 141.3 Hz 3 74.4 Hz 23 146.2 Hz 4 77.0 Hz 24 151.4 Hz 5 79.7 Hz 25 156.7 Hz 6 82.5 Hz 26 162.2 Hz 7 85.4 Hz 27 167.9 Hz 8 88.5 Hz 28 173.8 Hz 9 91.5 Hz 29 179.9 Hz 10 94.8 Hz 30 186.2 Hz 11 97.4 Hz 31 192.8 Hz 12 100.0 Hz 32 203.5 Hz 13 103.5 Hz 33 210.7 Hz 14 107.2 Hz 34 218.1 Hz 15 110.9 Hz 35 225.
like of the units like batteries, external power supplies and over voltage caused through external power supplies, light bulbs, broken antennas, broken swivel belt clips, broken or damaged acrylic glass windows and cabinet parts. Please contact the dealer or person where You have purchased Your Tectalk FM. Where to find service hints and documentation The complete technical documentation is updated regularly.