
User's Manual


Alarm.com © 2000 - 2008
- 3 -
• There is no GSM coverage in the area.
Alarm.com recommends a signal level of 2 or
higher for proper
operation of the module.
In connected mode, the LED toggles on and off.
Improving wireless signal
strength
For optimal wireless signal strength, follow these
guidelines:
• Install the module above ground level, as high up
as possible within the structure.
• Install the module near or adjacent to an outside
facing wall of the structure.
• Do not install the module inside a metal structure
or close to large metal objects or ducts.
• Make sure to follow the antenna positioning
guidelines that are included with the antenna.
Certain antennas must be oriented a specific way
in order to receive signals.
• Upgrade the antenna. If you are using the ¼
wave antenna included with the GSM Gateway
Module, upgrade to a remote cable antenna.
Contact Alarm.com technical support for antenna
options.
Troubleshooting/Testing GSM
• The LEDs are not responding. Turn off the panel
power and verify that the module is correctly
inserted into the panel.
• Module status LEDs do not turn on immediately
after initial power up. You may need to wait a few
minutes after power up
for the module to register on the network.
• Panel/sirens are beeping even though the system
is not armed. Press touchpad status button and
panel reports the
trouble condition. Consult the panel manual for
details. Note: If the GSM module is powered down
for a short period of time, buffered messages from
Alarm.com may be received when module power is
restored.
• Panel will not perform GSM phone test. Only 10
GSM phone tests are allowed in a 24h period. If
more GSM phone tests are required power cycle
the control panel.
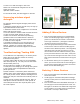
Figure 2
Adding Z-Wave Devices
1. Press and hold down the Alarm.com Z-Wave Mode
button until the Busy Light begins flashing a 4-blink
pattern to indicate that the module is in Add mode.
Then let go of the button. (See Figure 2 above for
illustration of how to press the button).
2. Press the appropriate button(s) on the Z-Wave device
to add it to the network. Observe the Busy light on
the Alarm.com Z-Wave Snap device. The orange Busy
light will become solid and stay solid for 1 minute
once the device has been added successfully. (Once
you’ve pressed the button on the device, it may take
up to 5 seconds for the light to become solid. You do
NOT need to hold down the device button during this
time.)
3. To add another device, you can repeat the steps
above. (You do not need to wait for the solid light to
go away before holding down the Alarm.com Z-wave
button to enter Add mode again.)
Deleting Z-Wave Devices
1. Press and hold down the Z-Wave Mode button on the
Alarm.com module.
2. The Busy light on the Z-Wave Snap device will begin
flashing a 4-blink pattern to indicate that the module
is in Add mode.
3. Press and hold down the Z-Wave Mode button (for ~2
seconds) again to enter Delete/Exclusion mode. The
Busy light on the Alarm.com module will change from
a 4-blink pattern to a 2-blink pattern to indicate that
the module is currently in Delete mode.