
User's Manual


Copyright © 2016 Alarm.com | www.alarm.com | v1.0
4
Simon XT/XTi/XTi-5 LTE/IP Module | Installation Guide
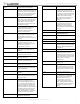
--- Number of Z-Wave
Devices
2
The total number of Z-Wave devices
currently known to the LTE module.
--- Add Z-Wave Device
2
Press OK to enter Z-Wave Add Mode.
Make sure the device you are trying to add
is powered up and within 3 to 6 feet of the
Simon XT, XTi, or XTi-5 panel. Refer to the
manufacturer’s instructions for button
presses required to enroll device.
--- Remove Z-Wave Device
2
Press “OK” to remove an existing Z-Wave
device, or to “reset” a Z-Wave device that
was previously learned into a different Z-
Wave network. Previously enrolled
devices must be reset before they can be
enrolled into the module.
--- Z-Wave Home ID
2
Press “OK” to query the Z-Wave network
Home ID. If the ID is 0, verify that the
module has communicated with
Alarm.com and that the Alarm.com
account is set up for Z-Wave.
-- Account Creation
This menu is available only to installers
who have their own Alarm.com account
creation system. You must enter a
Technician ID and a Lead ID in order to use
this menu.
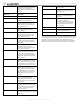
--Image Sensor Setup
1
An Image Sensor daughterboard is
required to enable Image Sensor
capabilities on the module. This menu is
only active if an Image Sensor
daughterboard is connected.
--- Learn Image Sensor
1
Press “OK” to enter Add Mode. Enroll the
Image Sensor by inserting batteries or
resetting.
--- Delete Image Sensor
1
Press “OK” and scroll to the Image Sensor
to delete. Press “OK” to delete.
---Image Sensor Settings
1
Press “OK” and scroll to the Image Sensor
of interest. Press “OK”.
----Image Sensor #[x]
1
[x] is the sensor ID. Press “OK” to view
information on this Image Sensor.
-----[Power Information]
1
Gives information on the Image Sensor’s
battery level and power status.
-----Signal
1
The signal strength of the communication
between the Image Sensor and the Image
Sensor daughterboard.
-----Test PIR
1
Press “OK” to put the Image Sensor in PIR
Test Mode.
-----PIR Sensitivity
1
Press “OK” to view current selection. Scroll
down to view available sensitivity levels.
Press “OK” to select.
-- Dealer Logo Update
This menu is used to upload a Dealer logo
to the two-way talking touchscreen
(2WTTS). (Only available for dealers who
have set up this feature with Alarm.com.)
Press “OK”. If a logo is NOT available for
upload to the 2WTTS, you will see “Logo
update not available”. If a logo is available,
you will be asked to wait until the panel’s
LEDs start flashing, then wait until the
panel’s LEDs stop flashing – at which time
the logo should show on the 2WTTS.
System Test + Installer Code
Scroll down to System Test, enter the
Installer Code and press OK
- Interactive Services
Scroll up to Interactive Services and press
OK
-- Sensor Reporting Test
This menu is used to automate the process
of confirming that all sensors report
correctly to the Central Station. It will put
the account on test and request the list of
sensors that did not report correctly. It is
available only to installers who have
integrated their sensor testing process
with the Central Station and with
Alarm.com
-- AVM/LTE Test
This menu is used to automate the process
of testing AVM over the LTE link. It is
available only to installers who have
integrated their wireless AVM testing
process with the Central Station and with
Alarm.com
-- LTE Module Status
See Installer Programming section above.
System Test + Master Code
Scroll down to System Test, enter the
Master Code and press OK
- Interactive Services
Scroll up to Interactive Services and press
OK
-- LTE Module Status
See Installer Programming section above.
-- Z-Wave Setup
See Installer Programming section above.
-- Thermostat Settings
This menu is used to troubleshoot the
interaction between Z-Wave thermostats
and the two-way wireless talking touch
screen (2WTTS).
--- Thermostat 1, 2, 3
Select the thermostat and press OK.
---- Node ID
The Z-Wave node id of the Z-Wave
thermostat. If 0, then the Z-Wave
thermostat has not been found. You may
need to troubleshoot the Z-Wave network
via the Z-Wave Setup menu. Press “OK” to
have the module try to find the
thermostat again.
---- Mode
The Z-Wave thermostat’s current mode
(Off, Heat, Cool)
---- Setpoints
The current heating and cooling setpoints
of the Z-Wave thermostat. These are the
temperature thresholds that determine
when the heating or cooling unit will turn
on.
---- Fan
The current fan mode (Auto, On)
---- Schedules
Shows whether the thermostat is running
on a schedule (On), or is using a fixed
setpoint. Note that these thermostat
schedules must be set from the
Alarm.com website. Some Z-Wave
thermostats allow setting schedules
directly at the thermostat. These built-in
schedules cannot be set or controlled via
the website or via the touch screen
(2WTTS).