
User Manual


Alarm.com Image Sensor Installation Guide
3 Copyright © 2017 Alarm.com. All rights reserved. Rev 3.5
c. Determine location to mount sensor.
Recommended Install Height and Angle Table:
Best Practices for Image Sensor Installation: Do’s and Don’ts
Do:
• Target capture areas should be centered in the frame
• Try to enroll and install within 100 ft of panel. Installation site conditions can reduce
range considerably.
• Make sure people are walking across the sensor coverage as oppose to walking
directly towards the sensor.
Do NOT:
• Do not set on flat surface.
• Do not set sensor across from mirrors or reflective surfaces.
• Do not face sensor toward or close to areas that have metallic objects or electronics to
avoid interference with RF communication.
• Do not install in area where there are obstructions in front of or around the camera lens
within 90 degrees and 2 ft around sensor (i.e. walls and ceilings in camera field-of-
view). This will result in washed out night captures.
• Do not install outdoors. The device is for indoor use only. (For proper operation in pet
immune applications, the room should be kept between 60° and 110° F.)
• Avoid backlit conditions (i.e. facing window or other light source) since it may result in
poor image quality.
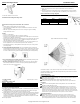
d. Choose applicable mounting bracket. The sensor hardware packet contains two
mounting brackets for different mounting scenarios. Use the provided large screws and
anchors to attach the bracket to the wall. (Leave at least 3 inches of clearance above
the sensor to allow for battery replacement without uninstalling the mounting bracket.)
Flat Wall Mount Corner Wall Mount
e. Place sensor with arm on mounting bracket. Adjust the horizontal positioning of the
sensor to point towards the desired coverage area.
f. Secure the mounting arm location by sliding lock pin into the hole. Use the washer
and remaining small screw to secure the lock pin by screwing upwards through the
bottom of the hole in the mounting bracket.
g. Set PIR Sensitivity Settings – 3 options that can be set through the panel or on the
dealersite:
PIR Sensitivity Settings Table
Normal
Default setting
High
More sensitive motion profile with potential higher risk of false alarm.
Low
Less sensitive profile with pet immunity for pets up to 40 lbs
9. Verify and Test Image Sensor Setup
a. Verify that rules are confirmed via the dealersite or on MobileTech, Resend rules if they
are not confirmed.
b. Verify RF Coverage by checking that the signal strength is above 40%. The signal
strength must be greater than 30% for sensor to function properly.
c. Conduct walk test - To conserve the customer’s monthly image upload quota, automatic
alarm uploads are disabled for the first four hours after any new sensor (Image Sensor
or other) is installed into the system. Installers can also test by requesting image
uploads and motion image uploads via MobileTech. Installers are required to be onsite
to test by running a comm test at the panel.
d. Test night captures.
DELETING IMAGE SENSOR FROM PANEL
Instructions on how to properly delete and Image Sensor from a system. It is important to
do the steps in order.
1. Delete the Image Sensor from the panel via Interactive Services, Dealersite or
Mobiletech.
2. Perform a network reset of the Image Sensor. Seeing instructions on how to network
reset an Image Sensor. You will only be able to do this after you’ve completed step 1.
PIR Lens and Camera Coverage Diagrams
Figure 3.Side View: PIR Lens Coverage
Figure 4.Top View: PIR Lens Coverage
As indicated in Figure 4, the camera coverage area is narrower than the PIR coverage
area. When installing, mount sensor where subjects are likely to be centered in or across
PIR and camera field of view.
TROUBLESHOOTING
General Troubleshooting Steps
Verify Module Signal Strength
Verify Image Sensor RF Signal Strength: The signal strength must be above 30% for
the sensor to function properly.
Verify Images Service Plan: Image capture functionality depends on the
customer’s service plan. Be sure the proper Image Sensor service plan is selected.
Enrollment
Verify Sensor is Receiving Power: After inserting batteries, the sensor LED should
illuminate or flash within 10 seconds.
Verify Sensor is Not Communicating with Another Network: If the sensor has been
previously enrolled in a different system or daughterboard, delete the sensor from the
system and hold the sensor reset button for 10 seconds to clear the sensor from old
network before attempting to enroll the sensor in a new network. The sensor cannot be
cleared if it is currently communicating with its network. In this case the sensor must be
deleted from the system first through the control panel or remote command.
Sensor Non-Responsive
Verify Range: Under the “Image Sensor Setup” menu, scroll to “Image Sensor
Settings,” select the sensor and verify under “Signal” that the sensor is registering a
strong signal. If signal strength is low, move non-responsive sensor closer to control
panel, verify signal strength and see if communication resumes. Be sure that Image
Settings Angle Mounting height
Pet Immunity
6° angle – Shallow
6 ft
Larger rooms
6° angle – Shallow
8 ft
Smaller rooms
18° angle - Deep
8 ft
Washer & Screw
Back Pin
Screw
s