
Specifications

Doors
TM
Users Guide Keri Systems, Inc.
8-16 Section 8: Multiple Sites 01914-008 Rev. 5.3
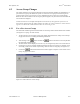
4.2.2 For Editing an Access Group
The Select Sites window appears between the Edit Access Group window and the Select Doors window
(see Figure 8-15 on page 15 of this section).
1. To select the sites to be used in an access group, follow the instructions in “Setup Access Groups”
on page 44 in section 3, but include the following information.
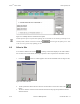
2. After selecting an access group name and clicking on the button in the Edit Access Group
window the Select Sites window appears.
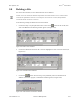
3. The Select Sites window displays an icon for every site recognized by the access control network.
4. Click on the icon for any site that should be included in the new access group. For example, click
on the Mfg - Sales icon to include only the Mfg - Sales site in the access group (see Figure 8-15 on
page 15 of this section).
5. Click on the button and the Select Doors window appears. Complete “Edit an Existing
Access Group” on page 50 in section 3.
4.3 Update Site
On the tool bar, the button changes to a button. The function is the same, uploading
an access control system with all recent changes made to the database. You may upload to all sites from
the Update Network window.
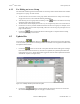
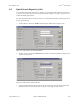
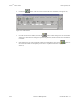
1. Click on the button on the tool bar. The Update Network window will appear. If changes
have been made and the network at any site needs to be updated, the Update Required field will
indicate this with a “Yes”, and the Skip/Update toggle box under the Smart Update Network field
will indicate “Update” (see Figure 8-16).
Figure 8-16: Multiple Site Required Network Update
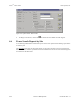
2. Click on the button to begin update of the network at each site. The Connect To
Site window will appear (see Figure 8-17 on page 17 of this section).