
Specifications

Doors
TM
Users Guide Keri Systems, Inc.
14-20 Section 14: Dual Verification 01914-014 Rev. 5.5
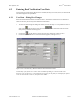
4. The following 5 fields are added for use with the Dual Verification feature. The rest of the fields
may be filled in according to the instructions given in “Entering User Data – Dialog Box Method”
on page 13 in section 4.
• Secondary ID – This number is either a card number or PIN and is automatically entered
during enrollment of the secondary ID. This field may be edited.
• Secondary Internal Number – This number is automatically assigned during enrollment of
the Secondary ID.
• Secondary Facility Code – This is the facility code associated with the Secondary ID.
• Secondary Format – This is the type of format used for Secondary ID.
• Secondary Status – This determines when a user is required to provide a Secondary ID on
readers/keypads where Dual Verification is in effect. Secondary Status is subject to the
Secondary ID Required Timezone.
Required - a Secondary ID is always required from this user in order to gain access.
No Access - this user is not allowed access to Dual Verification readers/keypads.
Exempt - this user may gain access simply by presenting their Primary ID. No Secondary
ID is required.
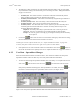
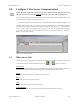
5. Click on the button. If the user data is not saved before clicking any other button or exiting
the User Data tab, the data entered is lost and must be re-entered.
NOTE: If you associate a photo with this user (see “Acquire and Edit User Photo” on page 20 in
section 9), that photo will show in the lower right corner of the User Data window.
6. Now update the access control network with the new information. Click on the button on
the tool bar (for details on the update process refer to “Update the Network” on page 35 in section 5
4.2.2 User Data – Spreadsheet Changes
When the Dual Verification feature is enabled in Doors, new columns are added to the Setup Users
Spreadsheet window to allow for data entry of necessary Dual Verification information.
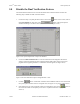
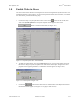
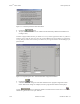
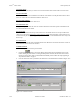
1. To enter user data through the spreadsheet method, click on the Setup ⇒ Users pull-down menu or
click on the tool bar button. These two icons are added to the tool bar and the
Setup Users spreadsheet window appears. If the spreadsheet is not visible, click on the tool
bar button to ensure the Setup Users spreadsheet window is active (see Figure 14-32).
Figure 14-32: Setup Users Spreadsheet Window With New Dual Verification Columns