
Programming instructions


11
WIRING
See the Installation Manual for more information.
POWER UP
• When applying power to the lock for the first time,
stop and follow the procedure outlined in "Quick Start,
First time Power Up" on page 12.
• When power is re-applied to a lock that was already
operational, proceed as follows:
1. Disconnect battery pack connector.
2. With battery power disconnected, press and hold
down
; for 10 seconds to insure discharge of all
capacitors.
3. Re-connect battery pack (lock will sound 3 short
beeps). If beeps are not heard, then begin again at
step 1.
4. Do not press any keys for 15 seconds.
5. After 15 seconds, the LED will flash red 6 times and 6
beeps will sound.
The lock is now ready for use. The pre-existing program
is loaded from fixed memory. Set the clock using
functions 38, 39 and 40.
ERASE ALL PROGRAMMING
(The "out of box" factory default will be loaded)
1. Disconnect battery pack connector and remove the
battery pack.
2. With battery power disconnected, press and hold
down
; for 10 seconds to ensure discharge of all
capacitors.
3. Re-install the battery pack (lock will sound 3 short
beeps). If beeps are not heard, then begin again at
step 1.
4. Within 5 seconds after hearing the 3 short beeps,
press and hold
; until the lock begins to beep, then
release.
5. A series of 5 RED LED and 5 beeps will be heard
followed by 10 seconds of silence, then 3 GREEN
LEDs and 3 fast beeps.
All settings and programming have been erased and the
lock is now ready for use. Note: All lock programming
can also be erased (without need to disconnect the
batteries) by entering Function 99.
BATTERY REPLACEMENT
When a valid code is entered and the batteries are weak,
the YELLOW LED will light and the sounder will sound for
4 seconds. PDL5300 Series locks use five (5) AA-size 1.5
volt alkaline batteries. Always replace weak batteries as
soon as possible.
CAUTION: Do not press any keys while batteries are
disconnected or you may erase the real-time clock
settings.
See Installation Instructions WI1623 for detailed illustra-
tions and mounting instructions.
1. At the Secondary Lock Side, remove the handle by
first inserting the key turning the key cylinder to a verti-
cal position. Then insert the lever release pin (or a stiff
wire such as a bent paper clip) into the underside han-
dle release hole and depress the lever catch. Pull off
lever.
2. Remove the two flat head screws from above and be-
low the lever spindle and remove the two flat head
screws on the left and right side of the top of the lock
housing.
3. Remove the secondary housing from the door by de-
pressing the spring tab.
4. Pull out the battery pack and quickly replace all 5
batteries - within 1 minute.
5. If you do not hear the 3 beeps when power is re-
applied, all programming and settings have been re-
tained, and the lock is ready for use. Go to step 5.
6. If you do hear 3 beeps when power is re-applied, do
not press any keys for 15 seconds. After the 15
second period, the LED will flash red 6 times and 6
beeps will sound. Reset the clock using functions 38,
39 and 40.
7. To reinstall the Secondary Lock Side, reverse the pro-
cedure in step 4.
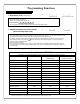
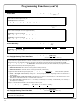
Wiring and Power Up
1. Battery Wire
Use only 1.5 volt Alkaline size-AA batteries.
2. Ribbon Cable
3. Motor Wire
4. Auxiliary Power / Remote Release
Wire colors in supplied plug are as follows:
Auxiliary Power:
Red: 6 - 9VDC
Black: Ground
Remote Release:
Two white wires; short to activate.
NOTE: Remote Input is enabled from the
factory (see page 24).
1 2 3 4