DR 70 Portable Digital DAB+ and FM Radio Receiver User Manual English Please read carefully before using this product 15 English
1 Table of Contents 1 2 3 4 Table of Contents ...............................................................16 Safety Instructions: ............................................................17 Specification: .....................................................................17 Controls and Attributes .......................................................18 4.1 Speaker:......................................................................19 4.2 Headphones: ...........................................
2 Safety Instructions: 1. 2. 3. 4. 5. 6. Do not use this radio near water. Clean with dry cloth. Do not block any ventilation openings. Do not use near heat objects. Use accessories provided by manufacturer. Do not allow this unit to be exposed to water, steam, sand or other environmental hazards. 7. Do not leave your radio where excessive heat could cause damage such as expose to direct sunlight in a parked car where the heat from the sun may damage the unit.
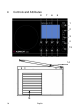
Controls and Attributes 8 7 6 5 1 2 3 4 13 9 10 11 12 14 15 18 English
16 17 18 4.1 1. 2. 3. 4. 5. 6. 7. 8. 9. 10. 11. 12. 13. 14. 15. 16. 17. 18. Power ON/OFF Up Button Down Button Menu Select DAB/FM Mode Preset LED Torch Light Direct Preset 1 Direct Preset 2 Direct Preset 3 Direct Preset 4 Direct Preset 5 Telescopic Antenna Battery Compartment Volume Control Headphone Jack DC 5V Power Adaptor socket Speaker: The DR 70 features a high-quality 4Ω 1.5W (RMS) speaker. 4.2 Headphones: The 3.5mm jack is located on the right-hand side of the radio.
4.3 Radio Antenna: 1. For DAB+ and FM reception there is a built-in telescopic antenna at the rear of the unit. 2. Extend the antenna and move it around to obtain the best reception. 3. If the reception is still unsatisfactory, pull the antenna as long as possible. 4.4 LED Torch Light: 1. A bright LED is built-in for lighting purpose. To turn ON the LED light, press once the “LIGHT” button or press again to turn it OFF. 5 5.
6 6.1 DAB Mode Search and select channels 1. Make sure the radio is in DAB+ mode. 2. Press the “MENU” button once to enter menu mode, 3. Press “UP or DN” button to select “DAB Autoscan” and confirm by pressing “SELECT” button to activate the full scan of all available DAB+ radio channels and all the scanned channels will be saved in a channel list. 4. Press the “UP” or “DN” button to select the desired channels from the list. 6.2 Direct Preset Button 1-5 1.
2. To load the preset channels, short press the “PRESET” button and select the preset channel(the name of channel will be displayed) by pressing the “UP” or “DN” button, then press “SELECT” button to confirm. 3. 20 preset channels are available for the DAB+ radio mode. 6.4 Service Information The Service Information display - Technical information on the current status of the station being broadcast. While listening to DAB+, the display will show the followings if applicable: 1. DLS information 2.
1. 2. 3. 4. 5. 7.4 Program type Channel Frequency Channel Name Signal Strength Battery Level Direct Preset Button 1-5 1. Tune to your favorite FM channel by “UP” or “DN” button, then long press “1” button to store the current FM channel as Preset 1. Repeat the same procedure for other direct presets 1-5. A message of “Preset Stored” will be displayed on the LCD screen if the preset is stored successfully. Remark: if this preset already has stored a station this action will overwrite the memory. 2.
8 8.1 Menu Sleep mode: 1. In the DAB+ or FM Mode, press once the “MENU” button to enter menu mode, press “UP or DN” button to “SLEEP” and confirm by pressing “SELECT” button to activate the sleep function. A flashing sleep timer will be shown on the top of LCD, press “UP” or “DN” to select the sleep time with each step 5 minutes (from 0 minutes to 90), then press “SELECT” to confirm and the flashing will stop. 2. The radio will automatically power off when the timer reaches zero. 3.
8.4 LCD Colour Selection: 1. Set the background colour of the LCD display. 2. Press the “MENU” button to enter LCD menu, use “UP” or “DN” to scroll to the “Color Select” item, press “SELECT” button to confirm, then “Color Select” menu will show on the display, and then use the “UP” or “DN” button to select the desired LCD background colour. 3. Press the “SELECT” button to confirm and save. Press “MENU” to exit. 8.5 Factory Reset: 1.
10 Warranty and Recycling Information We are legally obliged to include disposal and warranty information as well as EU declaration of conformity with the use instructions in different countries for every unit. Please find this information on the following pages. 2-Year Warranty From Date Of Purchase The manufacturer/retailer guarantees this product for two years from date of purchase.
WEEE And Recycling The European laws do not allow any more the disposal of old or defective electric or electronic devices with the household waste. Return your product to a municipal collection point for recycling to dispose of it. This system is financed by the industry and ensures environmentally responsible disposal and the recycling of valuable raw materials.
28 English