ALBRECHT DR 422 Anleitung / Manual Deutsch / English / Français / Italiano
Inhalt 1. Vor Erstgebrauch ��������������������������������������������������������������������������������������������������������������������������3 2. Erscheinungsbild und Tastenbeschreibung ����������������������������������������������������������������������������������4 3. Erste Schritte ��������������������������������������������������������������������������������������������������������������������������������5 4.
1. Vor Erstgebrauch Netzwerkanforderungen Vor der Verwendung des DR 422 müssen folgende Voraussetzungen erfüllt sein: ●● Breitbandanschluss in Verbindung mit einem verkabelten / Drahtloszugangspunkt, Router oder ähnlichem Netzwerkgerät. ●● Das Netzwerkgerät muss WLAN (802.11b/g/n) Drahtlosverbindung unterstützen. ●● Wenn das DR 422 per DLNA fernbedient werden soll, benötigen Sie einen PC oder Smartphone mit Verbindung zu dem gleichen Netzwerk wie das DR 422.
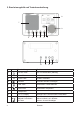
2. Erscheinungsbild und Tastenbeschreibung 8 7 9 6 5 4 3 10 1 11 12 13 Nr.
Nr. Beschreibung Funktionen 10 Aux-Eingang (Stereo) 3,5 mm Aux-Eingangsbuchse 11 Kopfhörer (Stereo) 3,5 mm Ohrhörerbuchse 12 Line-Ausgang (Stereo) 3,5 mm Line-Ausgangsbuchse 13 DC-IN 9 V / 800 mA Anschluss für Steckernetzteil 3.
• • • • Drücken Sie (STANDBY) zum Aufrufen des Stand-by-Modus. Uhrzeit, Datum und aktive Weckalarme werden im Display angezeigt. Haben Sie die Netzwerkverbindung eingestellt und Sie verwenden das DR 422 erneut innerhalb des Netzwerks, so wird die Verbindung automatisch hergestellt. Möchten Sie das Netzwerk ändern, so rufen Sie Einstellungen zur Änderung der entsprechenden Verbindung auf. Geben Sie die Schriftzeichen über ▲ und ▼ ein.
Nach dem Speichern des gewählten Senders kann er nicht erneut gespeichert werden. Navigieren Sie in den Sendervoreinstellungen zu Ihrem Sender und drücken Sie OK, um ihn zu hören. Alternativ drücken Sie ► zum Aufrufen des Untermenüs Löschen, Auf/Ab durch die Liste, Umbenennen oder Wiedergabe. 5.2. Sender/Musik Sender sind nach Weltweite Top 20, Genre und Land/Region kategorisiert. In den Unterkategorien wählen Sie den Sender, den Sie hören möchten. Für jeden Sender drücken Sie OK, um ihn direkt zu hören.
5.5. Service Sender suchen - Geben Sie ein Schlüsselwort zur Suche nach Sendern in der Liste ein. Neuen Sender hinzufügen - Hinzugefügte Sender werden unter den Favoriten gespeichert. Tipps: Das Laden der Daten vom Server kann, insbesondere bei schlechter WLAN-Verbindung, mehrere Sekunden dauern, solange erscheint Leer auf dem Display. 6. AUX-Eingang Der Aux-Eingangsmodus gibt Audio von einer externen Signalquelle wie beispielsweise einem MP3-Player wieder.
5. Bei erfolgreicher Konfiguration können Sie nun Ihre eigene(n) mediaU Senderliste(n) speichern und anzeigen. Benutzername und Passwort werden für das DR 422 nicht benötigt. 6. Haben Sie für das DR 422 verschiedene Konten gespeichert, so wählen Sie das gegenwärtig zu verwendende im Menü Einstellungen. Nach der Registrierung der MAC-Adresse bei mediaU muss das Gerät zum Einloggen neu Eingeschaltet werden. Zur Synchronisation des DR 422 nach Änderungen in der Senderliste gehen Sie über My mediaU. 8.
9. Media-Center 9.1. UPnP Wiedergabe Haben Sie die Medienfreigabe auf Ihrem PC eingerichtet, so können Sie freigegebene Medien unter UPnP sehen. Gibt mehr als ein Computer Medien frei, so werden die Alternativen aufgeführt. Wählen Sie die freigegebenen Medien zur Wiedergabe. Das Laden der Daten vom UPnPServer, insbesondere bei schlechter WLAN-Verbindung, kann mehrere Sekunden dauern, solange erscheint Leer auf dem Display.
Drücken Sie◄/►, um die Wettervorhersage anzuzeigen. Wetterinformationen können im Stand-by-Modus angezeigt werden. Auf der Wetterinformationsseite drücken Sie OK, um die Stadt im Stand-by-Modus anzuzeigen. Dann schalten Sie die Wetteranzeige ein, wie in Abschnitt 12.13 beschrieben. 10.2. Finanzdienste Zeigt die Börsennotierungen aus aller Welt an. 10.3. Systeminformationen Hier erhalten Sie die Version das DR 422 und Details zum verbundenen Netzwerk.
11. AirMusic Control App Das DR 422 kann mit einem Smartphone via WLAN gesteuert werden. Wir empfehlen dafür die App „AirMusic Control“. Neben der Steuerung des Radios, können mittels der App auch die lokalen Musikdateien des Smartphones auf dem DR 422 wiedergegeben werden. Aufgrund häufiger Updates ist die Anleitung der App nur online verfügbar. Um diese herunterzuladen, besuchen Sie bitte www.alan-electronics.de und geben die Artikelnummer 27422 in das Suchfeld ein.
12.2. My mediaU Managment Bei Aktivierung wird My mediaU im Hauptmenü angezeigt. Bestehen mehrere mediaU Konten für das DR 422, so wählen Sie das Standardkonto aus, mit dem Sie sich einloggen möchten. Im Abschnitt 7 finden Sie weitere Informationen zur mediaU Kontoeinrichtung. 12.3. Netzwerk 12.3.1. Funknetz-Einstellung Aktivieren/deaktivieren Sie das WLAN-Netzwerk. Bei Aktivierung des WLAN-Netzwerks verbindet sich das Radio automatisch mit dem Netzwerk. Wählen Sie den gewünschten Zugangspunkt.
Geben Sie den Netzwerkschlüssel zur Verbindung mit dem WLAN ein. Bei Fehleingabe drücken Sie ◄ zum Korrigieren. 12.3.2. Funknetz (WPS) Verwenden Sie einen Router mit WPS/QSS-Taste, so können Sie Ihre Netzwerkverbindung auch einfach mit der WPS-Funktion einstellen. Rufen Sie die Funktion auf und drücken Sie die WPS/ QSS-Taste auf Ihrem Router innerhalb von 120 Sekunden. Die Verbindung zwischen dem Router und dem DR 422 wird dann automatisch konfiguriert. 12.3.3.
12.4. Datum und Uhrzeit • • • • • Wählen Sie mit Datum und Zeit einstellen zwischen Manuell einstellen und Automatisch detektieren. Bei Automatisch detektieren wird die Zeit automatisch ermittelt, daher entfällt Punkt 4 (DST). Stellen Sie Datum und Uhrzeit ein. Nur bei Manuell nötig. Stellen Sie das Zeitformat als 12 Stunden oder 24 Stunden (Standard) ein. Stellen Sie das Datumformat für YY (Jahr), MM (Monat) und DD (Tag) – YY/MM/DD, DD/MM/ YY (Standard) oder MM/DD/YY ein.
Während des Alarms drücken Sie eine beliebige Taste, um den Schlummermodus aufzurufen. Der Alarm erfolgt dann erneut nach 5 Minuten. Drücken Sie , um den Alarm zu beenden. 12.6. Timer Über die Pfeiltasten ◄/► können Sie den Timer in Sekundenschritten einstellen. OK startet und unterbricht den Timer im Menü. Angehalten kann er wieder verstellt werden. Der Timer zählt rückwärts und piept, wenn er 00:00 erreicht hat. Jede Taste an dem Gerät beendet den Alarm.
12.9. Anzeige Wählen Sie aus, ob das Display in Farbe oder Schwarz/Weiß angezeigt werden soll. 12.10. Energieeinstellungen Wählen Sie den Energieverwaltungs-Timer (5/15/30 Minuten), mit dem das Radio automatisch in den Stand-by-Modus versetzt wird, wenn keine Netzwerkverbindung besteht. Mit „Ausschalten“ ignorieren Sie die Energiesparfunktion. 12.11. Schlaftimer Schalten Sie den Sleeptimer aus oder stellen Sie ihn auf 15/30/60/90/120/150/180 Minuten ein.
12.13. Wetter Das DR 422 kann im Stand-by-Modus aktuelle Wetterinformationen anzeigen (siehe Abschnitt 10). Schalten Sie das Stand-by-Display ein und stellen Sie die Temperatureinheit (°C oder °F) ein, um im Stand-by-Modus das Wetter angezeigt zu bekommen. Ist die Funktion eingeschaltet, so schaltet das Display im Stand-by-Modus zwischen Uhrzeit und Wetter um. 12.14. Lokale-Station-Einstellung Es gibt eine Verknüpfung Lokale Station unter Internet Radio (siehe Abschnitt 55.
12.15. Wiedergabe-Einstellung Wählen Sie den Wiedergabemodus für das Media-Center: - Aus: spielt den ausgewählten Titel einmal. - Wiederholen alle: wiederholt alle Titel des Ordners endlos. - Widerholen eins: wiederholt nur den gewählten Titel endlos. - Zufällig: spielt die Titel in zufälliger Reinfolge ab. 12.16. Gerät (DLNA-Einstellung) Der Standard-Gerätename für DLNA ist ALBRECHT DR 422. Hier können Sie den Namen für die DLNA-Einstellung ändern. 12.17.
12.18. Fortsetzen der Wiedergabe Das System ist standardmäßig auf die Fortsetzung der Wiedergabe des Internetradio eingestellt, wenn der Netzstecker entfernt wird. Bei Deaktivierung der Funktion startet das System im Hauptmenü, wenn es wieder eingeschaltet wird. 12.19. Software-Update Aktualisierung der Software. Befindet sich eine aktualisierte Softwareversion auf dem Server, so erscheint eine Nachricht auf dem Display und kann installiert werden. Ein Update kann mehrere Minuten in Anspruch nehmen.
13. Übersicht Standby 4 Hauptmenü 5 Internet Radio 5.1 5.2 5.3 5.4 5.5 Meine Favoriten Radiosender/Musik Lokale Station Zuletzt gehörte Sender Service 9 Media‐Center 9.1 9.2 9.3 UPnP Meine Wiedergabeliste Meine Wiedergabeliste leer 10 Information‐Center 10.1 10.2 10.3 Wetter‐Information Finanz‐Information Systeminformation 12.1 12.2 12.3 12.4 12.5 12.6 12.7 12.8 12.9 12.10 12.11 12.12 12.13 12.14 12.15 12.16 12.17 12.18 12.19 12.
14. Fehlerbehebung Fehler Abhilfe Das Gerät schaltet sich nicht ein. 1. 2. Kein Ton 1. 2. Netzwerkverbindung kann nicht aufgebaut werden. 1. 2. 3. 4. 5. WLAN-Verbindung kann nicht aufgebaut werden. 1. Kein Sender gefunden. 1. 2. 3. 2. 3. 4. Alarm funktioniert nicht. 1. 2. 3. 22 Überprüfen Sie, ob das Netzteil korrekt angeschlossen ist. Das Gerät zeigt Fehlfunktionen, wenn es in Bereichen mit starken Funkstörungen verwendet wird.
Fehler Abhilfe DLNA-Streaming ist nicht möglich. 1. 2. Das System friert ein. 1. 2. Überprüfen Sie die Netzwerkverbindung. Das DR 422 und Ihr Gerät müssen sich auf dem gleichen Netzwerk befinden; vergewissern Sie sich, dass das Netzwerk in Ordnung ist. Vergewissern Sie sich, dass die Einstellungen auf Ihrem Gerät korrekt sind. Das Radio ist überlastet, schalten Sie es aus und wieder ein. Der normale Betrieb des Geräts kann durch eine starke elektromagnetische Störung beeinflusst sein.
16. Gewährleistungs- und Recyclinginformationen Wir sind verpflichtet, jedem Gerät Informationen über die Entsorgung, über die gesetzlichen Gewährleistungsbestimmungen und die EG Konformitätserklärungen mit Hinweisen über das Benutzen der Geräte in den verschiedenen Ländern beizufügen. Sie finden daher diese Informationen im folgenden Text.
ALBRECHT DR 422 Manual English
Table of Content 1. Before you start ������������������������������������������������������������������������������������������������������������������������������������������������27 1.1. Network Requirement ��������������������������������������������������������������������������������������������������������������������������������27 1.2. Safety Precautions �������������������������������������������������������������������������������������������������������������������������������������27 2.
1. Before you start 1.1. Network Requirement Before using the DR 422, the following requirements are needed: • A broadband connection in combination with a wired/wireless access point, router or similar network device. • The network device needs to support WiFi (802.11b/g/n) wireless connection. • A PC or smart phone which is connected to the same network as the DR 422. This is only needed in case you want to stream music from your PC or you want to remote control the DR 422 with DLNA. 1.2.
2. Appearance and Key Descriptions 8 7 9 6 5 4 3 2 10 1 11 12 13 No.
No. Description Functions 10 Aux in (Stereo) 3,5 mm Aux in socket 11 Earphone 3,5 mm Earphone socket 12 Line out (Stereo) 3,5 mm Line-out socket 13 DC-IN 9V / 800mA socket for the main power adapter 3. Getting Started The packaging box contains the following items: - DR 422 - Power adaptor - User Manual Get the network ready • For wireless LAN (WIFI) network connection: • Check if WIFI LINK/ACT light of the wired/wireless access point or router is illuminated.
• • • See 12.3 for detailed network configurations. You may setup the network connection immediately, or set it later. (STANDBY) to enter standby mode. The time, date and any active alarm times will Press be displayed on the screen. If you have setup a network connection, and use DR 422 again within the network, it will automatically establish the connection. In case you desire to change the network, enter configuration to setup the corresponding connection.
If the selected station has been saved, you cannot save it again. Under the preset station list, move to your station, press OK to listen. You may also press ► to enter its submenu to Delete, Shift Up/Down along the list, Rename or Play. 5.2. Radio Station / Music Stations are categorized into Global Top 20, Genre and Country/Location. Enter to continue the subcategories and choose a station. For each station, press OK to play directly.
5.5. Service Search radio station - Enter your keyword to search for a radio station from the list. Add new radio station - The added stations will be stored in My Favorite. Note that the maximum character of the station name is 250. Tips: It may take a few seconds for the radio to load the data from the server, especially when the WiFi connection is bad. As long as the data isn‘t loaded the display shows Empty. 6. AUX IN Aux in mode plays audio from an external source such as an MP3 player.
8. Music-Streaming ALBRECHT DR 422 is the default device name for DLNA, and you may rename it as you like. (See section 12.16) The information below is the introduction of how to setup up media streaming from PC or other media server. Study the own instruction of the software or apps you use to enjoy music streaming if necessary. Make sure the music files are in the format of MP3, WMA, WAV or AAC for music streaming to DR 422. 8.1.
9. Media-Center 9.1. UPnP If you have set up shared media, you should see the shared media from UPnP. If you have more than one computer sharing media, the alternatives are listed. Select the shared media you want to play. On the main menu, select Media Center and choose UPnP. It may take a few seconds for the radio to complete the scan for available UPnP servers, especially when the WiFi connection is bad. If no UPnP servers are found, it will show Empty.
10.1. Weather Information There are weather information and forecasts for 5000 cities. Select the country and then the city for the weather details. Press ◄/► to see the weather forecasts. It is able to display the weather information on the standby mode. On the weather information page, press OK to set the city to displaying on the standby mode. Then turn on the weather display as mentioned in 12.13. 10.2. Financial Service View the stock index from around the world. 10.3.
11. AirMusic Control App The DR 422 can be controlled with your smartphone via WiFi. It is recommended to use the AirMusic Control App. Additionally to controlling the radio, the app is able to play the smartphone’s local music files on the DR 422. Due to frequent updates of the app, the manual is only available online. Please visit www.alan-electronics.de and enter the article number 27422 into the search. You will find the DR 422 product page.
12.3. Network 12.3.1. Wireless Network Configuration Enable / disable WiFi network. When you enable the WiFi network, the system will automatically connect to the network. Select your required AP. Enter WEP or WPA code to connect the WiFi. You can press ◄ to correct any character.
12.3.2. Wireless Network (WPS) If you are using a router with WPS/QSS button, you may set up the network connection simple via WPS function. Enter it and go to press the WPS/QSS button on your router within 120 seconds. The connection between the router and the DR 422 will then be configured automatically. 12.3.3. Manual Configuration You can choose DHPC (which IP assigned automatically) or manually input IP address for wireless network connection.
12.4. Date & Time • • • • Press Set Date and Time and choose between Manual Setup and Auto Detect. When Auto Detect is chosen, the time is determined automatically Set Time Format display as 12 Hour or 24 Hour (default). Only for manual setup required. Set Date Format in the positions of YY (year), MM (month) and DD (day) – YY/MM/DD, (default) or MM/DD/YY. Turn on/off (default) the Daylight Saving Time (DST).
12.6. Timer Press ◄/► to set the timer, press OK to start. The timer will count down and beep sound when it reaches 00:00. To cancel the timer, enter the timer screen and press OK again. 12.7. Language Select the OSD language: English / Deutsch / Español / Français / Português / Nederlands / Italiano / Pусский / Svenska / Norsk / Dansk / Magyar / Český / Slovenský / Polski / Türkçe / Suomi 12.8. Dimmer Configure the brightness of backlight on the display.
12.9. Display Choose the style of display: Color or Monochrome 12.10. Power Management Choose the power management timer (5/15/30mins) to set the duration of the radio to switch to the standby mode automatically when no network connection is available. Choose “Turn off” to ignore the power management function. 12.11. Sleeptimer Turn off or set the sleep time to 15/30/60/90/120/150/180 minutes. Once the time is set, there will be a bed icon with remaining minutes at the top right corner.
12.13. Weather DR 422 is able to display current weather information (refer to chapter 10.10) under standby mode. Turn on Standby Display and set Temperature Unit (°C or °F) to get the weather displayed at the standby mode. When it is turned on, the display will switch between time and weather while being in standby mode. 12.14. Local Radio Setup There is a shortcut Local Radio under Internet Radio (see section 5.3) so that you can easily go to the station list of your location.
12.16. Device (DLNA-Setup) The default device name for DLNA is „ALBRECHT DR 422“. You may rename it for DLNA setup on the PC or mobile. 12.17. Equalizer Default equalizer is Rock, you may change to Normal, Jazz, Flat, Soundtracks, Classical, Pop, or News. 12.18. Resume When Power On The system is set default to resume internet radio playback if you were listening to internet radio or media center before switching off the unit.
13. Main Menu Main Menu Standby 5 Internet Radio 5.1 5.2 5.3 5.4 5.5 My Favorite Radio Stadion/Music Lokale Radio History Service 9 Media Center 9.1 9.2 9.3 UPnP My Playlist Clear My Playlist 10 Information Center 10.1 10.2 10.3 Weather Information Financial Information System Information 12.1 12.2 12.3 12.4 12.5 12.6 12.7 12.8 12.9 12.10 12.11 12.12 12.13 12.14 12.15 12.16 12.17 12.18 12.19 12.
14. Troubleshooting Error Remedy The device does not switch on. 1. 2. No sound 1. Turn on the sound as it may be muted 2. Increase the volume. No network connection can be established. 1. 2. 3. 4. 5. WIFI connection cannot be established. 1. No station is found. 1. 2. 3. 2. 3. 4. Alarm does not work. 1. 2. 3. Unable to do DLNA streaming. 1. 2. Check if the power adaptor is connected properly. The device may malfunction when used in areas with strong radio interference.
Error Remedy System freezes suddenly. 1. 2. The radio is overloaded, reboot the unit. The normal function of the product may be disturbed by strong Electro-Magnetic Interference. If so, simply reset the product to resume normal operation by following the instruction manual. In case the function could not resume, please use the product in other location. 15. Specifications Model number DR 422 Description Internet Radio Display 320 x 240 TFT color display Network supported IEEE802.
16. Warranty and Recycling Information We are legally obliged to include disposal and warranty information as well as EU declaration of conformity with the use instructions in different countries for every unit. Please find this information on the following pages. 2-Year Warranty from Date of Purchase The manufacturer/retailer guarantees this product for two years from date of purchase.
English
ALBRECHT DR 422 Manuelle Français
17. Sommaire 1. Avant de commencer ��������������������������������������������������������������������������������������������������������������������������������������� 1.1. Configuration réseau requise ����������������������������������������������������������������������������������������������������������������������� 1.2. Précautions de sécurité �������������������������������������������������������������������������������������������������������������������������������� 2.
1. Avant de commencer 1.1. Configuration réseau requise • • • • Les conditions suivantes doivent être respectéez avant d‘utiliser la DR 422 : Une connexion haut débit, un point d‘accès filaire/sans fil, un routeur ou un dispositif réseau similaire. Le dispositif réseau doit assurer une connexion sans fil WiFi (802.11b/g/n). Un PC ou un smartphone connecté au même réseau que la DR 422.
2. Présentation de la radio et de ses éléments de commande 8 7 9 6 5 4 3 10 2 1 11 12 13 No.
No. Description Functions 10 Entrée auxiliaire (Stéréo) Prise d‘entrée auxiliaire 3,5 mm 11 Casque Sortie casque 3,5 mm 12 Sortie ligne (Stéréo) Prise de sortie ligne 3,5 mm 13 Entrée 9VCC/800mA prise pour l‘adaptateur d‘alimentation principal 3.
Pour plus d’informations sur la configuration réseau, reportez-vous au chapitre 12.3.1. Vous pouvez effectuer la configuration réseau immédiatement ou la laisser pour plus tard. • (STANDBY) pour passer en mode Veille. L‘heure, la date et les heures des Appuyez sur alarmes actives s‘affichent à l‘écran. • Une fois la configuration réseau de la DR 422 effectuée, la radio se connecte automatiquement au réseau lors des utilisations futures.
stations. Lorsque la station est en surbrillance, vous pouvez appuyer sur ► accéder à ce menu où vous pouvez ajouter la station à vos favoris. Si la station sélectionnée a été enregistrée, vous ne pouvez pas l‘enregistrer de nouveau. Dans la liste des stations préréglées, allez sur votre station et appuyez sur OK pour l‘écouter. Vous pouvez également appuyer sur ► pour accéder au sous-menu et effectuer l‘une des opérations suivantes Delete, Shift Up/Down, Rename ou Play. 5.2.
5.5. Service Search radio station - Entrez un mot clé pour rechercher la station radio dans la liste. Add new radio station - Les stations ajoutées seront mémorisées dans mes favoris. Il convient de noter que le nom d‘une station comprend au plus 250 caractères Conseils: La radio peut prendre quelques secondes pour charger les données à partir du serveur, surtout lorsque la connexion WIFI est mauvaise. Tant que les données ne sont pas chargées l’écran affiche Empty 6.
7. sez actuellement sous le menu Configuration. Chaque fois vous effectuez des modifications sur la playlist à partir du site web, allez à Configuration > Manage my MediaU pour répercuter les modifications sur la DR 422. 8. À propos de la diffusion de musique en continu ALBRECHT DR 422 est le nom par défaut du périphérique DLNA, mais vous pouvez le renommer. (See section 12.16) Les instructions ci-dessous décrivent comment effectuer la diffusion multimédia à partir d‘un PC ou autre serveur multimédia.
9. Centre multimédia 9.1. UPnP Si vous configuré supports partagés, vous devez pouvoir voir le support partagé à partir de UPnP. Si vous avez plus qu‘un ordinateur en tant que support partagé, d’autres possibilités sont listées. Sélectionnez le support partagé que vous souhaitez lire. Dans le menu principal, sélectionnez Centre multimédia et choisissez UPnP. La radio peut prendre quelques secondes pour rechercher les serveurs UPnP disponibles. Si aucun serveur UPnP n’est trouvé, Liste vide sera affichée.
10. Centre d‘information 10.1. Informations météo Des informations et des prévisions météo sont données pour 5000 villes. Sélectionnez le pays puis la ville pour en obtenir des détails sur la météo. Appuyez sur ◄/► pour voir les prévisions météo. Les informations météo peuvent être affichées en mode veille. Sur la page des informations météo, appuyez sur OK pour choisir la ville à afficher en mode veille. Puis affichez les informations météo comme indiqué dans 12.13 10.2.
11. AirMusic Control App Vous pouvez commander la radio DR 422 depuis votre téléphone multifonction, via WiFi. Cette prise de commande s‘effectue très facilement avec l‘application AirMusic Control. Elle a été développée pour contrôler votre radio, mais également pour lire les fichiers musicaux de votre téléphone multifonction et les diffuser sur la DR 422. Cette application est fréquemment mise à jour, aussi son guide d‘utilisation n‘est-il disponible qu‘en ligne. Rendez-vous sur la page d‘accueil www.
12.3.1. Configuration du réseau sans fil Activer/désactiver le réseau WiFi. Lorsque vous activez réseau Wi-Fi, le système se connecte automatiquement au réseau. Sélectionnez un point d‘accès. Entrez le code WEP ou WPA pour se connecter au WiFi. En cas d‘erreur d‘entrée de caractères, utilisez les touches ► et ◄ pour corriger. 12.3.2. Réseau sans fil (WPS) Si vous utilisez un routeur avec un bouton WPS/QSS, vous pouvez configurer une connexion réseau simple via la fonction WPS.
12.3.3. Configuration manuelle Vous pouvez choisir DHPC (où l‘adresse IP est attribuée automatiquement) ou entrer manuellement l‘adresse IP pour la connexion sans fil au réseau. Lorsque vous sélectionnez la configuration manuelle pour la connexion filaire, les éléments suivants doivent être entrés : 1. SSID (le nom du point d‘accès) ; 2. Adresse IP ; 3. Masque de sous-réseau ; 4. Default Gateway ; 5. Serveur DNS préféré ; 6. Serveur DNS secondaire.
Avec un réseau sans fil connecté, GMT (+00:00) est l‘heure de référence de réglage de l‘heure. Vous pouvez ajouter ou déduire un certain nombre d‘heures en fonction de votre fuseau horaire 12.5. Réveil Il y a trois alarmes indépendantes : 2 alarmes d‘heure absolue (Alarm 1 et Alarm 2) et une alarme pour l‘heure relative (NAP Alarm). Sélectionnez Home, Configuration, Alarm pour accéder à ce menu.
12.6. Minuterie (Timer) Utilisez ◄/► pour régler le minuteur, appuyez sur OK pour démarrer. Le compte à rebours démarre et un bip sonore retentira quand le palier 00:00 sera atteint. Pour désactiver la minuterie, rendezvous sur l’écran de la minuterie et appuyez de nouveau sur OK. 12.7. Langue Pour sélectionner la langue des menus (OSD) : English / Deutsch / Español / Français / Português / Nederlands / Italiano / Pусский / Svenska / Norsk / Dansk / Magyar / Český / Slovenský / Polski / Türkçe / Suomi 12.
12.10. Gestion de l‘énergie Vous pouvez choisir la durée (5/15/30 minutes) au bout de laquelle la radio bascule automatiquement en mode veille lorsqu‘aucune connexion réseau n‘est disponible. Choisissez „Turn off“ pour ignorer la fonction de gestion de l‘énergie. 12.11. Arrêt automatique Vous pouvez désactiver ou choisir le temps de veille automatique parmi 15/30/60/90/120/150/180 minutes. Une fois le temps est chois, un icône de lit avec les minutes restantes apparaît dans le coin supérieur droit.
12.14. Réglage de la radio locale Sous Internet Radio (voir section 5.3) le raccourci Local Radio permet d‘accéder à la liste des stations de votre emplacement. Vous pouvez définir manuellement votre emplacement Manual Setup, ou laisser le système le découvrir automatiquement Auto Detect. Le système découvre l‘emplacement selon l‘adresse IP du votre réseau connecté. Appuyez sur Local Station pour accéder directement à la liste des stations radio locales. 12.15.
12.17. Égaliseur L‘égalisation par défaut est Rock, vous pouvez choisir parmi Normal, Jazz, Flat, Film, Classical, Pop ou News. 12.18. Reprise à la mise sous-tension Par défaut le système est configuré pour reprendre l‘écoute de la radio Internet si vous écoutiez la radio Internet ou centre multimédia avant d‘éteindre l‘appareil. Si cette option est désactivée, le système reste dans le menu principal l‘appareil est allumé. 12.19.
13. Introduction Main Menu Standby 5 Internet Radio 5.1 5.2 5.3 5.4 5.5 My Favorite Radio Stadion/Music Lokale Radio History Service 9 Media Center 9.1 9.2 9.3 UPnP My Playlist Clear My Playlist 10 Information Center 10.1 10.2 10.3 Weather Information Financial Information System Information 12.1 12.2 12.3 12.4 12.5 12.6 12.7 12.8 12.9 12.10 12.11 12.12 12.13 12.14 12.15 12.16 12.17 12.18 12.19 12.
14. Guide de dépannage Erreur Suggestion L‘appareil ne s‘allume pas 1. 2. Vérifiez si l‘adaptateur secteur est correctement branché. L‘appareil peut ne pas fonctionner correctement s‘il est dans une zone à fortes interférences radio. L‘appareil reprend un fonctionnement normal lorsqu‘il n‘y a plus d‘interférences Aucun son. 1. 2. Activez la sortie sonore si elle a été désactivée Augmentez le volume sonore Impossible d‘établir une connexion réseau. 1. 2. 3. Vérifiez la fonction WLAN.
Erreur Suggestion Le système se bloque brusquement. 1. 2. La radio est surchargée, redémarrez l‘appareil. Le fonctionnement normal de l‘appareil peut être perturbé par de fortes interférences électromagnétiques. Si c‘est le cas, pour que l‘appareil reprenne son fonctionnement normal il suffit de le réinitialiser en suivant son guide d‘utilisation. Placez l‘appareil dans un autre endroit s‘il ne fonctionne toujours pas normalement. 15.
égratignures de l‘écran, défectuosité du boîtier, rupture de l‘antenne et les défaillances dues à des raisons extérieures telles que corrosion, surtension à cause d‘une source d‘alimentation externe inappropriée ou l‘utilisation d‘accessoires inadéquats. La garantie ne couvre pas les défaillances dues à un usage non prévu.Contactez votre revendeur local pour réclamation sous garantie. Le revendeur réparera/remplacera ou envoie le produit à un centre de service agréé.
ALBRECHT DR 422 Manuale dell‘utente Italiano
Indice 1. Informazioni prima dell‘utilizzo ��������������������������������������������������������������������������������������������������74 1.1. Requisiti di rete ��������������������������������������������������������������������������������������������������������������������74 1.2. Precauzioni di sicurezza ������������������������������������������������������������������������������������������������������74 2.
1. Informazioni prima dell‘utilizzo 1.1. Requisiti di rete I requisiti seguenti sono necessari per poter usare il dispositivo DR 422: ●● Una connessione a larga banda in combinazione con punto di accesso, cablato o wireless, router o altri simili dispositivi di rete. ●● Il dispositivo di rete deve supportare la tipologia di connessione wireless WiFi (802.11b/g/n). ●● Un PC o smart phone, connesso alla stessa rete del dispositivo DR 422.
2. Aspetto e descrizione dei tasti 8 7 9 6 5 4 3 10 2 1 11 12 13 No.
No. Descrizione Funzioni 10 Aux in (Stereo) Presa Aux in 3,5 mm 11 Auricolare Presa cuffia 3,5 mm 12 Linea uscita (Stereo) Presa Linea uscita 3,5 mm 13 CC-IN 9V / 800mA presa per alimentatore 3.
• Premere il tasto (STANDBY) per far entrare il dispositivo nella modalità omonima. Quindi lo schermo visualizza, ora, data ed eventuali allarmi attivi. • Se una connessione di rete è già stata impostata in precedenza e si intende usare di nuovo il DR 422 in rete, il sistema ristabilirà automaticamente tale connessione. In caso si voglia modificare la rete in uso, inserire i dati di configuration per impostare la relativa connessione. Immettere il carattere ruotando la manopola ▲ e ▼.
Se la stazione è già stata salvata, non la si può salvare ancora. Dall‘elenco delle stazioni preferite, selezionare la stazione scelta e premere OK per ascoltare. Si può anche premere ► per entrare nel sottomenù stazione e Delete, Shift Up/Down in lista, Rename o Play 5.2. Stazioni Radio/Musica Le stazioni radio sono divise nelle seguenti categorie: Global Top 20, Genre e Country/Location. Per continuare, inserire le sotto-categorie e scegliere la stazione da ascoltare.
5.5. Servizi Search radio station - Inserire la chiave di ricerca per trovare stazioni radio nell‘elenco. Add new radio station - Le stazioni aggiunte saranno salvate tra i preferiti. C‘è da notare che la massima lunghezza dei nomi delle stazioni radio è di 250 caratteri. Suggerimenti: la radio può richiedere alcuni secondi per caricare i dati dal server, soprattutto quando la connessione WIFI è cattiva. Fino a quando i dati non sono caricati, il display mostrerà Vuoto 6.
Ogni volta che si applicano modifiche alle proprie playlist, basta andare al menù Configuration > Manage my MediaU per sincronizzare le modifiche nel DR 422. 8. Informazioni sullo streaming di musica ALBRECHT DR 422 è il nome predefinito del dispositivo per il sistema DLNA, ed è possibile rinominarlo come si preferisce. (Vedere la sezione 12.16) Le informazioni seguenti sono un‘introduzione su come preparare e attivare una trasmissione di contenuti multimediali da un PC o altro server di file multimediali.
9. Media-Center 9.1. UPnP Se è stata attivata l‘opzione di condivisione contenuti multimediali, è possibile vedere i file condivisi sotto la voce UPnP. Se i file multimediali condivisi si trovano su più computer, compare l‘elenco delle alternative. Scegliere da qui il file condiviso che si intende riprodurre. Nel menu principale, selezionare Centro multimediale e scegliere UPnP. La radio può richiedere alcuni secondi per completare la scansione dei server UPnP disponibili.
10. Centro informazioni 10.1. Informazioni meteo Il sistema fornisce informazioni e previsioni meteo su 5000 località. Scegliere il paese e la città le cui info meteo si desiderano. Premere ◄/► per vedere le previsioni meteo. Il sistema può indicare le info meteo anche in modalità di standby. Sulla pagina delle info meteo, premere OK per definire la città di cui mostrare i dati sullo schermo di standby. Quindi attivare la schermata meteo, come descritto in 12.13 10.2.
11. AirMusic Control App DR 422 può essere controllata con il proprio smartphone via WiFi. Si raccomanda di utilizzare l‘App AirMusic Control. Oltre a controllare la radio, l‘app è in grado di riprodurre i file musicali locali dello smartphone su DR 422. A causa degli aggiornamenti frequenti dell‘app, il manuale è disponibile solo online. Visitare www.alan-electronics.de e inserire il numero di articolo 27422 nella ricerca. Si troverà la pagina del prodotto DR 422.
12.2. Gestione di My mediaU Se attivo, le opzioni di My mediaU saranno mostrate nel menù principale. Se ci sono più accessi mediaU definiti nel DR 422, scegliere da qui il profilo di accesso predefinito. Fare riferimento a 7 più avanti per altre informazioni sulla definizione di un profilo mediaU. 12.3. Rete Configurazione di rete wireless Attiva/Disattiva la rete WiFi. Quando la rete WiFi è attivata, il sistema si connette automaticamente alla rete. Scegliere l‘AP richiesto.
Inserire la chiave WEP o WPA per connettersi al sistema WiFi. Se premuto accidentalmente ► per spostare una battuta ridondante, premere ◄ per correggere. 12.3.1. Rete wireless (WPS) Se si dispone di un router dotato di tasto WPS/QSS, è possibile impostare la connessione di rete semplicemente, grazie alla funzione WPS. Inserirlo e premere il tasto WPS/QSS sul router entro 120 secondi. La connessione tra il router e il DR 422 sarà quindi configurata automaticamente.
12.4. Data e ora • • • • Impostare data e ora Scegliere il formato dell‘ora visualizzata tra 12 Hour o 24 Hour (predefinito). Scegliere il formato data indicando la posizione di YY (anno), MM (mese) e DD (giorno) – YY/ MM/DD, DD/MM/YY (predefinito) o MM/DD/YY. Attivare/Disattivare (valore predefinito) l‘opzione Daylight Saving Time (DST). In una connessione di rete wireless, il fuso orario GMT (+00:00) è l‘orario di riferimento per la regolazione dell‘ora.
schermo. L‘icona dell‘orologio con l‘orario di sveglia apparirà chiaramente anche sullo schermo in modalità standby. Quando la sveglia suona, premere un tasto qualunque per attivare la modalità di ripetizione sveglia. per interrompere la sveglia. La sveglia suonerà di nuovo in 5 minuti. Premere il tasto 12.6. Timer Premere ◄/► per impostare il timer, premere OK per avviare. Il timer effettuerà il conto alla rovescia ed emetterà un bip quando raggiunge 00:00.
12.9. Schermo Scegliere lo stile del display – Colori o Monocromo. 12.10. Risparmio energia Impostare il timer di risparmio energia (5/15/30min) che regola la durata di funzionamento della radio, prima del passaggio automatico alla modalità standby, quando la connessione di rete non è disponibile. Scegliere la voce „Turn off“ per ignorare la funzione di risparmio energia. 12.11. Timer auto-spegnimento Disattivare o impostare a 15/30/60/90/120/150/180 minuti il timer di auto-spegnimento.
12.13. Meteo DR 422 è in grado di mostrare le attuali condizioni meteo (fare riferimento a 10) in modalità standby. Attivare la schermata di standby e scegliere l‘unità di misura della temperatura (°C o °F) da usare per mostrare le condizioni meteo in modalità standby. Quando l‘opzione è attiva, lo schermo mostrerà alternativamente l‘ora e le info meteo quando l‘unità è in standby. 12.14. Impostazione radio locali C‘è un‘opzione di scelta rapida Local Radio nel menù Internet Radio (vedi sezione 5.
casuale tracce), Ripetizione di una o tutte le tracce, o Riproduzione casuale. 12.16. Dispositivo (DLNA-Setup) Il nome predefinito del dispositivo per il sistema DLNA è Internet Radio DR 422. Si può rinominare l‘unità dal menù di impostazioni DLNA sul proprio PC o dispositivo mobile.Equalizzatore L‘impostazione predefinita per l‘equalizzatore è Rock, ma si può scegliere un‘altra impostazione tra Normal, Jazz, Flat, Film, Classical, Pop o News. 12.17.
inizierà automaticamente come durante il primo utilizzo. Si noti che tutte le stazioni preimpostate, impostazioni e configurazione saranno perse dopo aver effettuato il „Factory Reset“. 13. Menù principale Main Menu Standby 5 Internet Radio 5.1 5.2 5.3 5.4 5.5 My Favorite Radio Stadion/Music Lokale Radio History Service 9 Media Center 9.1 9.2 9.3 UPnP My Playlist Clear My Playlist 10 Information Center 10.1 10.2 10.3 Weather Information Financial Information System Information 12.1 12.2 12.
14. Risoluzione dei problemi Errore Rimedio L‘unità non si accende. 1. 2. Nessuna emissione audio. 1. 2. Nessuna connessione di rete disponibile. 1. 2. 3. 4. 5. La connessione di rete WLAN non può essere stabilita. 1. Nessuna stazione trovata. 1. 2. 2. 3. 3. 4. La sveglia non funziona. 1. 2. 3. 92 Controllare che l‘adattatore di alimentazione sia collegato. Il dispositivo può avere malfunzionamenti se usato in aree con grandi interferenze radio.
Errore Rimedio Impossibile fare streaming tramite DLNA. 1. 2. Il sistema si blocca improvvisamente. 1. 2. Controllare la connessione di rete. Il DR 422 e il dispositivo di streaming devono appartenere alla stessa rete; controllare la buona qualità della connessione di rete. Verificare le impostazioni di rete del proprio dispositivo. La radio è sovraccarica, riavviare il sistema. Il corretto funzionamento del prodotto potrebbe essere disturbato da forte interferenza elettro-magnetica.
16. Informazioni smaltimento e garanzia La durata della garanzia decorre dalla data di acquisto da parte del primo utilizzatore finale o dalla data della ricevuta rilasciata dal rivenditore.
Italiano 95
Italiano