AE 82 H / AE 82 H BT Scanning Receiver
CONTENTS 1. 2. 3. 4. 5. 6. ENGLISH CAUTIONS................................................................................. 4 ABOUT AE 8 H/BT MODELS ............................................. 4 SUPPLIED EQUIPMENT ................................................................. 5 INSTALLING THE BATTERIES ....................................................... 5 INSTALLING THE ANTENNA ........................................................ 5 CONTROLS ..................................................
AE 8 H/BT INSTRUCTION MANUAL ENGLISH 10 10 10 11 12 12 12 13 14 14 15 15 15 15 16 16 17 17 18 18 19 19 19 10. SELECTING FREQUENCIES ............................................................. Mode Selection ..................................................................... Frequency Step Selection........................................................ 11. FREQUENCY BANDS...................................................................... 12. FREQUENCY SEARCH..................................
CAUTIONS ENGLISH Please read these instructions carefully before operating your receiver. Your scanner is a complex and powerful unit with many functions. Please retain this manual for future reference. Any illegal use offending the national law is not allowed. Never connect the receiver to the power source other than the specified battery. Otherwise the damage to your receiver may occur. Never use the receiver in or near the mining area, near explosives or where signs indicate ‘Blasting Area’.
INSTALLING THE BATTERIES Battery installation is made more convenient when the belt clip is removed. To do this, release the spring clip securing the belt clip to radio and slide the belt clip downward and away from the radio body. Next, press down with the thumb at the arrow, slide the battery cover down and lift off the battery cover. Insert four AAA batteries (alternate positive ends (+) toward the bottom of the transceiver (starting right to left).
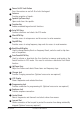
CONTROLS ENGLISH 16 1 2 15 14 13 12 3 4 5 6 7 ACC 10 9 CHG 11 8 1 Power On/Off Lock Button 9 Scan / Search&DW Keys 2 Antenna 10 Up / Down Keys 3 Squelch Up/Down Keys 11 Charger Jack 4 Function Key 12 LCD Display 5 Enter/VFO Keys 13 Earphone Jack 6 Menu/MW Keys 14 Progamming Jack 7 Step/MR Keys 15 Control Knob 8 Bank/Band&Skip Keys 16 Lanyard Slot INSTRUCTION MANUAL AE 8 H/BT
1 Power On/Off Lock Button Turns the receiver on and off. Also locks the keypad. 2 Antenna ENGLISH Provides reception of signals. 3 Squelch Up/Down Keys Opens and closes the squelch. 4 Function Key Enables extended keypad control functions. 5 Enter/VFO Keys Confirms selections and selects the VFO mode. 6 Menu/MW Key Provides access to setup menus and also access to write memories. 7 Step/MR Key Provides access to setup frequency steps and also access to read memories.
EXTENDED KEYPAD CONTROLS ENGLISH KEY Extended Function DESCRIPTION Keys FUNCTION + Manual Write Allows storage of frequencies into the Memory storage. + Memory Read Allows reading of the frequencies from the stored memories. + Skip Used to Skip channels when Scanning or Skip frequencies when Searching. + Dual Watch Activates or Deactivates the Dual Watch function.
Key Lock Briefly press the RED Button on the top of the unit to turn the Key Lock ON. Briefly press the RED Button again to turn the Key Lock OFF again. Volume Press the p key to increase the volume. Press the q key to decrease the volume. The volume level will be displayed from 00 to 3 . Squelch Func Key Menu Key Press the p key on the side of the radio to increase the Squelch setting and theq key on to decrease the Squelch setting. The Squelch level will be displayed from 00 to 09.
Control Knob ENGLISH The Control knob is used to change the current display option. In VFO mode, rotate the Control knob to change the displayed frequency at the selected frequency steps. Rotate clockwise to increase the frequency and counter clockwise to decrease the frequency. In Menu mode, rotate the Control knob to change the selected setting. In Channel memory mode, rotate the Control knob to step up or down through the memories.
ENGLISH n Frequency Step Selection By default, the receiver automatically selects the frequency Steps most commonly used for each band (see the Frequency Band chart for the default Steps for each band). To select a different step : 1) In VFO mode press STEP. 2) The following frequency steps are available for your selection. 5 kHz 6.25 kHz (6.2 displayed) 8.33 kHz (8.3 displayed) 10 kHz 12.
FREQUENCY SEARCH ENGLISH n Selected Band Search Use the Search function to locate active frequencies in one or more bands 1) Press the E/VFO key to select VFO Mode. (Note: the receiver automatically selects the VFO mode when it is turned on). 2) Press the BAND key to select the required Band. There are 4 factory preset Bands to choose from (see Frequency Band Table). 3) Set the Squelch level using the Squelch porq keys so that the noise just disappears.
n Full Band Search The Full Search function searches the entire scanner frequency range for signals. ENGLISH 1) Press the E/VFO key to select VFO Mode. (Note: the receiver automatically selects the VFO mode when it is turned on). 2) Set the Squelch level using the Squelch porq keys so that the noise just disappears. 2 3) Press and hold the SCAN SRCH key for 2 seconds. The ‘SRCH’ icon will be displayed and the receiver will Search the entire frequency range of the receiver.
4) Enter the second frequency using the Control knob. ENGLISH 5) The Dual watch begins automatically. If a signal is received, the receiver will remain on the active frequency for the duration of the ‘Busy Timer’ setting in the Menu setup. If the ‘Busy Timer’ is set to Busy the receiver will stay on the active frequency. 6) To stay on an active frequency indefinitely or to stop the Dual Watch function press Func DW again. The receiver will exit the Dual Watch function.
RECALLING FREQUENCIES FROM THE MEMORIES ENGLISH 1) Press the E/VFO key to select VFO Mode. 2) Press Func MR. The receiver will enter the Memory Read mode. 3) To step through the memory banks press the BANK BAND key. Memory banks are numbered 0 to 9. 4) Select the required channel using the control knob. CHANNEL SCAN n Selected Bank Scan Use the Scan function to locate active channels among the memorized channels in one bank. 1) Press Func MR to select the Memory Read mode.
ENGLISH Note: 1) If a signal is received, the receiver will remain on the active channel for the duration of the ‘Busy Timer’ setting in the Menu setup. If the ‘Busy timer’ is set to Busy the receiver will stay on the active channel for as long as the signal is present. 2) To change the bank while scanning, briefly press BANK/BAND key. 3) To change the scan direction while scanning, rotate the control knob clockwise or counter clockwise.
FUNCTION Busy Timer VALUES DESCRIPTION Determines how long the receiver will wait on a Busy, 5 Seconds busy channel while Scanning or Searching. When ‘Busy’ is selected, the receiver will stay on the busy channel as long as it remains busy. Beep Activates or deactivates the key-press beeps. Delay Determines how long the radio will wait on a 1-10 Seconds frequency after a signal has disappeared while scanning or Searching. Attenuation Reduces the receive sensitivity by -10dB.
BLUETOOTH COMPATIBLE OPERATION (ONLY FOR AE 82 H-BT MODEL) ENGLISH To activate the paring between your receiver and your headset or any other external Bluetooth equipment ; 1 1) Pressing E/VFO, turn on your receiver. On the LCD, 5 pairing ( ) is displayed. 2) Make your headset or any other Bluetooth equipment enter the pairing mode too. 3) Make sure that your receiver automatically confirms “OK”. 4) Press MENU and step down to Bluetooth compat 4 1 ible ( ) Mode.
SPECIFICATIONS n General ENGLISH - Frequency coverage: 66-174 MHz - Number of memory channels : 200 Units - Frequency resolution : 5, 6.25, 8.33 *,10, 12.5, 15, 20, 25, 30, 50, 100, 500KHz & Auto. *8.33kHz step works in 108-135.99MHz range only. - Operation temperature range : -107C to +607C - Reference frequency stability : 6 ppm 7C (-107C to +607C) - Power supply requirement : AAA x 4 Ni-MH or ALKALINE - Current drain Standby (power saved) : 50mA typical max.
DECLARATION OF CONFORMITY ENGLISH Where to find our collection of service hints and documentation. Our technical documentation is updated regularly. You can download the latest versions of user manuals, technical documents and also the dual language original Declaration of Conformity, as well as service hints or FAQ’s any time from our server under http://www.alan-albrecht.