Tectalk smart User Manual
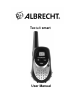
Speaker Microphone/ 1 Charger Jack PTT Button 2 Down Button 3 Mode/ Lock Button 4 Microphone 5 6 Antenna 7 LCD Display 8 Up Button Power/ 9 Scan Button 10 Speaker Thank you for purchasing this Albrecht PMR 446 radio. All our products are built to offer excellent value by combining advanced features, great design and manufacturing quality.
1. Contents 1. Contents 2. CAUTION 3. LCD Display 4. Equipment and Accessories Supplied 5. Powering the transceiver 6. Installing the batteries 7. Charge Information 8. Control Buttons (1) Power on-off button (2) Push-To-Talk (PTT) button (3) Up button (4) Down button 9.
2. CAUTION NEVER ATTEMPT TO CHARGE ALKALINE OR DRYCELL BATTERIES, AS BATTERIES MAY BURST CAUSING PERSONAL INJURY AND DAMAGE TO THE PRODUCT. WHEN RECHARGING NICKEL METAL HYDRIDE (Ni-MH) BATTERIES WITH THE SUPPLIED CHARGER AND WALL ADAPTOR, USE ONLY APPROVED RECHARGEABLE BATTERIES. USE OF CHARGERS WITH OTHER BRANDS OF BATTERIES IS NOT RECOMMENDED, AS BATTERY CHARGING TIMES WILL VARY WITH DIFFERENT BRANDS.
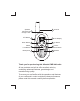
3. LCD Display 1 2 3 4 7 5 8 1. Transmit Indicator 2. Busy Indicator (Upon receiving a transmission) 3. Roger Beep Tone Indicator 4. Lock Indicator 5. CTCSS Subcode Indicator 6. Low Battery Level Indicator 7. Channel Number Display 8. Voice Activated Tansmission indicator 9. Channel Scan 6 9 4.
. Installing the batteries Battery installation is made more convenient when the belt clip is either rotated left or right to the horizontal position, or is removed. simply rotate the clip in either direction to the horizontal position. Be careful not to use excessive force. To remove the clip, press down on the spring release tab and pull the clip straight out from the radio body. CLIP SPRING RELEASE TAB COVER ARROW BELT CLIP POSITIVE TERMINALS BATTERY COVER 1.
8. Control Buttons (1) Power on-off Button Press and hold the POWER on/off button for at least 2 seconds.You will hear a confirming melody to indicate the unit is on. To turn the unit off, press and hold the button for at least 2 seconds. (2) Push-To-Talk (PTT) Button Pressing and holding this button will allow you to speak to any transceiver that is set to the same channel and privacy code setting as yours.
The BUSY icon ( ) appears to indicate an incoming call. - Press and hold the PTT button to transmit, then speak into the microphone clearly and slowly. The transmit icon ( ) appears on the display while the button is pressed. - Release PTT button to receive. - Communication can only be accomplished when the channel and CTCSS tone frequency of at least two parties are the same . - The CTCSS subcode (01-38) will be displayed on the LCD panel if the CTCSS tone frequency function is enabled (not oF).
To enable the VOX operation: - From standby mode, press the MODE button 3 times unitil the blinking VOX icon ( ) appears with on or oF. - Press the Up or Down button to select the VOX on or oF as desired. - Press the PTT button momentarily confirm selection. - When enabled, the VOX icon ( ) appears. (5) Roger Beep Tone The Roger Beep is a tone which is automatically transmittied whenever the PTT button is released.
(9) Channel Scan Operation This feature allows you to monitor all channels automatically for valid signals. While scanning, you can transmit and receive. When a signal is received, the scan is interrupted and will return to scan mode approximately 5 seconds after the interruption. Note: while the SCAN mode is active, the MODE button is inoperative. In addition, the SCAN mode will reduce the overall battery life since the battery save function is overridden.
10. Notes for Good Communication 1.The PMR446 radio channels are shared on a 'take turns' basis. This means other groups may be talking on any of the channels. A common code of courtesy is to switch to another vacant channel and not to attempt to talk over someone who is already using the channel you first selected. 2.The Tectalk Smart has been designed to maximize performance and improve transmission range in the field.
. Troubleshooting If you have problems with your Radio, reset your unit by turning it off and removing the batteries. And re-insert the batteries and turn the unit on again. Check the battery power level since in many cases low batteries cause problems such as no transmission, weak receiving signal and low sound. 13. Technical Specifications Operating frequencies 446.00625 to 446.09375 MHz Channel capacity eight channels Channel spacing 12.5KHz Power source 3 X 1.5 V ' AAA' battery or 3 x 1.2 V 14.
16. CE Declaration The CE marking on the product label demonstrates, that the product complies with the essential requirements of the European R&TTE (Radio and Telecommunication Terminal Equipment) Directive 1999/5/CE. This warning symbol indicates that this equipment operates in non-harmonised frequency bands and / or may be subject to licensing conditions in certain countries. Be sure to check the country list printed on the gift box.