40390 30” x 20” POLYMER BENCH TOP CABINET ASSEMBLY INSTRUCTIONS DIVISION OF S&H INDUSTRIES 5200 Richmond Road Cleveland, OH 44146 Phone 216-831-0550 Toll Free 800-253-9726 Fax 216-831-9573 www.shindustries.com E-mail: www.service@shindustries.
40390 Assembly Instructions Page 2 WARNING! Do not use an ALC Cabinet Blaster until you have read this manual and you understand its contents and warnings. These warnings are included for the health and safety of the operator and those in the immediate vicinity. Keep this manual for future reference. Dust created by power sanding, sawing, grinding, drilling, and other construction activities may contain chemicals known to cause cancer, birth defects or other reproductive harm and respiratory illnesses.
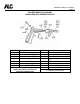
40390 Assembly Instructions Page 3 POLYMER BENCHTOP CABINET – 40390 Key Part No. Description Qty. 1 11646 Louver vent 1 2 11649 Hinge 1 3 11160 8-32 x 1/2” Screw 5 4 11161 8-32 Nut 13 5 10904 Plug 2 6 11644 Snap fastener 5 7 11643 Lens 1 ADDITIONAL PARTS NOT SHOWN ON SCHEMATIC 11208 Grate 40343 Pick-up tube 11605 Suction hose Key 8 9 10 11 12 13 Part No.
0390 Assembly Instructions Page 4 POLYMER BENCHTOP CABINET SIPHON GUN REPLACEMENTS PARTS Part No. 11604 40050** 40051 40052** Description Sandblast gun (economy) Small nozzle, 7 CFM Medium nozzle, 15 CFM Large nozzle, 20 CFM Part No.
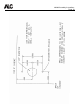
40390 Assembly Instructions Page 5 ASSEMBLY INSTRUCTIONS 1. Take gloves and slip over circular flanges inside the cabinet. Secure gloves to flanges with glove clamps. If cabinet is supplied with 18” rubber gloves, help may be required to stretch gloves over the flanges. This is normal. 2. Attach abrasive blast hose to pick-up tube on inner portion of pick-up tube leaving 1/4” gap between hose end and outer tube. Lay pick-up tube in bottom of cabinet with hose end towards right rear of cabinet.
40390 Assembly Instructions Page 6 3. The plug in the right upper side of cabinet is for installation of a shop vac. We strongly recommend the use of a shop vac or cabinet will leak the blast dust. 4. The 3” hole with louver vent in the upper left rear of the cabinet provides for proper venting of the cabinet during use. Never plug. AIR COMPRESSOR RECOMMENDATION: To permit efficient operation of your air compressor, follow these guidelines: 1.
40390 Assembly Instructions Page 7 6. Consider using different grades or different types of media to prevent nozzle clogging due to high moisture content. 7. Do no use sand. PRESSURE BLASTER SAFETY PROCEDURES CAUTION: READ THESE SAFETY PROCEDURES IN THEIR ENTIRETY – PARTS OF THE OPERATING INSTRUCTIONS ARE WITHIN THESE WARNINGS. These procedures are not intended to be exhaustive due to the many variables in the abrasive blasting field.
40390 Assembly Instructions Page 8 7. Do not use this equipment in any area that might be considered hazardous or where flammable gases or liquids are present. Failure to do so may cause an explosion resulting in serious injury. WARNING! The threads on the nozzle holder must be inspected each time the nozzle is secured to the holder. Check the threads for wear, and make sure nozzle holder securely grips the nozzle. The nozzle washer must also be inspected for wear.
40390 Assembly Instructions Page 9 WARNING Follow all electrical and safety codes as well as the National Electrical Code (NEC) and OSHA Regulations. Part No.
40390 Assembly Instructions Page 10
40390 Assembly Instructions Page 11 MAINTENANCE WARNING! Failure to observe the following before performing any maintenance could cause serious injury or death from the sudden release of compressed air: Depressurize the blast machine. Disconnect power supply. Lockout and tagout the compressed air supply. Bleed the air supply line to the blast gun. Immediate replacement of worn components is required.
40390 Assembly Instructions Page 12 Plastic Grit #40110 Primarily used to strip aluminum and fiberglass. Great for stripping paint, light oxidation and surface rust. Recommended for use in blast cabinets because it creates very little dust. Works quickly, last a long time and increases visibility within the cabinet. (10 Lb. container) Walnut Shells #40112 Walnut shells are recommended for use on “soft” surfaces such as aluminum, glass, wood, and other areas where no pitting is desired.
40390 Assembly Instructions Page 13 Holes in abrasive hose Air filter on compressor plugged Urethane gasket worn or dirty Replace hose Clean filter Clean or replace gasket Lack of abrasive flow: Blaster tank empty Fill tank Moisture in media Dry media Not enough air pressure Check system Abrasive hose kinked Straighten hose Debris in media Clean or screen media
40390 Assembly Instructions Page 14 Disclaimer of Warranties. S & H Industries, Inc. ("Seller") makes no warranties with respect to any goods delivered to Buyer or users except as specifically set forth within this manual. S & H INDUSTRIES, INC. MAKES NO IMPLIED WARRANTIES OF MERCHANTABILITY OR FITNESS FOR A PARTICULAR PURPOSE WITH RESPECT TO ANY OF THE GOODS, AND S & H INDUSTRIES, INC. EXPRESSLY DISCLAIMS ANY IMPLIED WARRANTIES AGAINST INFRINGEMENT. S & H INDUSTRIES, INC.