
Use and Care Manual


40402 & 40403 Assembly Instructions
Page 8
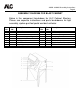
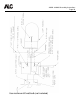
LIGHT ASSEMBLY INSTRUCTIONS
1. Press metal plug into 3/4” diameter hole from inside of
cabinet. (The purpose of the grommet is to prevent abrasion
of the light wires.)
2. Install electrical box to outside of cabinet using two 8-32 x
1/2” machine screws and two 8-32 hex nuts. Holes in box
and cabinet are prepunched. NOTE: Use one of the
machine screws to secure ground wire (green wire) to back of
box. Power cord is secured to box and should face down
when box is properly attached.
3. Route wires from light base through gasket and center of
grommet into electrical box. Install light with gasket between
cabinet wall and light base using two 8-32 x 1” machine
screws and two 8-32 hex nuts.
4. Secure white wire from light and white wire from power cord
with wire nut and leave in box.
5. The electrical switch has two screws on the side of the
switch. Attach black lead from light to one screw and black
lead from power cord to other screw. Attach switch to box
and install box cover to switch.
6. Before installing bulb and plugging in power cord, it is
recommended that all connections be checked and light
fixture hot, neutral and ground connections be checked using
appropriate testing meters.
7. Install light bulb (not included) maximum 60 watt.