
User's Manual


3CC12426AAAA TQ BJA 01 Issue 01 - April 2001 - Draft 04 89/346
104
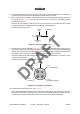
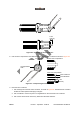
Figure 67 – Adding the large O-ring
13. Use a small grease brush to lubricate the O-ring with the silicone grease included with the connector.
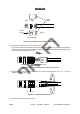
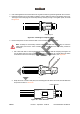
14. Add the outer connector body to the clamping nut and pin. Hold the clamping nut stationary with one
wrench, and thread the connector body onto the clamping nut with another wrench; see Figure 68.
Do not turn the clamping nut, only turn the connector body. Tighten to 1.9 to 2.4 Nm (16.8 to 20.8 in.-
lb) of torque.
Figure 68 – Assembling the connector
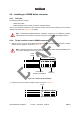
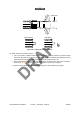
2.9.3 – To add a ring-flare L4PNM connector
1. Strip 51 mm (2 in.) or more of the cable jacket from the IF cable, ending at the lowest point of a valley
between two corrugations, as shown in Figure 69.
Note - This step can be done more accurately and quickly if Heliax cable tool 207886 is used
to score the cable jacket and cut the outer conductor.
O-ring
Stationary wrench