
8008- User Guide

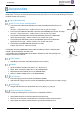
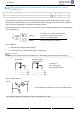
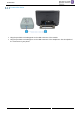
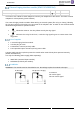
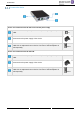
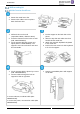
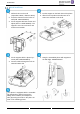
Table Of Contents
- 1 Getting to know your telephone
- 2 Contacts management
- 3 Speed dial management
- 4 Using your telephone
- 4.1 Information about the phone
- 4.2 Manage the call log
- 4.3 Calling by number
- 4.4 Calling by name
- 4.5 Call from call log
- 4.6 Make a call using your list of contacts
- 4.7 Calling using speed dial key
- 4.8 Receiving a call
- 4.9 Switching between audio modes
- 4.10 Activating the loudspeaker during a conversation (handset lifted)
- 4.11 Redialing
- 4.12 Sending DTMF signals
- 4.13 Mute, so that your contact cannot hear you
- 4.14 Lock / unlock your telephone
- 4.15 Making a second call during a conversation
- 4.16 Answering a second call during a conversation
- 4.17 To cancel your second call and recover the first
- 4.18 Placing a call on hold (hold)
- 4.19 Switching between calls (Broker call)
- 4.20 Transferring a call
- 4.21 Three-way conference with internal and/or external contacts (conference)
- 4.22 Hide your phone number
- 4.23 Do not disturb
- 4.24 Forwarding to a number or voicemail
- 4.25 Cancelling all forwards
- 4.26 Listen to your voicemail
- 4.27 Defining a 'hotline' number
- 5 Do more with your deskphone
- 6 Programming your telephone
- 6.1 Adjusting the audio functions
- 6.2 Adjust ringer volume while a call arrives
- 6.3 Configuring the welcome page
- 6.4 Selecting language
- 6.5 Adjusting the contrast of the display
- 6.6 Programming direct call keys (8028s Premium DeskPhone, 8018 DeskPhone, add-on module)
- 6.7 Install a jack accessory (headset, hands-free, loudspeaker) (8028s)
- 6.8 Install a USB accessory (Headset, Handsfree, Loudspeaker)
- 6.9 Install a RJ9 headset (8008G, 8008)
- 6.10 Manage connected devices (8028s)
- 7 Contacting your administrator (technical support)
- 8 Accessories
- 9 Technical specifications
- 10 Ordering information
- 11 Guarantee and clauses

SIP Business
8AL90341ENACed01
50 /60
8018 DeskPhone
1. Drill two holes on the wall
(separation=90mm, diameter=6mm).
2. Insert the fastener into the holes on
wall (P/N: 1AD007550003).
3. Fix the support with both screws and
adjust (P/N: 1 1AD007460003). The
support is used as a reference and
must be removeable.
5. Put the support on the back side of the phone.
6. Slide it from top side and make sure the 2
snaps are engaged on the shell.
3. Fix the support with the phone by 1
screw (P/N: 1AD204430001).
4. Connect cables through the hole on
support bottom side.
2. Hang the assembled phone with support on
the wall (P/N: 1AB045210162).
If your phone is equipped with the reversible
hook (beginning of 2020), improve the
stability of the handset (for example on
boats) by turning the hook on the phone as
shown in the following picture: