Other 500 DECT Handset 500 Ex DECT Handset OmniPCX Enterprise User manual 8AL90841FRBC ed02 1520
User Manual how Thank you for choosing an Alcatel-Lucent phone. The availability of certain functions described in this guide may depend on the version or configuration of your system. If your phone works on GAP mode, some features are not available. If in doubt, consult the person responsible for your system. Alcatel, Lucent, Alcatel-Lucent and the Alcatel-Lucent logo are trademarks of Alcatel-Lucent. All other trademarks are the property of their respective owners.
Contents Toc 1. Your telephone 2. Getting started p. 7 2.1 Installing the battery in the telephone . . . . . . . . . . . . . . . . . . . . . . . . . . . . . . . . . . . . . . . . p. 7 2.2 Charging your telephone battery . . . . . . . . . . . . . . . . . . . . . . . . . . . . . . . . . . . . . . . . . . . . p. 7 2.3 Battery management for 500Ex Dect (Explosive environment) . . . . . . . . . . . . . . . . . . . . p. 8 2.4 Switching on/off your telephone . . . . . . . . . . . . . . . . . . . . . . . . . .
Contents 8. Utilities p. 34 8.1 Calendar . . . . . . . . . . . . . . . . . . . . . . . . . . . . . . . . . . . . . . . . . . . . . . . . . . . . . . . . . . . . . . p. 34 8.2 Calculator . . . . . . . . . . . . . . . . . . . . . . . . . . . . . . . . . . . . . . . . . . . . . . . . . . . . . . . . . . . . . . p. 35 8.3 Stopwatch . . . . . . . . . . . . . . . . . . . . . . . . . . . . . . . . . . . . . . . . . . . . . . . . . . . . . . . . . . . . . p. 35 8.4 Wake up services . . . . . . . . . . . . . . . .
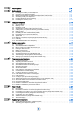
Your telephone 1 Other Off hook R CLR # Switch on / off On-hook Return to first screen - Return to previous menu Switch off ringer Activate/deactivate loudspeaker Calls log ; (Redial) Lock/unlock keypad (First press: Ok) Apply Access MENU : Message service , Personal directory , Settings menu items , Calls log Erase a character Apply Navigate (Up, down, left, right) Affected shortcuts to the navigation keys (out of navigation use) Activate/deactivate loudspeaker Access your personal directory Switch th
Call icons Incoming call Silent mode activated (Loudspeaker vol) Outgoing call Silent mode activated (Microphone) Loudspeaker activated Status icons Battery charge level Programmed call-back time Radio reception quality Set is locked Filtered calls Missed calls Silent mode activated (Ringer) New messages 6
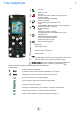
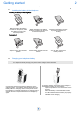
Getting started 2 Other 2.1 Installing the battery in the telephone Installing the battery in the telephone 3 Before inserting the battery module into the phone, make sure that its lock is in the unlocked position While maintaining the battery module in position, slip the lock to the locked position Check that the battery module is properly installed in its housing To remove it 3 Slip the lock to the unlocked position 2.
Battery charge Battery fully charged (75% 100%) Battery half charged (33% - 75%) Low battery (0% - 33%) Battery completely discharged (0%) Battery charge icon flashes when the phone is on the charger Recharge your telephone battery regularly. The telephone can be on or off when recharging the battery. If the telephone is to remain unused or out of its charger for several weeks, remove the battery and store it separately.
How can I recognize a degraded battery ? • The autonomy of the handset is very low or degraded. • The battery starts inflating. The use of the new software will help you to detect this situation. I have some old spare batteries available in stock. What should I do ? Can I use them ? • Check the date code of the battery pack, which is written on the battery itself. If the age is > 6 months, buy a new one from your ALE dealer. If the age is < 6 months, you can use it, with the new Software.
You must be in possession of the Bluetooth module for your phone Turn off the handset Slip the lock to the unlocked position Lift the battery module Insert the Bluetooth module (You should hear a click when the module is in place) Installing the battery in the telephone Turn on the handset Enable Bluetooth Menu Access MENU Select Access the handset settings menu Select the tab: Connectivity Bluetooth Select Yes Enable Bluetooth To disable Bluetooth, follow the same procedure by selecting No .
2.6 Installing the memory card 2 You must be in possession of the memory card for your phone Slide in the memory card from under the two small crescents and press it as shown in figure Installing the battery in the telephone Turn on the handset Turn off the handset Slip the lock to the unlocked position Lift the battery module When an empty memory card is inserted, the configuration of the handset is copied to the memory card.
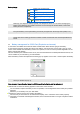
Using your telephone 3 Other 3.1 Access MENU Menu Select a function in the MENU It provides access to all the functions available on your system. Select Navigate in the menus and select the menu of your choice Change PIN code : Consult and send voice and text messages. Automatic keylock : From the call log, select one of the last numbers dialed Phone lock : Access your personal directory New ack password : Manage your appointments, your meetings , Program a call-back time.
3.4 Answering an internal call in intercom mode In the interphony, calls are automatically answered on the handset Activate intercom mode Menu Access MENU Select Access the handset settings menu Select the tab: Calls Answer mode Select Auto answer Select The interphony mode stays activated after the end of the communication. The interphony mode stays activated as long as the handset profile is not modified by user. 3.
3.6 Dial by name Depending on your system set-up you will need to follow one of the below procedures to use this feature Please contact your administrator. Redial last number Access the dial by name feature by pressing the down navigation key ((long press)) First method You can search for your contact using their name or initials.
Redial from call log You can call back from your phone call log. Call R OR Call Access to the calls log All incoming, outgoing, missed or unanswered calls are displayed in the call log Select the desired log: All calls Answered calls Sent calls Missed calls Select the recipient from the call log Send the call The call log can also be accessed from the menu 3.8 . Programming your personal directory Without a memory card, your personal directory can contain up to 20 contacts (200 with a memory card).
3.9 Speed dial This feature allows you to associate a contact to a key on the keypad. Therefore, pressing and holding on this key will automatically start the call to the associated contact. This feature allows to associate a contact or a feature code to a key on the kepypad. Pressing and holdingon this key will automatically start the call to the contact or will activate the associated feature.
During a conversation 4 Other 4.1 Introduction Your system offers a wide range of services and features. To activate a feature while in communication, enter the feature code directly. For information on the features codes list, contact your installer or administrator. The operation of your phone depends on its single or multi-line installation. By default, your set is installed as a single-line set. For more information regarding this configuration, contact the person in charge of your installation. 4.
4.5 Make a second call The operation of your phone depends on its single or multi-line installation. Contact your installer to know which feature description must be used on your installation. You are in communication with a first caller Dial directly number The first call is on hold You can call the second caller from the directory using the keyboard shortcuts.
4.8 Transferring a call (Single-line terminal only) To transfer your call to another number: You are in communication with a first caller Calling a second person during a conversation CLR Hang up the ongoing call The two callers are connected Multiline set. If the transfer feature is not available, when you hang up, the communication is ended and you are put in communication with the caller on hold. 4.9 Setting up a conference (Single-line terminal only) You are in communication with a first caller.
Programming your telephone Other 5.1 5.2 Lock/unlock keypad Lock Lock the keypad Unlock Unlock your phone Adjusting the audio functions Your handset allows you to set different ring tones depending on the type of incoming call.
5.4 Activate/Deactivate the vibrating ringer Menu Access MENU Select Access the handset settings menu Select the tab: Sounds & alerts Vibrator Select Select 5.5 Off : Vibration deactivated Vibrate then ring : The handset vibrates and then rings Vibrate only : The handset vibrates and doesn t ring Vibrate and ring : The handset vibrates and rings alternately Selecting language Depending on your system, there are two different methods to change the language on your phone.
5.6 Set time and date Menu Access MENU Select Access the handset settings menu Select the tab: General Time & date Select Time Select Save Set time More Select Time Format Date Select 5.7 Save Enter date More Choose the date format Use profiles to customize your handset You can configure the next options for each profile: • Ring volume , Ring external , Ring internal , Ring unknown call , Ring emergency : Melody according to the incoming call type • Ring normal msg. , Ring urgent msg.
Modify a profile Menu Access MENU Select Access the handset settings menu Select the tab: General Profiles Select Edit profile Select Select Select and modify the desired function (Follow information displayed on the screen) You can reset the defaults values by selecting Reset profiles. 5.
5.9 Configure the keys to answer a call By default, you answer a call by pressing the off hook key. You can also configure your handset to answer a call by pressing any key or automatically without pressing any key. Menu Access MENU Select Access the handset settings menu Select the tab: Calls Answer mode Select Select 5.
5.11 Call screening You can choose to accept or reject the callers identified in the list of filtered calls Menu Access MENU Select Access the handset settings menu Select the tab: Calls Caller filter Select Mode Select List Select Define the list of filtered calls Add Add a number to the list from your personal directory or by entering the number More 5.12 Accept list : Accept calls in the list of filtered calls Block list : Reject calls in the list of filtered calls.
5.14 Associate states of the handset to the LED colours You can define when the LED will light red, green and orange, according to a state or event of the phone. Menu Access MENU Select Access the handset settings menu Select the tab: Calls LED signal Select Select Select 5.15 Choose the color of the LED and choose the event that will light the LED Change the PIN Code Use the change PIN Code feature to change the PIN Code on the handset.
5.16 Enable or disable the Automatic keypad lock feature Use the Automatic keypad lock feature to disable key input and prevent accidental operation. The automatic keypad lock is activated 30 seconds after the terminal display goes to power save mode and no keys are pressed. Menu Access MENU Select Access the handset settings menu Select the tab: General Security Select Automatic keylock Select On / Off Enable or disable the feature Select 5.
Keep in touch 6 Other 6.1 Introduction Your system offers a wide range of services and features. To activate a feature when you are not in communication, take the set off the hook and enter the feature code followed by the parameters to associate to the feature. For information on the features codes list, contact your installer or administrator. You can program a feature on a speed dial key by entering the feature code followed by parameters associated to the feature. Refer to chapter: Speed dial . 6.
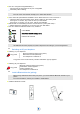
6.5 Consulting your voice mailbox A voice prompt indicates the presence of messages when you hook off the phone. Single-line set You are not in conversation Enter the feature code: Voice mail R Follow the voice guide instructions Code to associate to a speed dial key: Voice mail + Voicemail number . + Personal code.
6.7 Text messaging You can send and read text messages using your phone.
Predefined messages Scroll down the list and select the message to send Message to complete Scroll down the list and select the message to complete Access the fields to complete Complete the message Ok Send the message Message to create (Personal message) Write the message Ok Send the message Second method You are notified of new messages by a specific mail icon displayed on your phone screen Press the left navigation key to access the text messaging feature Scroll and select the new and draft menu S
Registering the telephone Other 7.1 Subscribing the handset to a DECT system You must subscribe the handset to at least one DECT system before you can use the handset to make a call. The handset can operate with a maximum of four DECT systems. When the handset is not yet subscribed to a system, the following message appears on the display screen: Register.
7.2 Selecting your telephone system You can switch from one registered system to another.
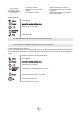
Utilities 8 Other 8.1 Calendar You can consult and manage an agenda on your phone. Menu Access MENU Select Access the agenda menu Modify the agenda format Access to the agenda View week : View of the week More Select View month : View of the month Select a date Access to the agenda More Go to date Select Enter date Select View the agenda for the selected date You can select a date with the navigation keys.
Copying an appointment reminder Menu Access MENU Select Access the agenda menu Select Select a date View the agenda for the selected date Copy Select the appointment Change the appointment by filling in the fields as described in the creation of appointments Delete an appointment reminder 8.
8.
Accessories Accessories Other 9.1 Characteristics of the mains power adapter Entry: 100/240 V - 50/60 Hz Exit: 12 V DC - 500 mA The mains power socket used must be close to the charger/holder and easily accessible, so that it can be used as an on/off facility. 9.2 Headphone / external microphone The side of the telephone features a 3.5 mm jack connector for headphone / external microphone. Contact your retailer for information on the various headphone models available. Your headset must be 2.
Precautions for use Safety Instructions - Declaration of compliance Other Changes or modifications to the equipment not expressly approved by the party responsible for compliance could void the usersauthoritytooperatetheequipment.'. To limit the risk of interference, people with pacemakers must keep the wireless telephone away from their equipment (minimum distance of 15 cm/6 inches).