Alcatel-Lucent OmniPCX Office Rich Communication Edition 8068 8039 8038 8029 8028 Premium Premium Premium Premium Premium DeskPhone DeskPhone DeskPhone DeskPhone DeskPhone User Manual R100 8AL90894ENACed01-1617
Introduction Thank you for choosing an ALE International phone. This model offers enhanced ergonomical features for more effective communication. This document describes the services offered by the following sets: 8068 Bluetooth® Premium DeskPhone (8068 BT) 8068 Premium DeskPhone 8039 Premium DeskPhone 8038 Premium DeskPhone 8029 Premium DeskPhone 8028 Premium DeskPhone The labels and icons displayed on the phone depend on the type of the set. Some features are depended on the type of the set.
1 GETTING TO KNOW YOUR TELEPHONE 1.1 1.2 1.3 1.4 1.5 1.6 1.7 1.8 1.9 1.10 1.11 1.12 8068 BLUETOOTH® / 8068 PREMIUM DESKPHONE 8038/8039 PREMIUM DESKPHONE 8028/8029 PREMIUM DESKPHONE CONNECTIVITIES WELCOME SCREENS NAVIGATION STATUS ICONS / CALL ICONS PERMANENT FEATURES KEYS ALPHABETIC KEYBOARD ADD-ON MODULE CALL MANAGEMENT SCREEN BLUETOOTH® WIRELESS HANDSET 7 7 7 8 8 9 10 10 10 11 12 13 14 2 USING YOUR TELEPHONE 15 2.1 2.2 2.3 2.4 2.5 2.6 2.7 2.8 2.9 2.10 2.11 2.12 2.13 2.14 2.15 2.16 2.17 2.
3 DURING A CONVERSATION 26 3.1 3.2 3.3 3.4 3.5 3.6 3.7 3.8 3.9 3.10 3.
6 KEEP IN TOUCH 35 6.1 6.2 6.3 6.4 6.5 6.6 6.7 6.8 6.9 6.10 6.11 6.12 6.13 6.14 6.15 6.
8.21 8.22 8.23 8.24 INSTALLING A BLUETOOTH® WIRELESS TECHNOLOGY HEADSET (MATCHING) USING A BLUETOOTH® WIRELESS TECHNOLOGY HEADSET DELETING AN ACCESSORY (HEADSET, HANDSET, ETC.): BLUETOOTH® WIRELESS TECHNOLOGY CONTACTING YOUR ADMINISTRATOR 47 48 48 48 9 ACD: AGENT SET / SUPERVISOR STATION 49 9.1 9.2 9.3 9.4 9.5 9.6 9.7 9.8 9.9 9.
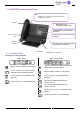
1 Getting to know your telephone 1.1 8068 Bluetooth® / 8068 Premium DeskPhone Bluetooth® wireless handset (8068BT) Wired handset LED Flashing blue: incoming call Arrival of a new call Flashing orange: alarm Color screen 10 dedicated functions keys Navigation 3.5 mm headset jack Permanent feature keys: quick access to the phone’s main features Alphabetic keyboard Loudspeaker An adjustable and stable foot 1.
1.3 8028/8029 Premium DeskPhone LED Flashing blue: incoming call Arrival of a new call Flashing orange: alarm Handset Monochrome screen 6 dedicated functions keys 4 programmable keys with Led and paper label 3.5 mm headset jack Navigation Alphabetic keyboard Permanent feature keys: quick access to the phone’s main features 1.4 Connectivities Loudspeaker An adjustable and stable foot Description of the connectors 8029 / 8039 8068 / 8038 / 8028 Add-on module connector (SATA type).
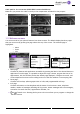
Cable path for line connection (8029/8039 Premium DeskPhone) Make sure you position the cable correctly in the compartment intended for that purpose: 1 2 4 5 3 1.5 Welcome screens You can access all of your phone's features from these screens. The default display has three pages that you can access by pressing the page tabs at the top of the screen. The selected page is highlighted.
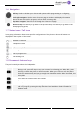
1.6 Navigation OK key: Used to validate your choices and options while programming or configuring Left-right navigator: Used to move from one page to another and display information about current calls (call in progress, calls on hold, incoming call). Up-down navigator: Used to scroll through the content of a page. Back/Exit key Use this key to go back to the previous step. Use this key to go back to the homepage (long press) 1.
Programmable keys (F1 and F2 keys).Lit when the function associated with the key is activated. A service or a direct call can be associated to these keys. Redial key: to access the 'Redial' feature. Last number redial (short press) Call back on the last 10 number dialed (long press) Guide key: Used to obtain information on functions of the “menu“ page and to program key of the “perso“ page Messaging key to access the messaging portal (call log, voice messages and instant messages).
1.10 Add-on module Flashing blue: incoming call Installation Premium Add-on 10 keys modules 2 1 4 3 1. 2. 3. 4. Remove the protection of the dedicated compartment behind the set Insert the add-on correctly in the compartment Plug the provided cord into the dedicated socket behind your set Fix the add-on with the provided screw Premium Add-on 40 keys / Premium Smart Display 14 keys: 1. Plug the provided cord into the dedicated socket behind your phone 2.
1.11 Call management screen Incoming call icon Call in progress ,Call on hold , … Incoming call and conversation presentation screen 8068 8038 Soft keys: actions available depending on the call status Each tab corresponds to a call, the status of which is symbolized by its icon (in progress, held, arrival of new call). When a call is in progress, use the left-right navigator to look at held or incoming calls. All features are accessible while the call is displayed on the screen.
1.12 Bluetooth® Wireless handset The Bluetooth® Wireless handset is only available with the 8068 Bluetooth® Premium DeskPhone. Off-hook/On-hook: press this key to take or terminate a call. Volume/Mute: LED Short successive presses to change the handset volume level (3 levels). Long press to activate or deactivate mute mode. If the Bluetooth® handset is on its base, you do not need to press the Off-hook/On-hook key to take or terminate the call. Just off-hook/on-hook the Bluetooth® handset.
2 Using your telephone 2.1 Messaging portal The messaging portal allows you to access and manage features such as the call log, instant messaging and voice messages. When there is a new event (new log, new instant message or new voice message) the message key blinks blue. Accessing the messaging portal Press the message key to access the messaging portal.
Configure access to the messaging portal The system default setting requires you to enter a password to access the messaging portal features. You can change the setting so that you don't have to enter a password each time you want to access the messaging portal features. Access the messaging portal Configure Authentification Enter your personal password Set authentication to on or off. On: password is always required. Off: password is never required. Press to confirm. 2.
2.3 Receiving a call Use one of the following: Lift the receiver Press the on-hook/off-hook key of the Bluetooth® device (Bluetooth® Wireless handset) Hands free Press the key next to the incoming call icon 2.
Call your contact using the company phone number Press the key associated with the company phone number Call your contact using another phone number (via contact card): Press the softkey associated with the contact name: The contact card opens and displays information about the contact: last name and first name, several phone numbers (Office, mobile, home), email address, instant message address and the company name.
2.9 Redialing Redialing the last number dialed (redial) (short press) Last number redial Call back on the last 10 number dialed (long press) Select the number to redial from the last 50 dialed numbers or Start the call You can also access this feature through the menu: Reach the “Menu“ page Redial list Select the number to redial from the last 50 dialed numbers 2.10 Consulting the call log At any time, you can consult all answered and unanswered incoming and outgoing calls.
Acknowledge all missed calls: Once a new log is consulted, it is automatically acknowledged. However, you can acknowledge all new missed calls without consulting them. Press the associated softkey. Press the associated softkey. All missed calls are acknowledged. Delete all missed calls: Press the associated softkey. Press the associated softkey. Press to confirm. All missed calls are deleted. Consulting all calls Using the left/right navigator key, select the “All” tab.
Acknowledge all missed calls: Press the associated softkey. Press the associated softkey. All missed calls are acknowledged. Delete all call logs: Press the associated softkey. Press the associated softkey. Press to confirm. All call logs are deleted. 2.
2.14 Sending DTMF signals During a conversation you sometimes have to send DTMF signals, such as with a voice server, an automated attendant or a remotely consulted answering machine. During a conversation Send DTMF Enter DTMF code The function is automatically cancelled when you hang up. 2.
Sending an instant message using the phone number Access the messaging portal Send IM Enter your contact's phone number Access instant message writing mode. Write the instant message to send. Send the instant message. Status of the instant messages Once the instant message has been sent, the message is stored in the “Sent” tab of the instant message feature in the messaging portal.
Answering a voice message Access the messaging portal Select the voicemail feature by pressing the associated softkey. Using the left and right navigation keys, access one of the following tabs: new voice messages or all voice messages. Using the up and down navigation keys, position the cursor on the voice message you want to answer with an instant message. When details of the voice message are displayed on the screen, press the softkey associated with the instant message.
Acknowledge new instant messages Once a new instant message is read, it is automatically acknowledged. However, you can acknowledge all new instant messages without reading them. Press the associated softkey. Press the associated softkey. All new instant messages are acknowledged Delete instant messages When consulting the instant messages, you can choose to delete the messages stored in the following tabs: new, sent, received or all messages. Press the associated softkey.
3 During a conversation 3.1 Making a second call during a conversation During a conversation Use one of the following: Dial directly the number for your call. Name of second caller. New call Number of second caller (long press) or / Menu page: / Redial list / Select the No.
3.2 Answering a second call during a conversation During a conversation, another person is trying to call you.
3.5 Transfer a call to a voice mail During the call, you want to transfer your caller to the voice mailbox of another caller TransferVMU Number of second caller 3.
3.8 Placing an outside call on hold (parking) You can place an outside call on hold and recover the call on another telephone: During a conversation Park call To recover the parked call: Reach the “Menu“ page Pickup Unparkcall If the parked call is not recovered within a preset time (default value 1 min 30), it is transferred to the operator. 3.9 Intrusion into an internal conversation Your caller’s line is busy.
4 “Meet me “ conference The “Meet me “ function is used to set up a conference with a maximum of 6 persons: the “master “ of the conference (who has the rights for initiating the conference) and the participants (maximum of 5) who meet for the conference. 4.1 Initiate a “Meet me “ conference In order for the participants to join the conference, you must first decide on a meeting time for the conference and send them the access code.
5 Sharing 5.1 Receiving supervised call ringing To receive the special ringing for calls to another number: Supervised call ringing programmed key Same key to cancel 5.2 Answering the general bell When the operator is absent, outside calls to the operator are indicated by a general bell. To answer: Reach the “Menu“ page Pickup Generalbell 5.
5.5 Outside calls to the operator will ring on your telephone and you can answer the call: Operator help programmed key Your telephone will ring at the same time as the switchboard Same key to cancel Calls to the switchboard: Calls to the switchboard will ring on your telephone Lift the receiver Operator help programmed key 5.6 Hunting groups Hunting group call: Certain numbers can form a hunting group and can be called by dialling the group number. Lift the receiver No.
5.9 Calling a caller on his/her loudspeaker Your internal caller does not answer. If authorised, you can remotely activate your caller’s phone: Your caller does not reply Interphony You are connected to the loudspeaker on your caller’s phone (if he/she has the hands free function) 5.10 Send a voice message copy Access the messaging portal Press the softkey associated with the voice message feature. Using the left and right navigation keys, select the tab to consult (new or all messages).
5.12 Broadcasting a message on the loudspeakers of a station group A message not requiring an answer can be broadcasted on the loudspeakers within your broadcast group: Off hook Number of broadcast group Speak, you have 20 seconds or Hang up The message will only be broadcast on terminals not in use and which have a loudspeaker.
6 Keep in touch 6.1 Selecting calls to be forwarded When a forward is applied, you can select the types of call to be forwarded: outside, internal, all. Ext/Int Select the type of Out/Int call type of call forwarded is displayed Allcalls forward internal and outside calls External Forward outside calls Internal Forward internal calls 6.2 Forwarding calls to another number (immediate forward) The number can be your home, mobile or car phone, voice mailbox or an internal extension (operator, etc.
Display name of sender, with date, time and ranking of message Play Listen to message Clear Erase message Call Call back sender of message Sendcopy Copy message Send IM Send an instant message Acknowledge all new voice messages Once you start listening to a voice message, the message is automatically acknowledged. However, you can acknowledge voice messages without listening to them. Press the associated softkey. Press the associated softkey. 6.
6.8 Forwarding your calls from the receiving terminal (“Follow me“) You wish to receive your calls in your present location: Use the “Follow me“ function. Followme Dial your extension number Forward is acknowledged If you have a key programmed with this feature, you can access the feature directly Press programmed key Dial your extension number Forward is acknowledged 6.
6.13 Do not disturb You can make your terminal temporarily unavailable for all calls. DoNotDisturb Forward is acknowledged Callers wishing to contact you will see the “Do Not Disturb“ message displayed on their sets when they try to call. 6.14 Leaving a recorded message for internal callers You can leave a message on your terminal which will be displayed on the screen of the terminal calling you.
Sending a new message NewMsg Write your message 6.15 Consulting written messages The light indicates that messages have been received.
7 Managing your charges 7.1 Charging your calls directly to business accounts You can charge the cost of your outside calls to business account numbers. Reach the “Menu“ page Settings My services Consultation Number of business account Number required Additional services Business account code 7.
8 Programming your telephone 8.1 Initializing your voice mailbox Light flashes Enter your personal code then record your name according to voice guide instructions Your personal code is used to access your voice mailbox and to lock your telephone. Your password has 6 digits. A weak personal code with 6 identical digits (000000, 111111, etc.) or a simple sequence of 6 digits (012345, 123456, etc.) will be rejected by the system. After a system upgrade, the password may still have only 4 digits.
8.
8.5 Adjusting the contrast of the display (8028/8029/8038/8039 Premium DeskPhone) Reach the “Menu“ page Settings Phone Contrast Screen or Keys Increase or reduce the brightness of the screen or keys (of the extension unit) by pressing consecutively on the corresponding keys 8.6 Selecting the welcome page This function is used to choose the page displayed by default on the telephone. Settings Options Homepage Select the default page 8.
8.9 Deleting direct call keys (Perso page) Access the Perso page using the navigator Select the key to delete Clear 8.10 Programming direct call keys (F1 and F2 keys) Press a programmable key (F1 or F2) If the key is not programmed yet: Select the key to program Enter the name and number to associate to the key If the key is already programmed: Select the key to program Enter the name and number to associate to the key 8.
8.13 Deleting direct call keys (8028/8029 Premium DeskPhone) Select the key to delete Clear 8.14 Programming an appointment reminder You can set the time of a temporary reminder (one within 24 hours) or a permanent reminder (every day at the same time) Reach the “Menu“ page Appointment Enter time of appointment Temporary / Permanent Select the type of appointment (temporary or permanent) The “Appointment programmed“ icon is displayed on the welcome page.
8.17 Configuring the audio jack of your telephone By default, the audio jack of your telephone can be used to connect a headset, hands-free kit or loudspeaker. A wideband headset can also be installed for optimized sound quality. Reach the “Menu“ page Settings Phone Jack Headset / Handsfree / Loudspeaker Select the type of device plugged into the jack 8.
8.20 Use of the Bluetooth® handset The Bluetooth® Wireless handset is only available with the 8068 Bluetooth® Premium DeskPhone . The Bluetooth® cordless handset permits the user to answer and converse with complete freedom within a radius of 10 meter from the set. The handset has a LED and two buttons. Light Green flashing: normal operation. Green steady: handset charging. Orange flashing: battery charge low or handset outside coverage zone. Orange steady: malfunction.
8.22 Using a Bluetooth® Wireless Technology headset Refer to the user documentation supplied with the headset. 8.23 Deleting an accessory (headset, handset, etc.): Bluetooth® Wireless Technology This feature is only available with compatible Bluetooth® phone (8068 Bluetooth® Premium DeskPhone). Otherwise the corresponding menu is not displayed or is inactive.
9 ACD: Agent set / Supervisor station 9.1 Agent set A call center solution allows optimum distribution of calls to agents according to their availability and skills. 9.2 Open an agent session (login) – Agent set Select the ACD application Login Select the agent and validate Depending the displayed information, enter your password or confirm ACD application welcome screen is displayed. 9.
9.4 The four operating statuses of the agent set An agent's availability is determined by the operating status (of which there are 4), that the agent can change at any time. These statuses are: Onduty In service, the agent is ready to receive calls. Offduty Withdrawn , the agent has withdrawn from the ACD application C.Work Additional task, the agent is performing a task concerning a call and is not taking other calls T.
9.9 Supervisor station A supervisor can consult the messages left in the voice mailboxes of the call centre groups (maximum 8 groups) using the function keys on a 8028 Premium DeskPhone, 8029 Premium DeskPhone, 8038 Premium DeskPhone, 8039 Premium DeskPhone or 8068 Premium DeskPhone. A supervisor can also perform the agent function from the same set 9.
10 Guarantee and clauses 10.1 Safety Instructions Changes or modifications to the equipment not expressly approved by the party responsible for compliance could void the user's authority to operate the equipment. Magnets could affect the functioning of pacemakers and implanted heart defibrillators.
10.2 Regulatory Statements Marking This equipment is in compliance with the essential requirements of Radio Equipment Directive (RED) 2014/53/EU and with Directive 2011/65/UE (ROHS). The Declaration of Conformity may be obtained from: ALE International 32, Avenue Kleber 92700 Colombes ebg_global_supportcenter@al-enterprise.com USA and Canada This device complies with Part 15 of the FCC Rules and with RSS-210 of Industry Canada.
Quick guide Alcatel-Lucent 8068/8038/8028/8039/8029 Premium DeskPhone Bluetooth® wireless handset (8068BT). Wired handset. LED Flashing blue: incoming call Flashing orange: alarm Welcome screens Contains several lines and pages providing information on calls and the features that can be accessed by pressing the keys associated to the labels on the display (10 keys for 8068/38/39 phones and 6 keys for the 8028/29 phones).
Call Dial the number directly or dial the number after pressing a line key (an off-hook key phone or Bluetooth handset, hands-free key) Call by name (Company directory) RCE - Enter the first letters of contact's name and follow the on-screen instructions. OTCT - Enter the name, contact’s surname/name or initials and follow the on-screen instructions.