OmniAccess 3500 Nonstop Laptop Guardian Release 1.2 Gateway Installation Guide Document Version: 25.05 Part Number: 060227-10 Rev C Published: 12.19.
Alcatel-Lucent Proprietary Copyright © 2007 Alcatel-Lucent. All rights reserved. This document may not be reproduced in whole or in part without the express written permission of AlcatelLucent. Alcatel-Lucent ® and the Alcatel-Lucent logo are registered trademarks of Alcatel-Lucent. All other trademarks are the property of their respective owners.
Table of Contents Chapter 1. Introduction ............................................................................ 1 Contacting Technical Support .................................................................. 1 Chapter 2. Safety Information .................................................................... 2 Chapter 3. Hardware Overview ................................................................... 4 Front Panel .................................................................................
Non-Operating Temperature............................................................... 40 Non-Operating Humidity ................................................................... 40 Operating Shock ............................................................................. 40 Shock, Unpackaged.......................................................................... 40 Shock, Packaged ............................................................................. 40 Vibration, Unpackaged ...............
Chapter 1. Introduction Chapter 1. Introduction The OmniAccess 3500 Nonstop Laptop Guardian (NLG) gateway is the server component of the OmniAccess 3500 NLG platform. The gateway terminates the secure tunnels initiated by the OmniAccess 3500 NLG cards, manages user credentials and security policies, and provides storage and file-transfer capabilities in support of thirdparty remote-access and device-management applications.
OmniAccess 3500 Nonstop Laptop Guardian Gateway Installation Guide Chapter 2. Safety Information When installing, operating, or maintaining this equipment, basic safety precautions should always be followed to reduce the risk of fire, electric shock, and injury to persons, including the following: • Read and understand all instructions contained in this guide. • Handle this product in conformity with the applicable building code.
Chapter 2. Safety Information o If the product has been exposed to rain or water. o If the product does not operate normally by following the operating instructions. Adjust only those controls that are covered by the operating instructions. o If the product has been dropped or the cabinet has been damaged. o If the product exhibits a distinct change in performance.
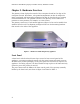
OmniAccess 3500 Nonstop Laptop Guardian Gateway Installation Guide Chapter 3. Hardware Overview The gateway is best deployed as a stub of the enterprise firewall at the edge of the enterprise network. Alternative, sub-optimal arrangements can also be adopted to match topological and functional peculiarities that may be found in the pre-existing network infrastructure. The physical location of the gateway can be either intrapremises or extra-premises (for example, in a data center).
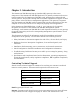
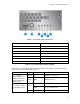
Chapter 3. Hardware Overview Figure 2: View of the front control panel Item Feature A USB 2.0 Port (not used) B Power Button C System Status (not used) D System Power LED E Hard Disk Drive Activity LED F Public Network Interface (WAN) LED G Private Network Interface (LAN) LED Table 1: Front control panel buttons and LEDs The function of the LEDs on the front control panel of the gateway (normally hidden by the front bezel) is described in Table 2.
OmniAccess 3500 Nonstop Laptop Guardian Gateway Installation Guide C — System Status (on standby power) E — Disk Activity Status LED is not used Green Random blink HDD access Off Off No hard disk activity Table 2: Function of the front control panel LEDs Back Panel The connectors and data ports on the back panel of the gateway are shown in Figure 3 and listed in Table 3. The WAN and LAN interfaces are labeled on the back panel for immediate identification.
Chapter 4. Installation Chapter 4. Installation Installing the gateway requires two people. To prevent damage to components from electrostatic discharge, always follow the proper guidelines for equipment handling and storage. Caution: In order to reduce the static potential, any person installing, removing, or handling the gateway should be properly grounded through the use of an approved antistatic wrist strap.
OmniAccess 3500 Nonstop Laptop Guardian Gateway Installation Guide • AC power cord • Two side-mount brackets • Mid-point mounting brackets • Wrist strap • Hard copy of the OmniAccess 3500 Nonstop Laptop Guardian Release 1.2 Gateway Quick Start Guide. Unpacking the Appliance To protect the gateway components from electrostatic discharge (ESD) and physical damage, read all the following instructions carefully before beginning.
Chapter 4. Installation Mounting in a Four-Post Rack System Refer to the guidelines below to install the gateway appliance in a 4-post 19” rack. REMOVE THE APPLIANCE HANDLES 1. Remove two screws (Figure 4) from each handle. 2. Set the handles and screws aside for reattachment later.
OmniAccess 3500 Nonstop Laptop Guardian Gateway Installation Guide ATTACH BRACKETS TO APPLIANCE 1. Place an appliance bracket along one side of the appliance in the front-mount position (Figure 5, A). 2. Align the holes (B) in the bracket with the tabs (C) on the appliance and place the bracket against the appliance. 3. Slide the bracket as far as it will go toward the front of the appliance. 4. Fasten the bracket to the appliance using screw (D). 5.
Chapter 4. Installation ATTACH DISKS TO APPLIANCE 1. Place an appliance disk at the side of the appliance towards the rear (see Figure 6, A). 2. Install screw (B) and tighten. 3. In the same manner, attach an appliance disk to the opposite side of the appliance.
OmniAccess 3500 Nonstop Laptop Guardian Gateway Installation Guide ATTACH BRACKETS TO REAR POSTS 1. Attach a nut bar (Figure 7, C) on the inside of the two rear rack posts using screws (A). Do not completely tighten the screws—leave them loose enough to allow insertion of the brackets in step 2. 2. Insert the slotted foot of a rear bracket (B) between each nut bar and post. 3. Align the face of the bracket foot with the edge of the rack post and firmly tighten the screws.
Chapter 4. Installation INSTALL APPLIANCE IN RACK Caution: Lifting the appliance and attaching it to the rack is a two-person job. If needed, use an appropriate lifting device. 1. With the appliance front facing you, lift the appliance and position the appliance disks (Figure 8, A) so they fit in the rear brackets (B).). Figure 8: Installing the appliance in the rear brackets 2. Slide the appliance toward the rear of the rack until the front of the appliance brackets contact the front posts.
OmniAccess 3500 Nonstop Laptop Guardian Gateway Installation Guide 3. Attach the appliance brackets (Figure 9, A) to the front posts (B) using two screws (C) and one nut bar (D) per side.
Chapter 4. Installation INSTALL APPLIANCE HANDLES NOTE: The handles are required to hold the bezel on. If you will not be installing a bezel, you do not need to install the handles. 1. Slide a handle (Figure 10, A) between the appliance and the appliance bracket. 2. Align the hole in the handle with the unused hole in the appliance bracket. 3. Install a spacer (B) between the handle and the appliance bracket. 4. Install and tighten screw (C) to secure the handle. 5.
OmniAccess 3500 Nonstop Laptop Guardian Gateway Installation Guide Mid-Mounting in a Two-Post Rack System Refer to the guidelines below to mid-mount the gateway appliance in a 2-post 19” rack. REMOVE THE APPLIANCE HANDLES 1. Remove two screws (Figure 11) from each handle. 2. Save the handles and screws for possible future reattachment. You will not reattach them as part of this process.
Chapter 4. Installation ATTACH BRACKETS TO APPLIANCE 1. Place a mounting bracket (Figure 12, A) along one side of the appliance in the midmount position. 2. Align the holes (B) in the bracket with the tabs (C) on the appliance and place the bracket against the appliance. 3. Slide the bracket as far as it will go toward the front of the appliance. 4. Fasten the bracket to the appliance using screw (D). 5. In the same manner, attach a bracket to the other side of the appliance.
OmniAccess 3500 Nonstop Laptop Guardian Gateway Installation Guide ATTACH L BRACKETS TO CENTER POSTS 1. Position an L bracket (Figure 13, A) on the backside of the center post (C). 2. Attach the L bracket to the center post using the screws (B) supplied with your rack. Do not fully tighten at this time. 3. In the same manner, attach an L bracket to the other center post.
Chapter 4. Installation INSTALL APPLIANCE IN RACK Caution: Lifting the appliance and attaching it to the rack is a two-person job. If needed, use an appropriate lifting device. 1. Locate one person at the front of the rack and one at the rear. 2. Position the appliance so that the L brackets (Figure 14, A) are inserted into the appliance mounting brackets (B). 3. While supporting the weight of the appliance, adjust the L brackets to fit tightly into the appliance brackets (C).
OmniAccess 3500 Nonstop Laptop Guardian Gateway Installation Guide Figure 15: Installing the appliance in the rack You have completed the mid-mount installation of your appliance in a two-post rack system. Front-Mounting in a Two-Post Rack System Refer to the guidelines below to front-mount the gateway appliance in a 2-post 19” rack. WARNING: Your appliance’s rack mount kit provides the option for mounting the system in a two post front-mount-only configuration.
Chapter 4. Installation REMOVE THE APPLIANCE HANDLES 1. Remove two screws from each handle (see Figure 16). 2. Set the handles and screws aside for reattachment later.
OmniAccess 3500 Nonstop Laptop Guardian Gateway Installation Guide ATTACH BRACKETS TO APPLIANCE 1. Place a mounting bracket (Figure 17, A) along one side of the appliance in the front-mount position. 2. Align the holes (B) in the bracket with the tabs (C) on the appliance and place the bracket against the appliance. 3. Slide the bracket as far as it will go toward the front of the appliance. 4. Attach the bracket to the appliance using screw (D). 5.
Chapter 4. Installation ATTACH L BRACKETS TO CENTER POSTS 1. Position an L bracket (Figure 18, A) on the backside of the center post (C). 2. Attach the L bracket to the center post using the screws (B) supplied with your rack. Do not fully tighten at this time. 3. In the same manner, attach an L bracket to the other center post.
OmniAccess 3500 Nonstop Laptop Guardian Gateway Installation Guide INSTALL APPLIANCE IN RACK Caution: Lifting the appliance and attaching it to the rack is a two-person job. If needed, use an appropriate lifting device. 1. Locate one person at the front of the rack and one at the rear. 2. Position the appliance so that the L brackets (Figure 19, A) are inserted into the appliance mounting brackets (B). 3.
Chapter 4.
OmniAccess 3500 Nonstop Laptop Guardian Gateway Installation Guide INSTALL APPLIANCE HANDLES Note: The handles are only required to hold the bezel on. If you will not be installing a bezel, you do not need to install the handles. 1. Slide a handle (Figure 21, A) between the appliance and the appliance bracket. 2. Align the hole in the handle with the unused hole in the appliance bracket. 3. Install a spacer (B) between the handle and the bracket. 4. Install and tighten screw (C) to secure the handle. 5.
Chapter 4. Installation Power Supply Connections Take the power cord that comes with the unit and connect it to the power supply connector on the back. Data Connections The network and management cables should be connected once the gateway is properly installed. Connections may include: • One Ethernet connection exchanging traffic with the public Internet via the enterprise firewall (WAN interface, item D in Figure 3).
OmniAccess 3500 Nonstop Laptop Guardian Gateway Installation Guide Chapter 5. Initial Configuration The initial configuration of the gateway is driven by the deployment scenario and by the network architecture. Please refer to the OmniAccess 3500 Nonstop Laptop Guardian Technical Overview document for more information on possible deployment scenarios.
Chapter 5. Initial Configuration 3. Router Configuration — Add a static route to the enterprise router adjacent to the gateway for every pool of VPN addresses that you allocate for the laptops and cards (see the description of the Card/Laptop Address Range/Mask parameters in the Configuration of Basic Parameters section below). 4.
OmniAccess 3500 Nonstop Laptop Guardian Gateway Installation Guide command, the name must be written entirely in lowercase letters (guard1.evros.sample-net.com in the example). o evros.sample-net.com — The full domain name served by the AD instance, also referred to as the Kerberos realm. In the –princ declaration of the ktpass command, the name must be written entirely in uppercase letters (EVROS.SAMPLE-NET.COM in the example).
Chapter 5. Initial Configuration o The DNS name of the gateway and the ADS that generates the keytab file may belong to different DNS domains. DNS Configuration A split DNS configuration must be applied to the DNS server of your network for resolution of the gateway’s FQDN.
OmniAccess 3500 Nonstop Laptop Guardian Gateway Installation Guide 6. Browse to the appropriate files in the file system of your computer to fill out the following fields: o Keytab File: File containing the credentials of the gateway for its authentication with the Active Directory server. o CA Certificate: Digital certificate of the Certificate Authority, which includes the CA’s public key and digital signature. The same CA certificate is installed in the OmniAccess 3500 NLG cards.
Chapter 5. Initial Configuration o Gateway FQDN: Fully Qualified Domain Name (FQDN) of the gateway. o WAN Interface IP: IP address assigned to the WAN interface of the gateway. The WAN interface is connected to a public subnet. o WAN Interface Netmask: Network mask for identification of the public subnet of attachment of the WAN gateway interface. o WAN Interface Next-hop Router: IP address of the next-hop-router within the public subnet of attachment of the WAN gateway interface.
OmniAccess 3500 Nonstop Laptop Guardian Gateway Installation Guide o User Authentication Type: Method used for authentication of the end users. Possible values are , , and . If is selected, the end users will be authenticated using KDC. With the other two values, a RADIUS server will authenticate the end users.
Chapter 5. Initial Configuration the Active Directory server, the Active Directory server typically acts as the primary NTP server for the OmniAccess 3500 NLG gateway. o Secondary NTP Server: IP address of the secondary NTP server (optional). SMTP Settings o SMTP Access Type: Settings for the Simple Mail Transfer Protocol (SMTP) server used for the exchange of emails to and from the OmniAccess 3500 NLG gateway.
OmniAccess 3500 Nonstop Laptop Guardian Gateway Installation Guide o Read Community: This string is used for SNMP authentication and is similar to a password used by the SNMP clients to access information. If an SNMP Client uses a Read Community, it is allowed read-only access to the Information. It is recommended that the Read Community and Read-Write Community strings are different. o Confirm Read Community: Re-type the Read Community string in this field.
Chapter 5. Initial Configuration on the [Connection Manager Tunnel Table (Add)] window, reachable through the [Gateway|Configure Advanced Settings|Tunnel Table|New] path. o Gateway Certificate ID: Identifier of the certificate that the OmniAccess 3500 NLG gateway uses for mutual authentication with the OmniAccess 3500 NLG cards. This entry must be set when the gateway is first configured.
OmniAccess 3500 Nonstop Laptop Guardian Gateway Installation Guide To access the management system GUI, open your web browser (any type will work) at the HTTPS URL that you have configured for the gateway (FQDN or LAN interface IP address; please note that HTTP won’t work). The management system GUI login screen appears (Figure 26). Figure 26: Management system GUI login screen You will be prompted for the Admin ID and the Password.
Chapter 6. Troubleshooting Chapter 6. Troubleshooting This chapter helps you identify and solve problems that might occur while you are using the gateway. Resetting the System Before going through in-depth troubleshooting, attempt first to reset your system using one of the methods below. To do this…. Press… Cold boot reset. Turn the system power off and then on.
OmniAccess 3500 Nonstop Laptop Guardian Gateway Installation Guide Chapter 7. Specification and Compliance Data This section provides detailed specifications and compliance information for the gateway. Physical Specifications Dimensions Height: 1.67” (4.24 cm) Width: 16.930” (43 cm) Depth: 20” (50.8 cm) Maximum weight: approx. 33 lb (15 kg).
Chapter 7.
OmniAccess 3500 Nonstop Laptop Guardian Gateway Installation Guide • GOST R 50628-95 Immunity (Russia) • Belarus License (Belarus) • Ukraine License (Ukraine) • RRL MIC Notice No. 1997-41 (EMC) & 1997-42 (EMI) (Korea) • GB 9254 - CNCA Certification (China) • GB 17625 - (Harmonics) CNCA Certification (China) Electromagnetic Compatibility Notice This platform complies with Part 15 of the FCC Rules.
Chapter 7. Specification and Compliance Data • This device complies with Part 15 of the FCC Rules. Operation is subject to the following two conditions: (1) This device may not cause harmful interference, and (2) this device must accept any interference received, including interference that may cause undesired operation.
OmniAccess 3500 Nonstop Laptop Guardian Gateway Installation Guide These terms, conditions, and warranties apply unless Customer has signed a separate purchase agreement or Statement of Work (SOW), in which case the separate agreement or SOW shall govern. All software sold by Alcatel-Lucent is subject to the license agreement included with the software package. Opening the software package or breaking the seal subjects Customer to the terms of the license agreement.