
User Guide


OmniAccess 3500 Nonstop Laptop Guardian Administration Guide
o Confirm Password — Confirmation replica of the SMTP password.
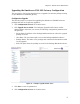
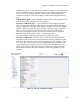
o SNMP Enable — The OmniAccess 3500 NLG gateway offers MIB-II support for its
native functional components (i.e., components that are not part of the
OmniAccess 3500 NLG platform). If the <SNMP Enable> option is set, it is
possible to use a third-party network management system to manage and
monitor the MIB-II objects of the gateway through SNMP.
o Port Number — Port over which the third-party network-management system
can exchange get and set SNMP messages with the OmniAccess 3500 NLG
gateway for retrieving and setting the values of the MIB-II objects. The port
number is typically 161, but the administrator can change it for security
purposes.
o Trap Port Number — Port over which the third-party network management
system can receive the trap messages generated by the OmniAccess 3500 NLG
gateway. The port number is typically 162, but the administrator can change it
for security purposes.
o Read Community — This string is used for SNMP authentication and works like a
password that any remote SNMP client must use when accessing objects of the
gateway MIB in read-only mode.
o Confirm Read Community — Confirmation replica of the read community
string.
o Read-Write Community — This string is used for SNMP authentication and
works like a password that any remote SNMP client must use when accessing
objects of the gateway MIB in read-write mode. It is recommended to setup
different values for the read community string and for the read-write
community string.
o Confirm Read-Write Community — Confirmation replica of the read-write
community string.
o HTTPS Port — The port on which you can securely access the management
system GUI from a web browser. The default value is <443>, in which case you
don't have to specify the port in the URL. If you set a different port, you will
have to use the port number in the URL while accessing the management
system. For example, if you specify the HTTPS port as <8443>, and the address
of the LAN interface (accessible from within the enterprise network) is
<10.1.1.1>, then you can open the management system GUI by typing the
following URL in the address box of your browser: <https://10.1.1.1:8443>.
o Card Address Range — IP address pool for assignment to the cards when they
connect to the gateway. This entry must be filled with one address range when
the gateway is first configured. Later on, the editing of the initial card address
range or the introduction of new address ranges must be executed on the
[Gateway Configure-> Address Pool Information] window, reachable through
the [Gateway|Configure Advanced Settings|Address Pool] path.
o Card Address Mask — Network mask for identification of the card address pool
set upon initial configuration of the gateway.
o Laptop Address Range — IP address pool for assignment to the laptop when the
corresponding Card connects to the gateway. This entry must be filled with one
82