Table of Contents 1 2 3 4 Your mobile............................................................. 5 1.1 Keys and connectors .......................................... 5 1.2 Getting started ................................................... 8 1.3 Home screen ...................................................... 13 Phone ......................................................................15 2.1 Making a call ....................................................... 15 2.
4.2 Send a multimedia message ............................ 22 4.3 How to type a message ..................................... 22 4.4 Settings ............................................................. 23 5 Email ......................................................................24 6 Camera ..................................................................25 6.1 Camera .............................................................. 25 6.2 K\WXb$$$$$$$$$$$$$$$................................
13 Calculator .............................................................35 14 FM Radio ................................................................36 15 Settings .................................................................37 15.1 Network & connectivity .................................... 37 15.2 Personalization .................................................. 41 15.3 Privacy & security .............................................. 44 15.4 Storage .....................................
www.sar-tick.com This product meets applicable national SAR limits of 2.0 W/kg. The specific maximum SAR values can be found on Radio waves section. When carrying the product or using it while worn on your body, either use an approved accessory such as a holster or otherwise maintain a distance of 15 mm from the body to ensure compliance with RF exposure requirements. Note that the product may be transmitting even if you are not making a phone call.
1 Your mobile .................................. 1.
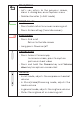
Camera Headset Jack Camera key Sub screen Volume Charging Port OK OK Confirm an option (press the middle of the key) Press: Access app list (Home screen) Navigation Press up, down, left or right to navigate Messages Press: Access Messages app 6
Back/Clear Let's bg return to the previous screen, close a dialog box, or exit options menu Delete character (In Edit mode) Call/Answer Press to dial call or to answer incoming call.
1.2 1.2.
Removing or installing battery Inserting or removing the Nano SIM card and microSD You must insert your Nano SIM card to make phone calls using your network.
SIM card Plastic clips To insert Nano SIM or microSD card, push the Nano SIM or microSD card into the corresponding card slot with the gold#connector facing down. To remove f[X SIM or microSD card, push down ba the plastic V_\c _bVTfXW gaWXe VTeW and pu [ the SIM or cg__ microSD card out. Your phone only supports Nano SIM card. Do not attempt to insert Mini or Micro SIM card sizes or you may damage your phone.
Charging battery Insert the smaller end of the charger into the device charging port, and plug the charger into an electrical outlet. 1.2.2 Power on your phone Long press the End/Power key until the phone powers on, Home screen will be displayed. If screen lock is set up, enter pass code to access Home screen. If you don't know your pass code or if you have forgotten it, contact your service provider.
Set up your phone for the first time Use the Navigation key f[X OK key OK . to select a language and press Welcome page will be displayed, press the Right Menu key to select Next. Keypad Introduction, Softkeys and Change Text Input Method tip pages will be displayed, press f[X Right Menu ^X to select Next and continue to next screen. Use the Navigation key to select Wi-Fi, if applicable.
1.2.3 Power off your phone Long press the End/Power key. 1.3 Home screen Status/Notifications Bar Displays Status and Notification indicators. Time Date Speed Dial 1-button dial T \ZaXW VbafTVf " ceX f[X G^\]i BZcj ^X fb TVVX . Notices Displays all Notices! ceX f[X AZ[i BZcj ^X fb TVVX . Apps (Applications) List :\ c_T T__ Tcc " ceX f[X D@ ^X fb TVVX $ OK Key Pres fb TVVX 7cc B\ f be Ta bcf\ba W\ c_T XW$ 13
1.3.1 Status bar From the status bar, you can view both f[X phone status (to the right side) and f[X notification information (to the left side).
1.3.2 Change home screen wallpaper From the Home screen, press the OK key OK , select Settings icon and then press the Navigation key to the right to select Personalization. Press the Navigation key and select Display > Wallpaper. Select Wallpaper, Gallery or Camera and press f[X OK key OK to enter option. When browsing Wallpaper or Gallery options, select Ta image and press f[X OK key OK or the Right Menu key to Save.
International call To dial an international call, select f[X Phone app , then press and hold to enter “+” in dial screen, then enter the international country prefix followed by the full phone number and finally press the Call/Answer key . Emergency call Ib `T^X Ta emergency VT__" W\T_ f[X X`XeZXaV ag`UXe TaW ceX f[X Call/Answer key . This works even without a SIM card, requires network coverage. 2.
2.3 Calling your voicemail (1) key to set up voicemail or Press and hold f[X ®®eXh\Xi voicemail messages. Follow the prompts to set up your voicemail account or baVX Xf gc" fb _\ fXa fb voicemail `X TZXs. 3 Contacts................................ 3.1 Consult your Contacts Contacts app provides quick and easy access to your stored contacts. You can access this app by pressing the OK key OK from the Home screen, then selecting the Contacts app pressing f[X OK key OK .
3.2 Adding a contact In contacts list screen, press the Left Menu key to access New Contact screen and enter contact details. Press f[X Navigation key down to access next contact information category. When finished, press the Right Menu key to save. 3.3 Editing your contacts In contacts list screen, select contact and press the Right Menu key to access Options, select Edit Contact, and press the OK key OK to edit.
When finished editing, press the Right Menu key To cancel edit mode, press Left Menu key exit. to save. to cancel and 3.4 Deleting a contact In contacts list screen, press the Right Menu key to access Options, then select Delete contact, and press the OK key OK . A confirmation page will be displayed, press the Right Menu key to delete.
3.5 Sharing your contacts You can share a single contact with others by sending the contact's vCard via E mail, Messages, or Bluetooth. Select a contact you want to share, press the Right Menu key to access Options, then select Share and press f[X OK key OK . Select Share with option: E-mail, Messages, or Bluetooth and follow f[X option prompts. 3.6 Additional options From the contact list, you can access the following options: Call Make a call to the selected contact.
4 Messages............................... Use the Messages app to send and receive text (SMS) and multimedia (MMS) messages. 4.1 Write message From the Home screen, press the OK key OK , select and press f[X OK key OK or Messages app ceX f[X BZhhV\Zh ^X on the device keypad to _TgaV[ BZhhV\Zh app. Press the Left Menu key to write a new message.
An SMS of more than 160 characters will be counted as an additional SMS. Specific letters or characters will also increase the size of the SMS. This may cause multiple SMS to be sent to your recipient. 4.2 Send a multimedia message CC XaTU_X bg fb XaW h\WXb V_\c " \`TZX " c[bfb " VbafTVf TaW bgaW U ceX \aZ f[X G^\]i BZcj ^X fb TVVX Dei^dch$ DXjf X_XVf 7WW 7ffTV[`Xaf" ceX f[X D@ ^X EA TaW X_XVf Yeb` K\WXb" Cg \V" =T__Xe " 9bafTVf be 9T`XeT$ X_XVf \`TZX%
Note: Use T9 input method to quickly type words. To turn T9 option ON select Settings > Personalization > Input Methods > Use T9 > On. Once activated T9 will be available under input options when pushing . To deactivate T9 select Settings > Personalization > Input Methods > Use T9 > Off. 4.4 Settings In the BZhhV\Zh app screen, press the Right Menu key to access Options > select Settings and press f[X D@ key OK to view the following options: Auto Retrieve Messages Select Dc l^i]dji gdVb^c\
5 Email....................................... Ib access the :bV^a app ceX the OK key OK Yeb` f[X Home screen, select :bV^a app and press f[X OK ^X $ An email wizard will guide you through the steps to set up an email account. Welcome screen will display, press the Right Menu key to select Next. Then enter the name, email address and password of the account you would like to set up. to access Next and set up Press the Right Menu key account.
If you do not want to send the email right away, you can press the Right Menu key and select Save as draft or touch the Back to save a copy. 6 Camera................................... Your phone features a 8VbZgV app to take photos and eXVbeW videos. 6.1 Camera To access the 8VbZgV app, press the OK key OK from the Home screen, select the 8VbZgV app and press f[X OK key OK .
Options Press the G^\]i BZcj key Self Timer to access: Sets the time a photo is taken after pressing the OK key OK or f[X Camera key . Grid Adds grid lines to photo screen to help take better photos by using grid lines to align photo image. Gallery Select Go to Gallery Application to view photos previously taken. Modes Select to switch between Photo and Video Mode. 6.2 K^YZd To shoot a video Zoom in/out Press the Navigation key down to zoom lens in and out.
7 Gallery.................................... The Gallery app provides you with one location to view and organize all your saved photos. The Gallery app also offers additional photo options. To access the
Gallery app photo options When viewing photos in f[X
Individual photo view options When previewing an individual image in f[X
9 Music....................................... Use the Bjh^X app to play music files stored on your phone. Music files can be downloaded from your computer to your phone using a USB cable. To access the Bjh^X app, press the OK key OK from the Home screen, select f[X Music app and press f[X OK key OK . 10 Browser................................ Use the 7gdlhZg app to navigate the Web. To access the 7gdlhZg app, press the OK key OK from the and press OK key OK .
11 Calendar............................... Use the 8VaZcYVg app, to keep track of important meetings, appointments, etc. To access the 8VaZcYVg app, press the OK key OK from the Home screen, select f[X Calendar app and press f[X OK key OK . 11.1 Multimode view You can display the Calendar in Day, Weekly, or Month view. Press the Right Menu key to change your Calendar view. Day view Weekly view Month view 11.2 To create new events Press the Left Menu key Calendar view.
Fill in new event information. If it is a whole-day event, you can select All-day Event. When finished, press the Right Menu key to save. More Options are available by pressing the Right Menu key from the Calendar main screen: Go to date J X fb Zb fb ceXYXeeXW date. Search SearchX scheduled events. Calendar to Display :\ c_T phone calendar or another account if added. Sync calendar ync calendar. Settings Xf a series of Calendar settings. 11.
12 Alarm .................................... Your mobile phone features an 6aVgb app with an Alarm, Timer and Stopwatch function. To access the 6aVgb app, press the OK key OK from the Home screen, select f[X Alarm app and press f[X OK key OK . 12.1 Alarm To set an alarm From the Alarm screen, press the Left Menu key a new alarm. The following options will appear: to TWW Time Press to set the alarm time. Repeat Select the days you want your alarm to go off.
Edit Press to edit alarm. Delete Press to delete alarm. Settings Press to set snooze time, volume, vibration and sound. 12.2 Timer From the Alarm screen, press the right side of f[X Navigation key to enter the Timer screen. Press the OK key OK to edit hour, minute and second, when finished, press f[X OK key OK to select and start timer. When the Timer is ongoing press f[X D@ key and pause timer. When the Timer is paused press f[X D@ key and continue timer.
When the Stopwatch is ongoing press f[X D@ key select to pause the time. When the Stopwatch is paused press D@ key select TaW Vbaf\agX f[X fbfT_ f\`X$ OK OK to to When Stopwatch is paused press the Left Menu key reset the stopwatch and clear lap times. to 13 Calculator............................ With the 8VaXjaVidg app, you can solve many mathematical problems. To access this app, press the OK key OK from the Home screen, select f[X Calculator app and press the OK key OK .
Enter the numbers using the keypad. Select the mathematical operation to be performed using the CVk^\Vi^dc key , follow f[X onscreen guide for each navigation direction and the corresponding mathematical operation. Press the D@ key OK fb X_XVf XdgT_ 3 TaW ZXf eX g_f $ 14 FM Radio............................... Your phone is equipped with a radio(1) with RDS(2) functionality.
Press the left/right side of f[X Navigation WXVeXT X%increase 0.1MHz. ^X to Long press the left/right side of f[X Navigation ^X to XTeV[ and go to the nearest lower/higher frequency channel. to access Dei^dch, select Yeb` Press the Right Menu key 7WW to favorites, Edit favorites or Switch to speaker/earphone. Favorite channels will have red start added and will be displayed in f[X channel list for easy access. 15 Settings................................ To access the HZii^c\h app, press the OK key t
International data roaming If you don’t need to transmit data on other operators’ mobile networks, disable Data roaming to avoid incurring significant roaming charges. Enhanced LTE Press to enable enhanced LTE. 15.1.3 Geolocation KaiOS uses GPS, and additional supplemental information such as Wi-Fi and mobile networks to approximate your location. Location data may be used by KaiOS and service providers to improve accuracy and coverage of the location databases. 15.1.
15.1.6 Calling Settings DTMF tones Dual Tone Multi-Frequency, or DTMF is a method for instructing a telephone switching system of the telephone number to be dialed, or to issue commands to switching systems or related telephony equipment. Press to set DTMF tones to normal or long. Call waiting Press to enable or disable call waiting. Caller ID Press to Xf [bi bge c[baX ag`UXe \ W\ c_T XW i[Xa `T^\aZ T VT__1 aXfibe^ WXYTg_f, hide number or show number.
WAP push Mark the checkbox to enable receipt of push messages from network. Service center :\ c_T f[X service center number '#)'(#)'*#/.'&. 15.1.8 Internet Sharing USB tethering USB tethering can share your phone's Internet connection with a single USB-connected device. Press to turn f[X USB tethering On. Note: Turning USB tethering Ea will automatically turn off Wi-Fi network. 15.1.9 Emergency Alert Alert inbox Press to view Alert message in f[X alert box.
Extreme alert Mark the checkbox to enable f[X extreme alert. Severe alert Mark the checkbox to enable f[X severe alert. AMBER alert Mark the checkbox to enable f[X amber alert. 15.2 Personalization 15.2.1 Sound Volume Press to set f[X volume for Media, Rightones & Notifications and Alarm. Tones Press to set Vibrate, Ringtones, Alerts, or to Manage Tones.
15.2.2 Display Wallpaper Press to select f[X wallpaper from available wallpapers, gallery or to use camera to take c[bfb. Brightness Press to set the level of brightness. Screen Timeout Press to set f[X screen timeout time. 15.2.3 Search Search engine Press to select f[X preferred default search engine. Select from: Yahoo, Google, Bing or DuckDuckGo. Search suggestions Press to enable or disable f[X search suggestions. 15.2.
Time Select to manually set the phone's time. Time zone Select to manually set the phone's timezone. Format Press to select 12-hour clock format or 24-hour clock format. Home Screen Clock Select whether to show or hide f[X clock on home screen. 15.2.6 Language Press to select f[X preferred language, English or Spanish. 15.2.7 Input methods Use T9 Select to turn f[X T9 En or Eff. Input Languages Press to select f[X input languages. 15.2.8 Answer mode Press to enable f[X flip to answer.
15.3 Privacy & security 15.3.1 Screen lock Screen lock allows you to set a 4-digit pass code which protects your phone information, if lost or stolen. Your phone will ask for f[X pass code entry in order to access device. 15.3.2 SIM Security A SIM PIN prevents access to the SIM card cellular data networks. When it's enabled, any device containing the SIM card will request the PIN upon restart. A SIM PIN is not the same as the screen lock pass code used to unlock the device. 15.3.
15.4 15.4.1 Storage USB storage Enabling USB storage allows another computer or device connected using USB to access files on this phone. 15.4.2 End user storage Use these settings to monitor the total and available space on your phone. 15.5 15.5.
9Zk^XZ GZhZi FeX fb XeT X T__ WXh\VX VbaY\ZgeTf\ba TaW Xff\aZ $ CZildg` HZii^c\h GZhZi FeX fb XeT X T__ WXh\VX aXfibe^ VbaY\ZgeTf\ba Xff\aZ $ 15.5.2 Downloads Press to view downloads. 15.5.3 Battery 8jggZci AZkZa Press to view current battery level or to set f[X power saving mode. EdlZg HVk^c\ BdYZ Turning power saving mode En will turn off the phone's data, Bluetooth and Geolocation connections to extend battery life.
AVg\Z IZmi FeX fb fgea f[X _TeZX fXjf Ea%EYY$ Captions Press to fgea f[X captions for phone screen Ea%EYY. Readout Readout mode function reads f[X labels of interface elements and providers sound response. Mono audio Press to turn f[X mono audio Ea%EYY. Volume balance Press to set f[X volume balance value. Keypad vibration Press to fgea f[X keypad vibration Ea%EYY. TTY TTY mode can be used by people who are deaf, have poor hearing or speech impairments.
15.6 Account manager Use the settings to add, remove, be manage your email and other supported accounts. 15.6.1 KaiOS Account Setup a KaiOS Account to use Anti-Theft option that remotely locks device or wipes all personal information in event of loss or theft. To create account: Select KaiOS Account. Press the OK key Right Menu key to Create Account then press the to select Accept. OK Enter your email and press Down on the Navigation key .
BV`Z G^c\ FeX fb [ThX Taf\#f[XYf `T^X bge c[baX e\aZ Ybe _bVTf\aZ$ GZbdiZ AdX` FeX fb _bV^ bge c[baX \Y _b f$ GZbdiZ L^eZ FeX fb i\cX T__ c[baX cXe baT_ WTfT \Y _b f$ 16 Making the most out of your phone........................................... 16.1 Upgrade You can use the Over-the-air Upgrade tool to update your phone's software. 16.1.1 Over-the-air Upgrade Using the Over-the-air Upgrade tool you can update your phone's software.
17 Safety information..................... We recommend that you read this chapter carefully before using your device. The manufacturer disclaims any liability for damage, which may result as a consequence of improper use or use contrary to the instructions contained herein. TRAFFIC SAFETY Given that studies show that using a device while driving a vehicle constitutes a real risk, even when the hands-free kit is used (car kit, headset...
When the device is switched on, it should be kept at least 15 cm from any medical device such as a pacemaker, a hearing aid or insulin pump, etc. In particular when using the device, you should hold it against the ear on the opposite side to the device, if any. To avoid hearing impairment, move the device away from your ear while using the "hands-free" mode because the amplified volume might cause hearing damage.
PRIVACY Please note that you must respect the laws and regulations in force in your jurisdiction or other jurisdiction(s) where you will use your device regarding taking photographs and recording sounds with your device. Pursuant to such laws and regulations, it may be strictly forbidden to take photographs and/or to record the voices of other people or any of their personal attributes, and duplicate or distribute them, as this may be considered to be an invasion of privacy.
Batteries must be disposed of in accordance with locally applicable environmental regulations. Only use the battery for the purpose for which it was designed. Never use damaged batteries or those not recommended by TCL Communication Ltd. and/or its affiliates. This symbol on your device, the battery and the accessories means that these products must be taken to collection points at the end of their life: - Municipal waste disposal centers with specific bins for these items of equipment.
Federal Communications Commission (FCC) Declaration of Conformity This device complies with part 15 of the FCC Rules. Operation is subject to the following two conditions: (1) This device may not cause harmful interference, and (2) this device must accept any interference received, including interference that may cause undesired operation. Changes or modifications not expressly approved by the party responsible for compliance could void the user‘s authority to operate the equipment.
During SAR testing, this is set to transmit at its highest certified power level in all tested frequency bands, and placed in positions that simulate RF exposure in usage near the body with the separation of 15 cm. Although the SAR is determined at the highest certified power level, the actual SAR level of the device while operating can be well below the maximum value. This is because the device is designed to operate at multiple power levels so as to use only the power required to reach the network.
Body-worn SAR testing has been carried out at a separation distance of 15 mm. To meet RF exposure guidelines during body-worn operation, the device should be positioned at least this distance away from the body. If you are not using an approved accessory ensure that whatever product is used is free of any metal and that it positions the device the indicated distance away from the body.
You can access, review and edit your personal information at any time by logging into your user account, visiting your user profile or by contacting us directly. Should you require us to edit or delete your personal data, we may ask you to provide us with evidence of your identity before we can act on your request. Licenses microSD Logo is a trademark. The Bluetooth word mark and logos are owned by the Bluetooth SIG, Inc. and any use of such marks by TCL Communication Ltd.
Manufacturer: TCL Communication Ltd. 5/F, Building22E, Science Park West Avenue, Hong Kong Science Park, Pak Shek Kok, Hong Kong. An electronic version of this user guide is available in English and other languages according to availability on our website: http://www. alcatelonetouch.us . Your device is a transceiver that operates on Wi-Fi with 2.4GHz and Bluetooth with 2.4GHz. Battery Recycling (USA & Canada): Alcatel partners with Call2Recycle® to offer a safe and convenient battery recycling program.
All third party materials in this device are provided "as is", without warranty of any kind, whether express or implied, including the implied warranties of merchantability, fitness for a particular purpose or use/third party application, interoperability with other materials or applications of the purchaser and non-infringement of copyright. The purchaser undertakes that TCL Communication Ltd.
19 Warranty...................................... Your device is warranted against any defect or malfunctioning which may occur in conditions of normal use during the warranty period of twelve (12) months(1) from the date of purchase as shown on your original invoice. Batteries(2) and accessories sold with your device are also warranted against any defect which may occur during the first six (6) months(1) from the date of purchase as shown on your original invoice.
4) Modification, adjustment or alteration of software or hardware performed by individuals not authorized by TCL Communication Ltd.; 5) Inclement weather, lightning, fire, humidity, infiltration of liquids or foods, chemical products, download of files, crash, high voltage, corrosion, oxidation… Your device will not be repaired if labels or serial numbers (IMEI/SN) have been removed or altered.
20 Troubleshooting ....................... Before contacting the service center, follow the instructions below: You are advised to fully charge ( operation. ) the battery for optimal Avoid storing large amounts of data in your phone as this may affect its performance. Use Factory reset and the upgrade tool to perform phone formatting or software upgrading. ALL Users phone data: contacts, photos, messages and files, downloaded applications will be lost permanently.
My phone cannot charge properly Make sure that your battery is not completely discharged; if the battery power is empty for a long time, it may take around 20 minutes to display the battery charger indicator on the screen. Make sure charging is carried out under normal conditions (0°C (32°F) to +45°C (113°F)). When abroad, check that the voltage input is compatible. My phone cannot connect to a network or “No service” is displayed Try connecting in another location.
Make sure the chip on your SIM card is not damaged or scratched. Make sure the service of your SIM card is available. Unable to make outgoing calls Make sure you have dialed a valid number and have touched . For international calls, check the country and area codes. Make sure your phone is connected to a network, and the network is not overloaded or unavailable. Check your subscription status with your service provider (credit, SIM card valid, etc.).
I cannot find my contacts Make sure your SIM card is not broken. Make sure your SIM card is inserted properly. Import all contacts stored in SIM card to phone. The sound quality of the calls is poor You can adjust the volume during a call by pressing the Volume Up/Down key. Check the network strength . Make sure that the receiver, connector or speaker on your phone is clean.
My callers are unable to leave messages on my voicemail Contact your service provider to check service availability. I cannot access my voicemail Make sure your service provider's voicemail number is correctly entered in "Voicemail number". Try later if the network is busy. I am unable to send and receive MMS Check your phone memory availability as it might be full. Contact your service provider to check service availability and check MMS parameters.
How to make your battery last longer Make sure you follow the complete charge time (minimum 3.5 hours). After a partial charge, the battery level indicator may not be exact. Wait for at least 20 minutes after removing the charger to obtain an exact indication. Switch off the backlight upon request. Extend the email auto-check interval for as long as possible. Update news and weather information on manual demand, or increase their auto-check interval.
To download the complete user manual and learn more about your phone, visit alcatelonetouch.us .