Available applications and services are subject to change at any time.
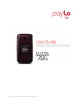
Table of Contents Get Started 1 Your Phone at a Glance 1 Set Up Your Phone 2 Activation and Service 4 Create Your Account and Pick Your Plan 4 Activate Your Phone 4 Manage Your Account 4 Top-Up Your Account 5 Set Up Voicemail Phone Basics 5 6 Your Phone’s Layout 6 Turn Your Phone On and Off 9 Navigate Through the Menus 9 Status Bar 9 Enter Text 10 Phone Calls Make Phone Calls 13 13 Call Using the Phone Dialer 13 Call from Recent History 13 Call from Contacts 13 Call Using
Recent History Contacts 18 20 View Contacts 20 Contacts List Options 21 Add a Contact 21 Create a Group 22 Save a Phone Number 23 Edit a Contact 23 Add or Edit Information for a Contact 23 Assign a Ringtone to a Contact 23 Delete a Contact 23 Remove a Member from a Group 24 Assign a Speed Dial Number to a Contact 24 Messaging 25 Text and Multimedia Messaging 25 Send a Text Message 25 Send a Multimedia Message (MMS) 26 Save and Resume a Draft Message 26 New Messages Notifica
Tools and Calendar 35 Alarm Clock 35 Calendar 35 Add an Event to the Calendar 35 View an Event 35 Edit/Delete an Event 35 Bluetooth 36 Update Phone 36 Phone Memory 36 microSD Card 37 Insert or remove a microSD Card 37 View microSD Card Memory 37 Format the microSD Card 37 Use the Phone’s microSD Card as a USB Drive 38 Transfer Files Between Your Phone and a Computer 38 Calculator 38 Stop Watch 39 Voice Memo 39 World Time 39 Settings 40 Display Settings 40 Wallpaper
Default Text Entry 42 Accessibility Settings 42 Call Answer Settings 43 Airplane Mode 43 Data Settings 43 Roaming Settings 43 Persistent Alerts 43 Regulatory Information 44 Specific Absorption Rates (SAR) for Wireless Phones 44 FCC Radio Frequency Emission 44 Using Your Phone With a Hearing Aid Device 44 Warning Statements 46 Copyright Information 47 Index 48 iv
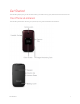
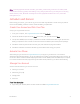
Get Started The following topics give you all the information you need to set up your phone and service the first time. Your Phone at a Glance The following illustration outlines your phone’s primary external features and buttons.
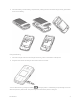
Set Up Your Phone You must first install and charge the battery to begin setting up your phone. Install the Battery: 1. Remove the back cover using the notch in the bottom-left corner of the phone. 2. Insert the external microSD card into the slot with the gold contact facing down. To remove the external microSD card, gently press and slide it out.
3. Insert the battery into the battery compartment, making sure the connectors align. Gently press down to secure the battery. Charge the Battery: 1. Insert the charger cable into the Charger/Accessory Jack on the bottom of the phone. 2. Plug the other end of the charger cable into an electrical outlet. You are advised to fully charge the battery ( ). Charging status is indicated by the percentage on screen while the phone is powered off. The percentage increases as the phone is charged.
Note: The charging status bar will not float if your battery is extensively consumed. To reduce power consumption and energy waste, when battery is fully charged, disconnect your charger from the plug; switch off Wi-Fi, GPS, Bluetooth or background-running applications when not in use; reduce the backlight time, etc. Activation and Service Before using your phone, you must set up your service with Virgin Mobile.
Top-Up Your Account Sign up for Auto Pay to keep your service working month after month. Or, you can buy Top-Up cards at thousands of retailers and add money to your account from your phone or by logging in at virginmobileusa.com. Auto Pay Auto Pay is the easiest way to keep your service working. Once you register your credit card, debit card or PayPal account, you can set it to automatically pay your monthly plan.
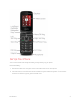
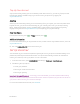
Phone Basics Your phone is packed with features that simplify your life and expand your ability to stay connected to the people and information that are important to you. The following topics will introduce the basic functions and features of your phone. Your Phone’s Layout The illustrations and descriptions below outline your phone’s basic layout.
Phone Basics 7
Key Functions Item Function Menu/OK Key Enter the main menu / Confirm an option Navigation Keys Press left / right / up / down to navigate menus and options Left softkey Messaging Right softkey Contacts List Send Key Recent Call (home screen) / Answer / Send a call End/Power Key Power on / Power off / End a call / Return to the Home screen 1 Key Press and hold to access Voicemail CAUTION! Inserting an accessory into the incorrect jack may damage the phone.
Turn Your Phone On and Off You can turn your phone on and off using the End/Power Key. Turn Your Phone On/Off n Press and hold the End/Power Key . Your screen remains blank while your phone is off (unless the battery is charging). Navigate Through the Menus Use the navigation keys to scroll through onscreen items. To navigate through a menu, press up or down using the navigation keys. Select Menu Items As you navigate through the menu, menu options are highlighted.
Icon Status Silent Bluetooth Network (full signal) Network (no signal) Network (roaming) 1X network (data service) Alarm set Battery (charging) Battery (full charge) Notification Icons Icon Notification Missed call New message New voice mail Music playing Event Alarm Enter Text Your phone provides a convenient keypad to enter letters, numbers, and symbols whenever you are prompted to enter text.
1. From a screen where you can enter text, press OPTIONS (right softkey) to change the text mode. (If you are in the message entry screen, press OPTIONS [right softkey] > Text Mode.) 2. Select one of the following options: l l Abc to enter characters by using the alphabet mode. T9Word to enter text using a predictive text system that reduces the number of key presses required while entering a word. l 123 to enter numeric characters. l Symbols to enter symbols. l Smileys to enter smile icons.
Number Function 1 1, commonly-used symbols 2 a, b, c, A, B, C, 2 3 d, e, f, D, E, F, 3 4 g, h, i, G, H, I, 4 5 j, k, l, J, K, L, 5 6 m, n, o, M, N, O, 6 7 p, q, r, s, P, Q, R, S, 7 8 t, u, v, T, U, V, 8 9 w, x, y, z, W, X, Y, Z, 9 0 0, + * *, change input methods # #, insert a space Phone Basics 12
Phone Calls With Virgin Mobile service and your phone’s calling features, you can enjoy clear phone calls across the country. Make Phone Calls There are several convenient ways to place calls from your phone. Call Using the Phone Dialer The most “traditional” way to place a call is by using the phone’s dialpad. 1. From the home screen, press the number keys on the dialpad to enter the phone number. 2. Press to call the number. 3. To end the call, press .
1. From the home screen, press CONTACTS (right softkey) to display the Contacts list. 2. Highlight a contact and then press to place a call. Call Using a Speed Dial Number Speed dial numbers let you dial numbers by pressing and holding a single number on the dialpad. n From the home screen, enter the speed dial number and then press to place a call. Call Emergency Numbers You can place calls to 9-1-1 even if the phone’s screen is locked or your account is restricted.
Mute the Ringing Sound To mute the ringer without rejecting the call, press the Volume Down Button. Reject an Incoming Call n Press the End/Power Key to reject an incoming call and send the call to voicemail. Reject a Call and Send a Text Message You can reject an incoming call and automatically send a text message to the caller. n Press Ignore with Text Message to ignore the call and send a text message to the caller. Voicemail The following topics outline your phone’s voicemail service.
Use Traditional Voicemail to Access Your Messages 1. Touch and hold . If prompted, enter your voicemail password. 2. Follow the voice prompts to listen to and manage your voicemail messages. Use Another Phone to Access Messages 1. Dial your wireless phone number. 2. When your voicemail answers, press the asterisk key on the phone (*). 3. Enter your password. Tip: You can restore messages you have sent to the trash folder.
n Add New Contacts: Add a new contact or update existing. n Contact Details: View detailed information of the incoming number. n Main menu: Display the main menu list. n 3-Way Call: Initiate a 3-way conference call. n Contacts: Display your contacts list. n Voice Memo: Create a new memo while remaining on the call. Warning: Because of higher volume levels, do not place the phone near your ear during speakerphone use. Note: If Mute is activated, the speaker mode is deactivated.
4. Press TALK to join calls. Your conference call is now in session. 5. To end the three-way call, press . Note: If one of the people you called hangs up during your call, you and the remaining caller stay connected. If you initiated the call and are the first to hang up, all callers are disconnected. Call Using a Speed Dial Number You can store up to 99 numbers in your phone’s speed dial memory to make contacting friends and family easier.
For additional options, press OPTIONS (right softkey): n New group n Contact details n Delete n Delete All Phone Calls 19
Contacts Your phone’s Contacts help you stay in touch with family, friends, and colleagues by keeping track of all their contact information. The following topics explain how to use your phone’s Contacts. Personal Contacts Entries – Entries for an individual Your phone can store up to 600 personal Contacts entries. Each entry can contain up to 7 phone numbers, and 3 email addresses, 3 IM addresses, and 3 Web addresses. Group Contacts Entries – Entries that contain more than one personal Contacts entry.
Contacts List Options The Contacts List provides various options for managing your contact entries. n New Group: Create a new a group for contacts(s). n Edit Contact: Edit contact information. n Delete Contact: Delete the contact you select. n Delete All: Delete all contacts in the list. n Contact History: View call history. n Send Contact: Send contact via Bluetooth, etc. n Set as Secret/Show Secret: Hide/Unhide your contact from contact list.
l Company Create a Group You can create a group by assigning personal Contacts entries as members and then naming the new group. Each group entry can contain up to 40 members for sending messages. 1. From the home screen, press CONTACTS (right softkey) > OPTIONS (right softkey) > New Group. 2. Press START (left softkey), mark the check box to select contacts for the group, press Continue, create a name for group, then press to save.
Save a Phone Number You can save a phone number to Contacts directly from Recent History or Call History. 1. From the home screen, press . 2. Highlight a phone number and press OPTIONS (right softkey) > Save Contact. 3. To add the number to an existing contact, press Update existing. To add a new contact, press Add New Contact. 4. For an existing contact, select the contact name, select a number type for the new number, and then press DONE (left softkey).
1. From the home screen, press CONTACTS (right softkey). 2. Select a contact to display and then press OPTIONS (right softkey) > Delete Contact. 3. Press DELETE (left softkey) to confirm. Remove a Member from a Group You can remove a member from a current Group. 1. From the home screen, press CONTACTS (right softkey). 2. Highlight a group and then press OPTIONS (right softkey) > Edit Group. 3. Highlight a contact and then press OPTIONS (right softkey) > Remove From Group.
Messaging Send messages to your family and friends with text messaging (SMS) and multimedia messaging (MMS). Text and Multimedia Messaging With Text Messaging (SMS), you can send and receive instant text messages between your wireless phone and another messaging-ready phone. Multimedia messages (MMS) can contain text and pictures, recorded voice, audio or video files. Refer to your service plan for applicable charges related to messaging.
Send a Multimedia Message (MMS) When you need to add a little more to a text message, you can send a multimedia message (MMS) with pictures, voice recordings, audio or video files. 1. From the home screen, press MESSAGING (left softkey). 2. On the Messaging screen, select Send Message. 3. To enter a recipient, select a contact or press NEW ADDRESS (right softkey). l To enter multiple recipients, press MULTIPLE (left softkey). When you have selected all the message recipients, press CONTINUE (left softkey).
Read a Text Message 1. From the home screen, press MESSAGING (left softkey) > Messages. 2. Select the text message or message thread to open and read it. 3. If you have a new message notification, press OPTIONS (right softkey) to reply, forward or delete it. 4. To return to the Messaging screen from a text message thread, press the BACK key . View a Multimedia Message (MMS) 1. From the home screen, press MESSAGING (left softkey) > Messages. 2.
4. Press YES (left softkey) to confirm.
Music Your phone lets you discover, download, and listen to your favorite music through the Music Player application. It lets you listen to and organize music files you have loaded into your phone’s microSD card. Note: For information about loading music onto your phone, see Transfer Files Between Your Phone and a Computer. Listen to Music Using the Player 1. From the home screen, press > Player . 2. To adjust the volume, press the Volume up or Volume down keys.
Web and Data Your phone’s data capabilities let you wirelessly access the Internet. The following topics address your phone’s data connections and the built-in Web browser. Your phone supports a 1X network. Launch a Web Connection Launching a Web connection is as simple as opening the browser on your phone. 1. From the home screen, press > Web. (Your data connection starts and you see the home page.) 2. To scroll through the screen, use the Up and Down Navigation keys. 3.
n From any open Web page, press OPTIONS (right softkey) > Browser settings. l Startup page: Set startup page. l Automatic Overview Mode: Turn on/off Automatic Overview Mode. l Default zoom size: Select automatic or customized zoom value. l Do not show images/Show images: Display or Hide images on the Web page. l Icon row: Display or hide the area showing icons. l Popups: Allow or block pop-ups. l Clear private data: Clear cookies, cache, history, or stored passwords.
Camera and Video You can use your phone's camera or camcorder to take and share pictures and videos. Your phone comes with a 2-megapixel camera that lets you capture sharp pictures and videos. Open or Close the Camera You can open the camera through the applications list and close it from the camera menu. In addition to using the applications list to open the camera, you may be able to launch the camera from within other applications such as Contacts or Messaging.
1. From the home screen, press > Photos > Camcorder. 2. If prompted, choose a recording mode: Video Mail or Long Video. 3. Press to start capturing video. 4. Press again to stop recording. 5. Press OPTIONS (right softkey) to Send, Play, Delete, or Review Album. View Pictures and Videos Using My Album Using My Album, you can view pictures and watch videos that you’ve taken with your phone’s camera, downloaded, or copied onto your storage card or phone memory.
1. From the home screen, press > Photos > My Album. 2. Select an image or video to view. Note: If you want to select another image or video, press to return to the My Album. Watch Videos Use the onscreen controls to play, pause, fast-forward or rewind the video. 1. From the home screen, press > Photos > My Album. 2. Select an album containing a video you want to watch, and then select an image to view the video. 3. Use the onscreen icons to control your playback.
Tools and Calendar Learn how to use many of your phone’s productivity-enhancing features. Alarm Clock Set multiple alarms using your phone’s Alarm application. 1. From the home screen, press > Tools > Alarm. 2. If you haven’t created an alarm yet, press CREATE NEW (left softkey). l If you have existing alarms set, press OPTIONS (right softkey) > Create New. 3. Fill in all required information for this alarm 4. When done, press DONE (left softkey).
1. From the home screen, press > Tools > Calendar. 2. Select a date that has an event. 3. To edit an event, select the event and then press EDIT (right softkey); to delete the event, press DELETE (left softkey). Event Reminders If you have set at least one reminder for an event, the upcoming event icon n will appear. Select View Now or Dismiss.
microSD Card A microSD™ card is an optional accessory that allows you to store images, videos, music, documents, and voice data on your phone. Insert or remove a microSD Card Insert the external microSD card into the slot with the gold contact facing down. To remove the external microSD card, gently press and slide it out. Note: You can easily damage the microSD card by improper operation. Please be careful when inserting, removing, or handling the microSD card.
Use the Phone’s microSD Card as a USB Drive To transfer music, pictures, and other files from your computer to your phone’s microSD card, you need to set the phone’s microSD card as a USB drive. For more details about transferring content between your phone and a computer, see Transfer Files Between Your Phone and a Computer. 1. Connect the phone to your computer using a USB cable (not included). 2. From the home screen, press > Tools > Mass Storage > Connect to PC. 3.
Stop Watch Your phone provides a convenient and easy-to-use Stop Watch application. n From the home screen, press > Tools > Stop Watch. Voice Memo Record audio memos using your phone’s Voice Memo application. n From the home screen, press > Tools > Voice Memo. World Time View the current time in cities around the world using the World Time application. n From the home screen, press Tools and Calendar > Tools > World Time.
Settings The following topics provide an overview of items you can change using your phone’s Settings menus. Display Settings Adjusting your phone’s display settings not only helps you see what you want, it can also help increase battery life. Wallpaper Settings Select and assign your phone’s background wallpaper. 1. From the home screen, press > Settings > Display > Main Screen > Wallpaper. 2. Select an option to set the wallpaper.
Volume Settings Use the Volume settings menu to configure the incoming ringer volume, playback volume, and key beeps. n From the home screen, press > Settings > Volume. Ringtone Settings Use the Ringtones settings menu to configure options related to incoming calls, voicemail, messages, power up/down, and battery alert. n From the home screen, press > Settings > Ringtones.
Reset Phone Your phone’s reset menu erases all data from the phone’s application storage, including messages, phones calls, downloaded application, etc. Tip: Before performing a factory data reset on your phone, you may want to remove the microSD card to avoid losing any data you may have stored on it. 1. From the home screen, press > Settings > Reset/Delete. 2. Enter your 4-digit security code.
Call Answer Settings The Call Answer settings menu lets you determine how calls are answered on your phone. n From the home screen, press > Settings > Others > Call Answer. Airplane Mode Airplane Mode allows you to use many of your phone’s features, such as Camera and Music, when you are on an airplane or in any other area where making or receiving calls or data is prohibited. When you set your phone to Airplane Mode, it cannot send or receive any calls or access online information.
Regulatory Information The following topics provide important regulatory information. Specific Absorption Rates (SAR) for Wireless Phones The SAR value corresponds to the relative amount of RF energy absorbed into the head of a user of a wireless handset. The SAR value of a phone is the result of an extensive testing, measuring and calculation process. It does not represent how much RF the phone emits. All phone models are tested at their highest value in strict laboratory settings.
Some hearing devices are more immune than others to this interference noise, and phones also vary in the amount of interference noise they may generate. ANSI standard C63.19 was developed to provide a standardized means of measuring both wireless phone and hearing devices to determine usability rating categories for both. Ratings have been developed for mobile phones to assist hearing device users find phones that may be compatible with their hearing device.
Warning Statements THIS DEVICE COMPLIES WITH PART 15 OF THE FCC RULES. OPERATION IS SUBJECT TO THE FOLLOWING TWO CONDITIONS: (1) THIS DEVICE MAY NOT CAUSE HARMFUL INTERFERENCE, AND (2) THIS DEVICE MUST ACCEPT ANY INTERFERENCE RECEIVED, INCLUDING INTERFERENCE THAT MAY CAUSE UNDESIRED OPERATION.
Copyright Information © 2014 Virgin Mobile USA, L.P. All rights reserved. The Virgin Mobile name and signature and the Virgin Mobile name and logo are registered trademarks of Virgin Enterprises Ltd. and used under license by Virgin Mobile. ALCATEL is a trademark of Alcatel-Lucent used under license by TCT Mobile Limited. ONETOUCH and RETRO are trademarks of TCT Mobile Limited. Other marks are property of their respective owners.
Index 3 3-way Calling 17 A Accessibility 42 Activate Your Phone 4 Activation and Service 4 Airplane Mode 43 Alarm Clock 35 Answer a Call 14 Auto Pay 5 B Backlight 40 Bluetooth 36 Turn on or off 36 Brightness 40 Browser Navigate 30 Settings 30 Contact 24 Create a Group 22 Delete 23 Edit 23 Make call from 13 Remove a Member from a Group 24 Save a phone number 23 Contacts List 20 Contacts List Options 21 Copyright Information 47 Create Your Account and Pick Your Plan 4 D Data 30 Data Settings 43 Default Text
I In-call Options 16 Incoming Call Answer 14 Reject 15 K Key Functions 8 Keypad 10 L Language 42 Language & Input Settings 42 Location GPS satellites 41 Location Services 41 Lock Phone 41 M Manage Your Account 4 Messaging 25 Drafts 26 microSD Card 37-38 Format 37 Insert 37 View memory 37 MMS Send messages 26 Multimedia Messaging Share Pictures and Videos 34 Music 29 My Album 33 N Navigate Through the Menus 9 Notification Icons 10 Notifications 9-10 P Parental Control Settings 41 Persistent Alerts 43 Phone D
T Text Entry 10 Text Input Default 42 Text Messaging Conversations 26 Notifications 26 Send messages 25 Tools 35 Top-Up Your Account 5 Turn Your Phone On and Off 9 Typing 10 U Update Phone 36 USB 38 V Video Camera Record video 32 Videos Record 32 View 33 Watch 34 Voice Memo 39 Voicemail 15 Notification 15 Retrieve messages 15 Set up 15 Setup 5 Volume Settings 41 W Wallpaper 40 Warning Statements 46 Web 30 Launch a Connection 30 World Time 39 Index 50