
User's Manual


7
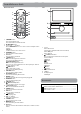
Connections
Micro-USB
Connect your unit to a PC or a USB storage device with a USB cable
(not included) and USB converter cable (included) to transfer music,
pictures and other files in both directions.
Notes:
• To change your unit’s USB connection options, you should go to
Settings > DEVICE > Storage, and tap Menu icon
at the upper
right corner. Then tap USB computer connection to enter to
setup.
• The unit can be connected to a keyboard, a mouse or other input
devices via a USB cable and use it just as you would connect with
a PC.
Micro SD
Remove the rubber cover on the side of screen and insert the micro
SD card into the unit’s Micro SD slot until it clicks.
To check the storage of the micro SD card, go to
Settings > DEVICE > Storage
Remove the micro SD card by pushing in on the card's edge. The
card will pop out and can be removed.
Notes:
• You can use microSD
TM
card and microSDHC
TM
card (up to 32GB,
SD card not included).
• Never remove or insert micro SD card in On mode.
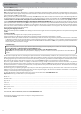
Micro-HDMI
Connect your unit to a TV or other display device with a HDMI cable
(not included) and HDMI converter cable (included) to output the
video.
Notes:
• To change your unit’s HDMI options, you should go to
Settings > HDMI > to modify each setting.
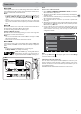
Wi-Fi
Connect to a Wi-Fi Network
1. Go to Settings > WIRELESS & NETWORKS > Wi-Fi, and slide the
Wi-Fi switch to the ON position.
2. The device will scan Wi-Fi networks automatically and display the
available names.
• If the device finds a network that you connected to previously, it
will connect to it automatically.
3. Tap a network name to connect to it, and enter a password if
necessary.
4. Alternatively, if your Wi-Fi router supports Wi-Fi Protected Setup,
tap the WPS icon
at the top of the screen, and then press the
WPS button on your router.
5. If your network does not broadcast its SSID, tap the Plus icon
+ at the top of the screen, and enter the Network SSID (name)
of the network. If necessary, enter security or other network
configuration details.
VPN (Virtual Private Network)
You can create virtual private network (VPN) and connect to your
private network securely through a public network, such as the
internet. You must set a lock screen PIN or password before you can
use credential storage.
Add VPN network and follow the instructions on the screen.
HDMI, the HDMI logo and High-Definition
Multimedia Interface are trademarks or
registered trademarks of HDMI Licensing, LLC.
Note:
you can tap Menu icon
at the upper right corner in the Settings
screen for advanced settings.
Settings
WIRELESS & NETWORKS
Wi-Fi
Bluetooth
More...
DEVICE
ScreenshotSetting
Storage
Battery
Hdmi
Sound
Display
6:14
ON
OFF
CoffeeShopWF
WPS available
MyHomeWF
Connected
EN
HDMI Converter Cable (included)
USB Converter Cable (included)
TV
HDMI IN
High
Definition
TV
HDMI Cable
(not included)
Control
Panel