
User`s guide


5
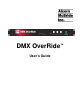
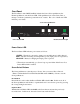
Resume Button
Pressing the Resume Button will always cause the DMX OverRide to pass DMX data
from the input to the output. The button’s multi-color LED indicates the following:
GREEN – Resume Mode is active and DMX is actively detected on the input and
being passed to the output.
ORANGE – DMX is not detected on the input. If the Dropout Enable mode is
activated with the rear-panel DIP switch, Scene 1 will activate and
the corresponding Scene 1 button will be Green.
Operation
Operating your DMX OverRide is easy! Basically you just feed it DMX and record your
3 presets or “Scenes”. Once you’ve done that you can press each of the buttons on the
front panel to activate each scene, or use the remote inputs to do the same thing.
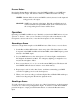
Recording a Scene
A Scene is a single-frame snapshot of the DMX universe. Here’s how to record a Scene.
1. Set the Record Mode DIP switch to the down-position. The Scene buttons on the
front panel of the DMX OverRide will all turn RED, and the DMX input is passed
directly to the DMX output.
2. Set your DMX universe to the desired preset. For house-lights or maintenance
this might be all channels at 100%. For emergency lighting you might choose to
run just the exit lights to 100%.
3. Press a scene button (1, 2, or 3) to store the current DMX preset. The button will
turn GREEN while the data is written to nonvolatile memory.
4. Repeat steps 2 and 3 for the other Scenes, each time commanding your DMX
controller or lighting console to the desired preset.
5. When you’re done recording your Scenes flip the Record Enable DIP switch up to
disable recording and place the unit into playback mode.
Recalling a Scene
To recall a Scene all you need to do is press one of the 3 Scene buttons on the front panel,
or activate one of the corresponding Remote inputs. To return to normal where DMX is
passed from input to output, press the Resume button, or activate the Resume remote
input.