
User`s guide


WinScriptLive Tutorial Page 17
WinScript
Naming Resources
You can assign unique names to your Show Controller’s Inputs, Buttons, Outputs, Variables, and other
resources so that they make intuitive sense when someone else is reading your script. Let’s assign some
names to the Inputs, Buttons, Outputs, Variables, and Devices we’ll be using.
First of all, it’s a good idea to set some rules in place to avoid confusion later in the design. Using label
identifiers on the objects used in the script will serve as reminders later on as to the function they perform.
For example, including the letters “btn” (or the full word “button”) in a Button label reminds you that this
resource is in fact, a button when it appears in other areas of the script. You’ll see how handy this as we
move along. This also helps you avoid accidentally assigning the same name to different resource types.
For example, if you name a Button “StartShow” and also name a Variable “StartShow” you will make
WinScript very angry and it will generate nasty error messages when you try to compile and load it into
your Show Controller.
Here are some suggested examples for label identifiers:
btn = buttons,
str = strings,
int = integer,
bool = boolean,
sp = display string and so on.
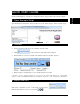
To assign unique names to a specific resource all you need to do is to double left-click the resource to
expand the tree (i.e. Buttons), then right-click the specific resource and select View/Edit Resource.
You can also click on Resources in the menu bar and select Buttons… or whatever other resource you
want to edit.
Buttons
Our show will use the first three front panel buttons of your Show Controller to perform various functions.
Here’s a summary of what the buttons will do.
Button 1 (we will call it btnRunShow) will start a two-minute video presentation.
Button 2 (we will call it btnDayNightMode) will toggle between…guess what…That’s right, Day Mode
and Night Mode!
Finally, Button 3 (we will call it btnCredits) will display your name on the display when it is pressed and
return the display to its previous state when you let it go.
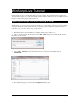
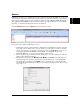
Go up the menu bar and click on Resources and select Buttons…
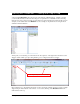
When the form opens, (as shown below) notice the "Couple" column. When the box is checked beside the
button, the button and the input with the same number will be functionally the same. There is never any
physical electrical connection between the two; they are only assigned to do the same function in the Show
Controller when this box is checked. If this box is un-checked the button and input operate independently
of each other. We are not going to want them to be connected in this script, so leave this box unchecked.