Outdoor Furniture IMPORTANT If you have any problems with this product (missing or damaged parts, assembly issues, etc.), PLEASE DO NOT RETURN TO THE RETAILER/STORE from where you purchased the product. Please call our Toll‐Free Customer Service Hotline Or visit our website To expedite any future warranty claims, please retain the Instruction Sheet, Warranty Card and receipt for future use.
Outdoor Furniture 1-Year Limited Warranty Program For a period of one (1) year after purchase, the Manufacturer will either repair or replace defective components in accordance with this Limited Warranty. This warranty is between Manufacturer and the original purchaser and is valid only when accompanied by the original purchaser’s sales receipt showing original date of purchase and location of purchase. Replacements under this warranty revert back to the date of original purchase for future warranty.
Care & Maintenance Outdoor furniture can be enjoyed for many years when well maintained. Regular Maintenance Wash the furniture with a solution of mild detergent and water, rinse with clear water, and dry thoroughly. To all metal frames, apply a fine, clear automobile wax for maximum protection against harmful ultraviolet exposure and salt air. For best protection, perform this maintenance two or three times per year in low pollution areas or more frequently in high pollution areas.
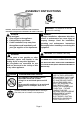
ASSEMBLY INSTRUCTIONS CSA Installer: Leave these instructions with consumer. Consumer: Keep these instructions for future reference. DANGER If you smell gas: 1. Shut off gas to the appliance. 2. Extinguish any open flame. 3. If odor continues, keep away from the appliance and immediately call your gas supplier or fire department. WARNING: Improper installation, adjustment alteration, service or maintenance can cause injury or property damage.
TABLE OF CONTENTS Important Safety Information .................................................................3 Important Information about Propane....................................................4 Specification ..........................................................................................4 Parts Identification List ..........................................................................5 Installation ........................................................................................
IMPORTANT SAFETY INFORMATION The installation must conform with local codes or, in the absence of local codes, with the National Fuel Gas Code, ANSI Z223.1/NFPA 54; International Fuel Gas Code. ; Natural Gas and Propane Installation Code, CSA B149.1; or Propane Storage and Handling Code, B149.2, as applicable. The appliance and its appliance main gas valve must be disconnected from the gas supply piping system during any pressure testing of that system at test pressures in excess of 1/2 psi (3.5kPa).
IMPORTANT SAFETY INFORMATION ABOUT PROPANE (LP) GAS A LP-gas cylinder for use with this appliance must have a capacity of 20 lbs / 9kg. and must be equipped with a Type 1 connector and an OPD (overfill protection device). Figure 1 The LP-gas supply cylinder to be used must be constructed and marked in accordance with the specification for LP-gas cylinders of the U.S.
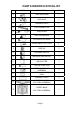
PARTS IDENTIFICATION LIST PART DESCRIPTION QTY A CONTROL KNOB 1 B GAS VALVE 1 C THERMOCOUPLE 1 D FLEX CONNECTOR 1 E ELECTRODE 1 F IGNITION MODULE 1 G LP REGULATOR HOSE 1 H ADJUSTABLE FOOT CAPS 4 I FIRE ICE 1 J PROPANE ORIFICE 1 K NATURAL GAS ORIFICE 1 L AIR SHUTTER 1 M “AA” BATTERY(1.
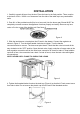
INSTALLATION 1. Carefully unpack all items from the box. Place the base in the final position. There must be a minimum of 24 in / 60.96 cm of clearance from the side of the table top to any combustible walls. 2. Pour ALL of the provided media (fire ice or lava rock) into the burner pan. Burner MUST be completely covered to ensure the appliance functions properly and safely. Remove any lava rocks or fire ice on top of the ignition well. See figure 2. Figure 2 3.
NATURAL GAS CONVERSION Natural gas conversion must be performed only by your natural gas provider or service company. 1. SHUT OFF THE GAS SUPPLY TO THE UNIT AND ANY NEARBY ELECTRICAL SOURCE OR APPLICANCES 2. Below the burner, carefully disconnect flex connector attached to the orifice holder (see step1). 3. Carefully unscrew the orifice holder from the burner pipe (see step2). 4. Remove the propane orifice from the holder and replace with natural gas orifice (see step2). 5.
ALL the connections. NEVER USE A FLAME TO CHECK FOR GAS LEAKS! Step5 10. Stick the conversion label on the rating plate as shown in Figure 5. Metal Rating Plate Serial Number _________________ 1. appliance must be used. This regulator is set for an outlet pressure of CAUTION: The gas pressure regulator provided with this 2. This appliance has been converted to use Natural 3. Gas. Input 30,000 Btu/hr. Max Gas Supply Pressure 7 inch w.c. (1.74 kPa) 4. Min. Gas Supply Pressure 5 inch w.c. (1.24 kPa) 5.
BATTERIES Make sure the control knob is in the "OFF" position. Unscrew the push button cap on the ignition module located on the control panel to access the battery compartment. The ignition module requires one Alkaline AA size battery (1.5V). The negative (-) end goes in first. See Figure 7.Dispose of battery safely. May explode or leak if charged or disposed of in fire. Make sure of the polarity. Mercury and cadmium free.
2. Push in the igniter button. You will hear a slight clicking sound. With the igniter button pushed in, push and turn the control knob to the “ON” position. The fire should light within a few seconds. Once the flame is lit, release the igniter button and continue to hold the control knob in for 10 to 15 seconds. Release the control knob. The control knob should pop back out and then the fire remain lit.
ONE-YEAR LIMITED WARRANTY What is Covered Under This Warranty? The item you have purchased is warranted against defects in material and workmanship for the following parts from the date of purchase for the period of warranty as outlined below, but only when the unit is installed and operated in accordance with the instructions in this Owner’s Manual and in compliance with local building and fire codes: Limited 1 Year • Stainless Tube/Plate burner Limited 90 days • All remaining parts How Do I Obtain Warrant