ALD-14096 GmbH 040417 DEUTSCHLAND Installation and user`s guide A.I.O.® EVO HD "All-In-One" 178 V/H ULTRAWIDE LED TV C B ECO STANDBY 0.5W 3000 KANÄLE VIDEOTEXT EPG MEHRSPRACHIG EPG Vermieter Mode elektr.
Contents 03 Warning instructions 05 Installation 06 TV description 07 Installation diagram with Alden automatic antenna 08 Installation diagram with Alden manual antenna 09 Installation diagram with a TWIN LNB 10 Use with Alden automatic antenna 11 Use with manual or semi-automatic antenna 12 Preparing the remote control 13 Remote control description and functions 15 Using the television 15 Basic features 15 How to use the system for the first time (auto installation) 16 How to use in terrestrial mode 16 Ho
Warning instructions The reproduction of whole or part of this guide is strictly forbidden without Alden’s approval. Alden weist Sie auf die Risiken hin, die aus der nichtfachgerechten Montage erwachsen können. Alden übernimmt keinerlei Verantwortung, wenn das Produkt nicht korrekt montiert wird und insbesondere nicht, wenn es von einem Nichtfachmann installiert wird. Alden draws your attention to the risks that may occur if the mounting is not correct.
Install the television in a place where it will not be affected by humidity, dust, and on a flat and stable surface. Use the device carefully. The screen is made of a thin layer of glass, it is therefore sensitive to shocks, scratches... Do not clean with corrosive products. Simply use a slightly damp, soft cloth. Do not place magnetic products (like loudspeakers...) near the television. In case of dysfunction (unusual sound or smoke...
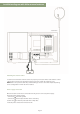
Installation Connecting the televison to other devices RCA adaptor audio-video connection (yellow / white / red) Earphone YUV adaptor video connection (red / blue / green) CI-Slot Mini AVM ini YPbPr USB cable (not supplied) VOL- CH+ CH- USB VOL+ SOURCE MENU N HDMI cable connection HD audio-video (not supplied) HDMI D O è VGA Allows to maintain the cables during manipulations with AIO TV. LNB IN: Coaxial cable to connect to your satellite dish DC IN VGA Video connection on a computer.
TV Description 1 VOL - Lower the volume. In a menu, move the selection to the left 2 VOL + Increase the volume. In a menu, move the selection to the right 3 CH - Display the previous programme number In a menu, move the selection to the bottom 4 CH + Display the next programme number In a menu, move the selection to the top 5 MENU Display the main menu. In a sub-menu, return to the previous menu.
Installation diagram with Alden automatic antenna Coaxial cable Motor cable D+ contact (this line must be able to deliver 1.5 A min) Attaching the antenna cables In order to ensure that the antenna cables are properly secured, the motor cable and the coaxial cable must be placed in the appropriate housing, which must be closed with the supplied screw. NOTE: there are 3 possible cable entry solutions. Connect the 2 cables to the matching inputs depending on the configuration of the TV set.
Installation diagram with Alden manual antenna Coaxial cable Attaching the antenna cables In order to ensure that the antenna cables are properly secured, the motor cable and the coaxial cable must be placed in the appropriate housing and close it with the supplied screw. NOTE: there are 3 possible cable entry solutions. Bring 2 cables to one of the inputs depending on the configuration in which the TV is installed.
Installation diagram with a TWIN LNB To head LNB TWIN or antenna positioner of another brand. Coaxial cable CAUTION: The installation diagram above applies in case the AIO TV SATMATIC-HD is connected to the second coaxial output of an antenna equipped with an LNB TWIN or if it is connected to a satellite pointing module of another brand.
Commissioning of your satellite system Commissioning of your satellite system. 1. Make sure that the antenna can stand and rotate without encountering obstacles (branches, buildings, telephone relays, etc.) during reception or operation. 2. Switch the main switch located on the underside of the AIO SATMATIC-HD to position 1 (on) to turn the power on. 3. Activate your AIO SATMATIC-HD by pressing the button on your remote control. The start-up phase can last up to 30 seconds.
Use with manual or semi-automatic antenna Commissioning of your satellite system 1. Make sure that the antenna can stand and rotate without encountering obstacles (branches, buildings, telephone relays, etc.) during reception or operation.. 2. Switch main switch located at the bottom of the AIO to position 1 (on) to turn the power on. 3. Activate your AIO with the button on the remote control. It turns on and remains on standby for the transmitted signal by the satellite selected for manual search.
Preparing the remote control - Remove the battery cover on the back side of the remote control. - Put 2 new 1.5 V AAA batteries in place: make sure polarity is correct. - Put the cover back in place. Caution: - A non-conform use of the batteries can cause leaking and corrosion. - Do not install the batteries in the wrong way. - Do not charge, open, overheat nor short-circuit the batteries. - Do not throw the batteries in the fire. - Do not leave old batteries in the remote control.
Remote control description and functions POWER MUTE Turns the AIO SATMATIC-HD TV on or off Press once to switch the sound off Press a second time to active the sound P.MODE Press several times to select a picture pre-setting. S.MODE Press several times to select a sound pre-setting. SLEEP Press several times to programme the TV to switch off automatically. 1...0 Use these buttons to select your channel. -/-- Quickly set a channel that has more than 2 digits. D.ZOOM SOURCE EJECT ▲▼◄► OK MENU D.
Remote control description and functions HOLD ◄◄ INDEX ►► REVEAL Ι◄◄ SUBPAGE ►►Ι REPEAT Press once to not update the current teletext page, a second time to launch the automatic update. Press to rewind (DVD, media). Press to display the index page of the teletext. Press to fast forward (DVD, media). Display the information hidden on the current teletext page. Press to return to the beginning of the DVD chapter / previous media. Display/hide the sub-page.
Using the television Basic features Press on Source to display the list of video inputs. Use ▲and▼ to select the input that you wish to watch: DTV Digital satellite TV (DTV-S/S2) SCART SCART (SD) PC Computer (VGA) ATV Digital terrestrial TV (DTV-T/MPEG4) YPbPr Composite input (SD) MEDIA Multimedia Player AV Analogue input (SD) HDMI HDMI input (HD) DVD DVD-Player Press Enter to confirm your choice.
7. Change PIN code: allows you to change the PIN code. The PIN code is a 4-digit code. To change this code, enter the old code (8008 by default), the new code you want, the new one second time for confirmation. A message appears confirming the PIN code change. 8. Your TV is now installed. To use the system in DVB-S satellite mode: Press source>TNT, you can see a pre-programmed channel list by pressing Enter. To switch to DVB-T mode, refer to the channel menu.
How to use in DVD mode Important information: Handling a DVD can only be done once the DVD mode has been selected. It is not possible to insert or eject a DVD if another mode is selected. Press Source to display the list of video sources. Use ▲and▼ to select DVD then press Enter to confirm your choice. The DVD player will unlock. Insert the DVD in the DVD player, printed side towards the back of the TV. The DVD will start automatically.
Advanced functions Important information The settings and modifications made in the menus are only valid for the current source. This enables you to customize each source (TV, DVD,...) depending on your needs. Picture menu Picture mode Once selected, press ►to display the list of available pre-settings. Use ▲and ▼to make your choice and press Enter to confirm your choice (Standard; Optimal; Bright; Soft; User). The User mode enables you to customize the brightness, contrast, sharpness and colour settings.
Colour temperature Once selected, press ►to display the setting options. Use ▲and▼to make your choice and press Enter to confirm (Standard; cold; warm). Aspect ratio Once selected, press ►to display the setting options. Use ▲and ▼to make your choice and press Enter to confirm. Noise reduction Once selected, press to display the available presets list. Use and to make your choice and press Enter to confirm (Off, Low, Medium, High). Sound Mode Once selected, press ► to display the available pre-settings.
Surround Once selected, press ►to display the different options. Use ▲and▼ to make your choice and press Enter to confirm (Off ; On). AVL Once selected, press ►to display the different options. Use ▲and▼ to make your choice and press Enter to confirm (Off ; On). SPDIF Once selected, press ►to display the different options. Use ▲and▼ to make your choice and press Enter to confirm (Off ; MIC ; Auto ; Multi). Channel Menu Channel Management Once selected, press Enter to access the channel management sheet.
Favourite channel list management Once selected, press Enter to access the favourite management sheet. Use ▲and▼ to navigate in the list and select the channel you wish to modify. You can use: • (red) to add/ remove the selected channel from list No. 1; • (green) to add/ remove the selected channel from list No. 2; • (yellow) to add/ remove the selected channel from list No. 3; • (blue) to add/ remove the selected channel from list No. 4.
Funktionsmenü Lock Once selected, press Enter, then enter the PIN code to access the sub menu (factory setting: 0000). Use ▲and▼ to navigate and select the action that you wish to make: • System lock: enables you to activate or not the parental locking. Once activated, the options become available. • Keypad lock: enables you to deactivate the functions of the keys on the TV. Only Power remains active. • Parental locking: enables you to activate or not the parental locking (Off, ).
Sleep-Timer Enables you to set the time after which the TV will automatically switch to standby mode. Once selected, press ► to display the list of available setting options. Use ▲and▼ to make your choice and press Enter to confirm (Off; 15 min –› 240 min). Auto Power Off Enables you to set the time after which the TV will automatically switch off. Once selected, press ► to display the list of available setting options.
Setup Menu OSD Timer Enables to set the duration after which the menu will be automatically hidden. Once selected, press ► to display the list of available setting options. Use ▲and▼ to make your choice, then press Enter to confirm (Never; 5 Sec –› 30 Sec). Technician Allows to access to the different parameters of the antenna and the satellite pointing system. Auto-SCART Once selected, press ►to display the list of available setting options.
Troubleshooting Problem No picture and/or no sound. You have a picture but no sound. The remote control no longer/does not work. No TV signal. No external video signal The picture lacks colour or is too dark. The message "short-circuit antenna" is displayed. The antenna is oriented to the satellite but there is no picture Solution Check the power supply. Make sure the switch is in ON position. Make sure the volume is not set too low (minimum 0) in Mute mode.
Technical specifications Accessories TV mode specifications General specification Model AIO 18,5’’ DVD Combo Technology LED backlight Screen size 18.5" wide screen Aspect ratio 16:9 Resolution 1366 x 768 Pixel Contrast 1000:1 Active surface 409,8 (H) x 230,4 (V) Brightness 250 cd/m2 Response time 5 ms Color 16,7M Power supply DC 12 V Power consumption in operation ≤ 26 W Power consumption in standby <1W Analogue TV system PAL, SECAM Digital TV system DVB-T/T2, DVB-S/S2, H2.
Technical specifications Accessories TV mode specifications General specification Model AIO 21.5" DVD Combo Technology LED backlight Screen size 21.5" wide screen Aspect ratio 16:9 Resolution 1920 x 1080 Pixel Contrast 1000:1 Active surface 479 (H) x 271 (V) Brightness 250 cd/m2 Response time 5 ms Color 16,7M Power supply DC 12 V Power consumption in operation ≤ 26 W Power consumption in standby <1W Analogue TV system PAL, SECAM Digital TV system DVB-T/T2, DVB-S/S2, H2.6.
Technical specifications Accessories TV mode specifications General specification Model AIO 23.5" DVD Combo Technology Backlight LED Bildschirmgröße 23,5’’ wide screen Bildformat 16:9 Auflösung 1920 x 1080 Pixel Kontrast 1000:1 Aktive Fläche 520 (H) x 292 (V) Helligkeit 250 cd/m2 Reaktionszeit 5 ms Farbe 16,7M Betriebsspannung DC 12 V Stromverbrauch in Betrieb ≤ 26 W Stromverbrauch in Standby <1W Analoges TV-System PAL, SECAM Digitales TV-System DVB-T/T2, DVB-S/S2, H2.6.
ALDEN Warranty The ALDEN warranty covers the following: Alden SAS warrants to the initial Buyer the products for a standard period of two years from the original date of purchase of the product by the end user. The end user must return the warranty form that is enclosed in the user’s guide with a copy of the invoice to Alden. If this document is not returned, the warranty will begin at the date of purchase by the initial Buyer.
Warranty Alden recommends that the installation should be done by a professional technician. If you choose to install the product yourself, you will be responsible for security matters. In this case, you must have the necessary competence. You will have to respect the rules applicable for professional installers. Respect the law. The product may only be used for the intended purpose. Warranty: The buyer will contact his retailer if problems occur with the product.
Alden Deutschland GmbH • Feldbrügge 14 • 49434 Neuenkirchen-Vörden Telefon 05493 - 913660 • Telefax 05493 - 913663 info@alden-deutschland.de • www.alden-deutschland.