
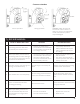
Replacement Part List


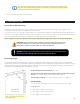


12
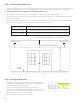
STEP 1: Measuring the Mount Site
1. Measure the length of your awning along the wall where you intend to install it. This line will be the highest point of
your awning and align with the top of the wall bracket. Use a leveler to make a chalk line across the distance.
2. Important: double check that the line is level all the way across.
3. Be sure that the line is centered over the patio door, window, or other feature, if applicable.
4. Now that you have a straight, centered line, measure the middle point and mark it. This is where the middle wall
bracket will be installed.
5. Take a wall bracket and place the top of it, completely level, under the line, as shown in the diagram below. With
chalk or a pencil, mark the position of all the wall brackets and their bolt holes.
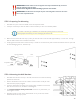
STEP 2: Drilling the Bolt Holes
1. Now that you have a straight, level line across the wall with the
locations of the wall brackets and their bolt holes marked, you
will drill holes to mount the brackets.
2. Using a 16mm masonry drill bit, drill the rst bolt hole
approximately 4 inches (9 centimeters) deep, as shown in the
diagram. This must be drilled through solid brick or concrete to
oer the necessary support for the awning.
3. Drill the remaining holes exactly as in step 2.
Awnings < 10.8 Feet Requires only 2 wall brackets total: one for each end of the torsion bars.
Awnings 10.8 - 14 Feet Requires 3 wall brackets total: one for each end, and one in the middle.
Awnings 14.5 - 20 Feet Requires 4 wall brackets total: one for each end, and two in the middle.
Wall bracket Wall bracket
Level (horizontal line)
Wall bracket leveled against horizontal line
Drill 9 cm (~4') deep