
Use and Care Manual


13
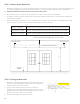
STEP 3: Preparing For Mounting
1. Now that all of your holes are drilled, insert the expansion bolts.
2. It may be necessary to drive the bolts in with a wooden (or other non-metallic) mallet.
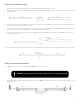
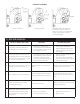
STEP 4: Mounting the Wall Brackets
1. Now that the bolts are securely in the wall, remove the nuts that are loosely
placed over the bolts.
2. Place a wall bracket onto one set of bolts. This should be an easy t if the
bolt holes are properly aligned.
3. Once the wall bracket is resting on the bolts, place a washer over the bolt,
then secure it with a nut, as shown in the diagram.
4. The brackets MUST sit rmly on the wall. If there is any movement, you
must tighten it more.
5. Repeat this step for each of the wall brackets. Once you do this, all wall
brackets will be securely in place.
IMPORTANT: All bolt holes must be aligned vertically and horizontally to ensure
that the awning hangs straight.
Double check alignment before drilling if you are not certain.
IMPORTANT: The diameter and depth of your mounting holes must be the same
size as the expansion bolts.
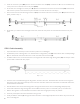
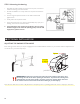
3. Make sure that the bolts are rmly in place, yet let them stick out of the wall approximately 1 inch or less - enough
that the wall bracket can be installed onto them.
4. Firmly tighten the bolts with a 19mm hex key. It is best to use the hex key with a closed end rather than an open end
to avoid damaging the nut, should it slip.
If a mallet is necessary for installation, we recommend placing the nut on the screw
(loosely) before hammering to avoid damaging the bolt threads.
Expansion bolt
Bolt
Spring washer Nut
Washer
Washer
CROSS SECTION
OF WALL