
Instructions / Assembly


10
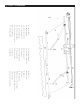
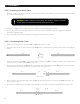
STEP 7: Front Bar & Arm Assembly
Q
P
P
Q
Steps 1-7
WARNING Be sure that the safety sleeves holding the two front bar arms are
secured to the torsion bar. Failure to check this could result in injury.
1. Put the arm bar link (Q) and the blocker (P) into the front bar (wedge shaped piece).
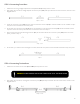
2. Move the blocker (P) to the middle of the arms.
3. Move the arm bar link (Q) until it connects with the arm’s hole.
4. Align the front bars and the arms.
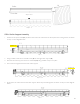
5. Using a Phillips screwdriver, tighten both bolts upwardly.
6. Fasten the arm bar’s self locking nut to the front bar tightly, using a ribbon tube spanner.
7. Lastly, place the blocker (P) in the center of the two arms and fasten it.
Insert in
Tighten Tighten
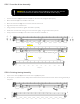
STEP 8: Finishing Awning Assembly
1. Tap the front bar caps (R) and the torsion bar caps (U) into place.
2. At this point, it is safe to cut the safety sleeves that hold the arms and torsion bar down. Awning assembly is
complete!
R
R
UU