
Instructions / Assembly


6
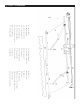
STEP 2: Connecting Roller Tubes
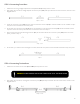
1. Gather the two long, silver roller tubes (A-1 and A-2) and lay them in a line.
2. Also gather the one short, silver connector tube (A-3) and lay it between the two roller tubes, as seen in the diagram
below.
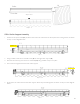
3. Insert the connector tube (A-3) into the interior end of the roller tube (A-2). If insertion is dicult, use a mallet to tap
it into place. One inserted, screw (A-A-1) it into place.
4. At this time, the connector tube (A-3) will be connected to one of the two roller tubes (A-2) and secured with screws.
A portion of the connector piece will stick out of the roller tube until step 5.
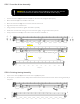
5. Now, connect the second remaining roller tube (A-1) to the other side of the connector tube (A-3) and screw it into
place, just like in step 3.
6. At this time, you will have one full-length roller, with both roller tubes connected and screwed securely into place.
A-1 A-3 A-2
Steps 1 and 2
Steps 3 and 4
A-1 A-3 A-2
A-A-1
Steps 5 and 6
A-1 A-2
🔧 ASSEMBLY
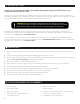
STEP 1: Preparing Your Work Space
1. Before you begin, it is best to lay out all necessary tools to make setup smoother. Consult the required tools section
for the list of necessary tools.
WARNING DO NOT remove the safety wrap that holds the awning arms down.
Serious injury can result from removing the wrap too soon.
2. Open the awning box and unwrap each piece carefully to avoid damaging the product.
3. Lay out each piece of the awning to ensure that all pieces are present. Consult the parts diagram for detailed
information regarding parts.
4. Open the small, inner box that contains the small parts and lay them out as well.