
Instructions / Assembly


12
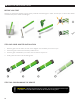
STEP 11: Finishing Awning Assembly
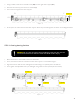
1. At this point, it is safe to cut the safety sleeves that hold the arms and torsion bar down. Awning assembly is
complete!
2. Now, proceed to the wall mounting section.
R
R
WW
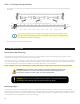
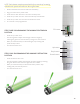
If you nd that the fabric wraps unevenly or that the two arms won’t open together at the
same time, look at the stability of the two arms. Solution: adjust the arm bar link’s position
on the front bar outwards, as necessary.
🔨 INSTALLATION
Notes About Wall Mounting
This awning can be secured to reinforced concrete, brick, and wood, however this awning kit only supplies screws
suitable for mounting to brick and reinforced concrete walls.
If you wish to secure your awning to wood, please use carriage bolts of adequate length and of an appropriate diameter
to secure the awning to wood beams. The bolt size depends on the size of wood; these can be purchased at a hardware
store. We recommend a professional installer for the safest and most secure installation.
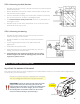
Never attempt to secure the wall brackets to loose wall stones or any surfaces that are not absolutely rm!
WARNING: Failure to securely fasten all the brackets to the wall could result in
the collapse of the awning and cause personal injury or death.
CAUTION: Proper location of the brackets is the most important aspect of the
awning installation. It is critical that you fasten all the mounting brackets to
studs, joists, headers or other major structural components.
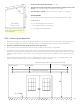
Mounting Height
It is important to take the awning’s drop area into consideration before bolting your wall mounts. If you would like to
mount above a patio door, for example, please leave at least 8 inches above the door frame and be sure that the awning
does not interfere with opening and closing the door. The drop angle can only be changed minimally, so take this into
consideration when deciding where to place your awning.
X
X