
Instructions / Assembly


13
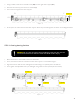
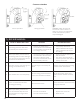
WALL
SIDE VIEW
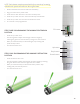
• Recommended Installation Height: 8-12 feet.
• The ideal drop angle (when fully extended) has already been set in the
factory, so you may not have to change the pitch/angle.
• The awning has a drop of 24 inches when at a slope, or 15 degrees.
CALCULATIONS:
You can use the following formula to calculate the appropriate angle.
C = A + 0.17 * L
A = The desired height of the front bar
L = The length of the arm stretched out
C = The height of the wall brackets
We recommend that the awning surface
make an angle of about 80 degrees to
the wall when open.
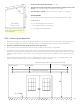
STEP 1: Measuring the Mount Site
1. Measure the length of your awning along the wall where you intend to install it. This line will be the highest point of
your awning and align with the top of the wall bracket. Use a leveler to make a chalk line across the distance.
2. Important: double check that the line is level all the way across.
3. Be sure that the line is centered over the patio door, window, or other feature, if applicable.
4. Now that you have a straight, centered line, measure the middle point and mark it. Now measure the middle point
between the right side and the middle line, and the middle point between the left side and the middle line. You will
install two of the brackets on these points. The remaining two brackets will be installed on the far right and far left
points.
5. Take a wall bracket and place the top of it, completely level, under the line, as shown in the diagram below. With
chalk or a pencil, mark the position of all the wall brackets and their bolt holes.
Wall bracket Wall bracketWall bracket
Ground
Wall bracket leveled against horizontal line
Level (horizontal line)