
Instructions / Assembly

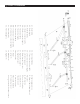

8
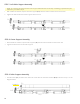
Step 8
B-1 B-3 B-2
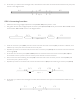
STEP 4: Connecting Torsion Bars
1. Gather the three white torsion bars (B-1, B-2, B-3) and lay them in a line.
2. Also gather the two short, rectangular connection pieces (B-B-1, B-B-2) and lay one between B-1 and B-3, and the
other between B-3 and B-2, as seen in the diagram below.
WARNING DO NOT REMOVE THE SAFETY SLEEVES THAT HOLD THE ARMS DOWN!
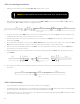
Step 1 and 2
B-1 B-B-1 B-3 B-B-2 B-2
3. Insert the connector piece (B-B-1) into the interior end of the torsion bar on the left (B-1). If insertion is dicult, use
a mallet to tap it into place. Once inserted, screw it into place.
4. Repeat this process on the other side; insert the other connector piece (B-B-2) into the interior end of the torsion
bar on the right (B-2).
5. At this time, the rectangular connector pieces (B-B-1, B-B-2) will be connected to each of the outer torsion bars (B-1,
B-2) and secured with screws. A portion of the connector pieces will stick out of the torsion bars.
6. Now, connect the third remaining torsion bar (B-3) to the other side of the connector piece on the left (B-B-1) and
screw it into place, just like in step 3.
7. Please repeat this process on the other side; connect the remaining torsion bar (B-3) to the remaining connector
piece (B-B-2).
8. At this time, you will have one full-length torsion bar, with both arm pieces connected and screwed securely into
their place.
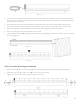
Steps 3 - 7
B-1 B-B-1 B-3 B-B-2 B-2
STEP 5: Fabric Assembly
1. Open the fabric box carefully to ensure that the product is not damaged.
2. Unfold both pieces of awning fabric. You should have one large fabric piece (M) and a valence with a scalloped edge
(O). You should also have three fabric liner cords, two thick and one thinner (N).
3. Thread the fabric liner, one thick and one thin, through both ends of the large awning fabric (M). This may be a slow
process and is easiest with two people.