
Instructions / Assembly


9
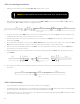
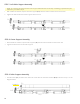
Steps 6 - 9
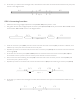
Steps 4 and 5
Roller
Front bar
M
R
Q
2 23 31 1
P P
Q
R
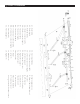
4. Once the liner is threaded through the large fabric, nd the roller tube. Thread the fabric and its liner through the
slot/notch in the roller tube all the way to the end. Note: the fabric has a front and a back. The back side has a hem,
and should face downwards.
5. Now thread the other end of the awning fabric through the slot/notch in the front bar (wedge-shaped piece).
6. Once both sides of the large awning fabric are threaded, with one person on each side, pick up the roller tube.
7. Roll the awning fabric counterclockwise around the roller tube as tightly and evenly as possible.
8. Once fully rolled, place the roller tube back on the ground.
9. Finally, thread the valance (O) through the other slot/notch in the wedge-shaped front bar all the way to the end, as
seen in the diagram.
O
N
Steps 1, 2, 3
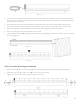
STEP 6: Front Bar Wrist Support Assembly
1. Slide the blocker (P) and the arm bar link (Q) into the wedge-shaped front bar through the large trough/slot.
2. Put both the left and right plastic covers (R) on each end of the front bar.
3. Tighten the screws on the covers to lock the fabric into position.