User Manual Drywall Sander Model: DP-3000 www.dpairless.
1. PRODUCT DESCRIPTION The machine is designed for sanding drywalls, ceilings and walls of the inner and outer surfaces, clearing the floor residues, paint coatings, adhesive and loose plaster etc. Our machine is not suitable for processing the object containing asbestos. You must abide by certain safety precautions when using the equipment. In order to prevent injuries and damages from occurring, you must always read through this operating manual carefully.
. SAFETY INSTRUCTIONS The following pictograms appear throughout these operating instructions: Indicates danger of injury, risk to life and possible damage to the appliance if these instructions are not followed. Indicates the presence of electric shocks. Read through these operating instructions carefully before using the appliance. Become familiar with the functions and method of operation. To ensure proper operation, always maintain the appliance according to the instructions.
2) Electrical safety a) Power tool plugs must match the outlet. Never modify the plug in any way. Do not use any adapter plugs with earthed (grounded) power tools. Unmodified plugs and matching outlets will reduce risk of electric shock. b) Avoid body contact with earthed or grounded surfaces, such as pipes, radiators, ranges and refrigerators. There is an increased risk of electric shock if your body is earthed or grounded. c) Do not expose power tools to rain or wet conditions.
. PRECAUTIONA ON USING DRYWALL SANDER Attention! You must abide by the following basic safety measures against electrical shocks, injuries and the danger of fire when using electric tools. Read and abide by these instructions before you start to use any tools. These instructions must be kept in a safe place. _ The equipment must never be used in surroundings where an explosive atmosphere exists. _ Do not let the cable touch any parts of your body.
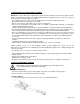
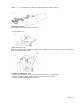
--With dust hose and the dustproof ring and connected with the extension rod[1-2] 6.2 Electronic Control This machine has the characteristics as below: --Lock-on switch [1-3]; --Adjustable Speed [1-4] Adjust the speed from 800-1700rpm by turning the speed wheel [1-4]. In this way, user can choose different speed for different sanding surface. 6.
Attention: Only install the specified sanding pad on the machine. 6.4 Stick the Sanding Paper to the Pad【1-6】 Please ensure the holes on the sanding paper to fit the holes on the pad accurately. 6.5 LED【1-7】;【1-8】 LED light,3.8W can work in a dark environment. LED light can be adjusted on every side. 6.6 Suction power adjustment【1-9】 Clockwise to reduce suction power, counter-clockwise to increase suction power.
6.7Grinding Adjacent Edges【1-10】 Detachable brush segment can reach up to the adjacent edge with ease. 6.8 To change the dust hose. -- Loosen the hoop by the screwdriver, take out the dust hose [1-11] -- Counterclockwise rotation of the dust hose [1-12] 6.9 Disassemble the extension rod [1-13] When disassemble the extension rod, pls must press the limited knob, then take out the extension rod.
7. Operate the Machine --Do not control the machine’s head. --Hold the machine with both hands. --Before operating the machine, make sure every fastening handle is closed. --Connect the machine to the main power supply. -- Before switching on the machine, keep the sanding head slightly away from the work surface. -- Start the machine for necessary sanding work. Operate the machine with short length in narrow and awkward area. Run the machine with medium length for higher walls.
Use less thrust during the task. (3) Motor gets hot. -- Foreign substances have got inside the motor. Have the foreign substances removed. -- Lack of or contaminated lubrication grease. Have lubricating grease applied or replaced. -- Pressure too high Use less thrust during the task (4) Frequent or strong sparks on the commutator. -- Short circuit on the armature. Have the armature replaced. -- Carbon brushes worn out or jammed Have the carbon brushes checked. -- Rough running of the commutator.
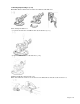
Exploded view Page 11 of 13
Page 12 of 13
Page 13 of 13