www.ALEKOPRODUCTS.com INSTRUCTION MANUAL for ALEKO® RETRACTABLE AWNING www.ALEKOPRODUCTS.
www.ALEKOPRODUCTS.com Important Safety Precautions WARNING NOTE: FOR PERSONAL SAFETY, IT IS IMPORTANT TO FOLLOW THESE INSTRUCTIONS, PLEASE KEEP THIS MANUAL IN A SAFE PLACE This warning triangle calls attention to hazards that can lead to death or serious injuries. This sign identifies important notes. Read these instructions carefully before you begin the assembly. WARNING: The awning is primarily intended for protection against the sun.
www.ALEKOPRODUCTS.
www.ALEKOPRODUCTS.com WARNING: Awning Assembly DO NOT REMOVE SAFETY BANDS FROM THE ARMS UNTIL INSTRUCTED TO DO SO. Step 1: Put the fabric tube coupler (10) into Step 2: Slide the flexible fabric rod (6) Step 3: Place the fabric tube so that the coat of super glue to all self-tapping the fabric (5). gear box will be located (left end). Then the fabric tubes A & B (3&4).
www.ALEKOPRODUCTS.com Step 7: Connect the square and the front Step 8: Locate the fabric tube bracket on Step 9: Insert the side of the fabric hanging secure the square bars with a square bar the fastening bolt with 1/4'(6mm) Allen of the awning frame mentioned in step 7. bars of the awning frames A & B (1&2) and bolt (15) and tighten the front bar fastener (10) centered at the seam with 1/4'(6mm) Allen wrench. the right side of the awning frame. Loosen wrench. And remove the bracket from the bar.
www.ALEKOPRODUCTS.
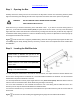
www.ALEKOPRODUCTS.com Step 1: Opening the Box Carefully remove the awning from the box and remove the Styrofoam cushions from the awning. Remove plastic bags from the awning and carefully place all of the components around the work area to prevent any damage. WARNING: DO NOT REMOVE SAFETY BANDS FROM THE ARMS UNTIL INSTRUCTED TO DO SO. Think about how you will mount the awning to the wall ahead of time.
www.ALEKOPRODUCTS.com PROPER LOCATION OF THE BRACKETS IS THE MOST IMPORTANT ASPECT OF THE AWNING INSTALLATION. . IT IS CRITICAL THAT YOU FASTEN ALL THE MOUNTING BRACKETS TO STUDS, JOISTS, OR OTHER MAJOR STRUCTURAL COMPONENTS. WARNING: FAILURE TO SECURELY FASTEN THE BRACKETS TO THE WALL COULD RESULT IN COLLAPSE OF THE AWNING AND CAUSE PERSONAL INJURY OR DEATH Step 3: Drilling the Holes 3.1.
www.ALEKOPRODUCTS.com NOW YOU CAN REMOVE SAFETY BANDS FROM THE ARMS. If the square bar can’t be inserted into the wall brackets due to misalignment you should slightly loosen the wall brackets' nuts and then try again. Don’t forget to tighten the nuts after the installation. Step 6: Changing the Drop Angle (Optional) IT’S HIGHLY RECOMMENDED TO PERFORM THIS STEP WITH A HELPER. FAILURE TO DO SO MAY RESULT IN UNWANTED COMPLICATION DURING THE ADJUSTMENT.
www.ALEKOPRODUCTS.com Optional Awning Accessories AC Tubular Motor DM-45R ALEKO® tubular motor opens and closes your awnings with just a simple click of a button on the remote control. Powerful, reliable, simple to install and adjust it will bring a new level of comfort to your home. ALEKO® Sun-wind Sensor is designed to close your Sun-Wind Sensor awning automatically after sunset or when the wind speed gets too fast and open it when the sun starts to shine again.
www.ALEKOPRODUCTS.com Troubleshooting Motorized Awning Problems No. 1. ISSUE The awning does not work when operated with the remote control. REASON SOLUTION No power supply. Check the plug to see whether its The automatic circuit breaker Put the breaker in your house is in “off” position. 2. 3. 4. 5. 6. properly connected. position. switch to “on” Call the specialist if you don’t know the location of the circuit breaker. The voltage is too low.