
Replacement Part List


www.ALEKOPRODUCTS.com
8
PROPER LOCATION OF THE BRACKETS IS THE MOST IMPORTANT ASPECT OF THE
AWNING INSTALLATION. IT IS CRITICAL THAT YOU FASTEN ALL THE MOUNTING
BRACKETS TO STUDS, JOISTS, OR OTHER MAJOR STRUCTURAL COMPONENTS.
.
WARNING:
FAILURE TO SECURELY FASTEN THE BRACKETS TO THE WALL COULD
RESULT IN COLLAPSE OF THE AWNING AND CAUSE PERSONAL INJURY
OR DEATH
Step 3: Drilling the Holes
3.1. Use a 5/8(16 mm) masonry drill bit to make 4” (9cm) deep holes for the brackets at the marks mentioned in the
previous step.
3.2. Inset the anchor bolts. If the bolt doesn’t get in easily you may use a hammer and a wooden block.
Note : The only part of the anchor that has to be outside the wall is the threaded part.
Figure shows the holes 4 inches (9cm) deep in the wall
DO NOT DRILL THROUGH MORTAR OR DRYWALL! THESE MATERIALS DON’T
PROVIDE ENOUGH SUPPORT TO SECURE THE AWNING.
THE ANCHOR BOLTS INCLUDED IN THE PACKAGE ARE NOT SUITABLE FOR
MOUNTING THE AWNING TO WOODEN BEAMS.
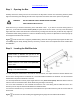
Step 4: Attaching the Brackets
4.1. After inserting the anchor bolts add the washers. Then install the wall brackets. Place another set of washers on
top of the brackets and tighten the 3/4(19mm) nuts.
Figure shows the proper installation of the wall brackets,
Step 5: Hanging the Awning
5.1. Have another person to help you lift the awning.
5.2. Insert the square bar of the awning into the wall brackets.
5.3. Put the 9/16(14mm) retaining bolt through the bracket and tighten it with the nut on top.
5.4. Repeat for the rest of the brackets.
Figure provides the visual of how the awning should be installed.