PORTABLE AIR CONDITIONER OWNER' S MANUAL Models C425 C535 Thank you for purchasing this product. Please read this Owner's Manual carefully before operating. Table of Contents.................................. ......................
CONTENTS 1.SAFETY RULES............................................................................. 1 2.NAMES OF PARTS.......................................................................... 2 3.ACCESSORIES................................................................................ 3 4.OPERATION PANEL OF THE AIR CONDITIONER........................ 3 5.OPERATING INSTRUCTION FOR THE AIR CONDITIONER ........ 5 6.INSTALLATION...............................................................................
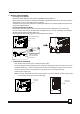
SAFETY RULES 1. Do not connect unit to any AC socket in disrepair. 2. Do not use in the following locations: A: Next to source of fire B: An area where oil is likely to splash. C: An area exposed to direct sunlight. D: An area where water is likely to splash. E: Near a bath, a shower or a swimming pool. 3. Never insert your fingers or any foreign objects into the air outlet. Take special care to warn children of these dangers. 4.
NAMES OF PARTS Operation Panel Horizontal Louver Vertical Louver Blades Carrying Handle (both side) Water Tank Caster Fig.1 Air Inlet (indoor) Power Cord Fixing Strap (insert) Drain Plug Air Outlet outdoor Power Cord and Plug Air inlet outdoor Fig.
ACCESSORIES PARTS : PARTS NAME : QUANTITY : Duct 1 Adaptor A (for permanent duct mounting) 1 1 Adaptor B (for temporary duct mounting) Expansion plug 4 Power Cord Fixing Strap (for bundling the power cord) 1 Drain Hose(Continuous drainage) 1 Drain Hose(Connected with water tank) 1 1 Window Slider Kit Check all the accessories are included in the package and please refer to the installation instructions for their usage.
Key Pad Functions Fig.3 1 TIMER ON Button: Used to initiate the AUTO ON start time program, and used to adjust Auto-Timer settings. 2 TIMER OFF Button: Used to initiate the AUTO OFF stop time program, and used to 3 adjust Auto-Timer settings. Used to adjust (forward) temperature settings(1oC/2oF increments). 4 Used to adjust (backward) temperature settings(1oC/2oF increments). 5 MODE Button: Selects the appropriate operating mode: Cool-Heat-Fan-Dry (Dehumidify).
OPERATING INSTRUCTING FOR THE AIR CONDITIONER Before Starting This Unit 1) Select a suitable location, make sure you have easy access to an electrical outlet. 2) Install the Flexible Exhaust Hose and the Adjustable Window Slider Kit as depicted in Fig.4 & Fig.4a Fig.4 Fig.4a NOTE: Step 2 is required only while using the cooling mode . 3) Plug the unit into a 220-240V~50Hz/ or 115V~ 60Hz (Refer to the nameplate located on the right side of the unit.) grounded electrical outlet.
Operating Instructions O O O O 1 COOLING OPERATION (Operating temperature range: 17 C-32 C/62 F-92 F) - Press the "MODE" button several times until the "COOL" indicator light comes on. - Press the "TEMP SETTING" buttons " " or " " to select your desired room temperature. The temperature can be set within a range of 17OC-30OC/62OF-88OF. - Press the "FAN SPEED" button to choose the fan speed.
6 WATER TANK DRAINAGE A) During Cooling Mode: - Install the Flexible Exhaust Hose and the Adjustable Window Slider Kit . - When the water level inside the internal tank reaches a predetermined level, the unit stop operation automatically. The fan motor will continue to operate. - Carefully remove the water tank from the cabinet and dispose of the water. Replace the water tank back to its original position.
INSTALLATION 1. Window Kit Installation Your window kit has been designed to fit most standard Vertical and horizontal window applications, However, it may be necessary for you to improvise/modify some aspects of the installation procedures for certain types of window. Please refer to Fig. 7 & Fig. 7a for minimum and maximum window openings. Horizontal window Horizontal window Window Slider Kit Minimum:67.5cm(2.22ft). Maxmum:123cm(4.04ft). Window Slider Kit Minimum:67.5cm(2.22ft). Maxmum:123cm(4.04ft).
A) TEMPORARY1. Attach one end of the duct to the exhaust air outlet of the mobile air condition, push it downwards, be sure to fix thoroughly. (See Fig.9) 2. Attach the other end of the duct to adaptor B. 3. Put the end of duct to a nearby window. Expansion plug position Adapter A B) PERMANENT1. Attach one end of the duct to the exhaust air outlet of the mobile air conditioner. According to the arrow direction, push it downwards, be sure to fix thoroughly. (See Fig.9) 2.
MAINTENANCE IMPORTANT: 1) BE SURE TO UNPLUG THE UNIT BEFORE CLEANING OR SERVICING. 2) DO NOT USE GASOLINE, THINNER OR OTHER CHEMICALS TO CLEAN THE UNIT. 3) DO NOT WASH THE UNIT DIRECTLY UNDER A TAP OR USING A HOSE. THE ELECTRICAL CAUSE DANGER. 4) IF THE POWER CORD IS DAMAGED, IT SHOULD BE REPAIRED BY MANUFACTURE OR ITS AGENCY. 1 AIR FILTER - Clean the air filter at least once every two weeks to prevent inferior fan operation because of dust.
TROUBLE SHOOTING TROUBLES POSSIBLE CAUSES SUGGEST REMEDIES 1. UNIT DOES NOT - Water full indicator blinks, water tank Dump the water in the water tank. START WHEN PRESSING is full. BUTTON - Room temperature is higher than Reset the temperature. the set temperature.(Heating mode) - Room temperature is lower than Reset the temperature. the set temperature.(Cooling mode) 2. NOT COOL ENOUGH - The windows or doors in the room are not closed.
One Year Limited Warranty General The Alen Corporation portable air conditioners are warranted for a period of one year from the date of original purchase. Alen will, at its option, either furnish a replacement part or replace your portable air conditioner provided the product is determined to be defective as a result faulty material or workmanship while in normal use. Replacement parts or units will be either new or refurbished.