
Owner`s manual


A) TEMPORARY-
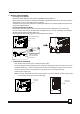
1. Attach one end of the duct to the exhaust air outlet of the
mobile air condition, push it downwards, be sure to fix
thoroughly. (See Fig.9)
2. Attach the other end of the duct to adaptor B.
3. Put the end of duct to a nearby window.
B) PERMANENT-
1. Attach one end of the duct to the exhaust air outlet of the
mobile air conditioner. According to the arrow direction,
push it downwards, be sure to fix thoroughly. (See Fig.9)
2. Install the adaptor A onto the wall by using 4 expansion
plugs and screws, be sure to fix thoroughly. (See Fig.10)
3. Attach the other end of the duct to adaptor A.
4. Cover the hole using the adaptor cap when not in use.
The duct can be compressed or extended between 20inches
and 78inches, but it is desirable to keep the duct length to a
minimum.
IMPORTANT:
DO NOT OVER BEND THE DUCT (SEE Fig.11)
Fig.11
4. WATER TANK SAFETY FEATURE
Fig.12
9
Fig.13
max 120CM
min 30CM
Fig.10
Adapter A
Expansion plug
position
This unit is equipped with a water tank which
is fastened with a band to protect the water
level switch in transportation. Prior to the
first usage, remove the water tank from the
air conditioner and remove this band (see
figure 13). Return the water tank to it’s original
position in the air conditioner.
When the water level reaches a pre-determined
level within the tank, the digital display will show
"P1" and the water full indicator light will flash(red).
Carefully remove the water tank from the cabinet
and dispose of the water (see figure 14). Replace
the water tank back to its original position. The red
light will stop flashing and the "P1" will stop being
displayed.
Note: When you remove the water tank, please
do so slowly and gently to prevent from spilling
the condensed water.