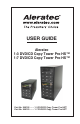
USER GUIDE Aleratec 1:3 DVD/CD Copy Tower Pro HS™ 1:7 DVD/CD Copy Tower Pro HS™ Part No. 260152......... 1:3 DVD/CD Copy Tower Pro HS™ Part No. 260153.........
Copyright/Model Identification The content of this manual is for informational purposes only and is subject to change without notice. This manual is copyright with all rights reserved. Under copyright laws, this manual and the software described within may not be copied, except in the normal use of the product(s) described within or to make a backup copy. Copyright© 2013 Aleratec, Inc. 9851 Owensmouth Avenue Chatsworth, CA 91311 U.S.A.
Radio/TV Interference Statement The equipment described in this guide emits radio frequency energy. If it is not installed in accordance with the manufacturer’s instructions, it may cause interference with radio or television reception. This equipment has been tested and found to comply with the limits for a Class B digital device, pursuant to Part 15 of the FCC Rules. These limits are designed to provide reasonable protection against harmful interference in a residential installation.
www.aleratec.
Table of Contents Introduction........................................................................................1 Product Features...................................................................................... 1 Key Items – DVD/CD Copy Tower Pro HS............................................ 2 Removable Hard Disk Drive...................................................................3 DVD/CD Copy Tower Pro HS Display Panel.........................................5 Precautions..................
www.aleratec.
Introduction Thank you for purchasing the DVD/CD Copy Tower Pro HS. Please read this User Guide thoroughly before using this product. Product Features The DVD/CD Copy Tower Pro HS is a multiple disc DVD/CD Duplicator. The DVD/CD Copy Tower Pro HS is based on Dual-Standard 8-in-1 DVD±R/RW Technology, that supports all popular DVD formats. • • • • • • • • • • High DVD recording speed for high-volume duplicating.
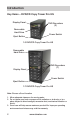
Introduction Key Items – DVD/CD Copy Tower Pro HS Display Panel DVD Recorders (3) Removable Hard Drive Power Switch Eject Button 1:3 DVD/CD Copy Tower Pro HS Removable Hard Drive DVD Recorders (7) Display Panel Power Switch Eject Button 1:7 DVD/CD Copy Tower Pro HS Note: Choose a Good Location 1. Allow adequate clearance for moving parts. 2. Do not place near heat sources such as radiators or air ducts, or in a place subject to direct sunlight, excessive dust, mechanical vibration or shock. 3.
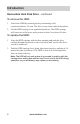
Introduction Removable Hard Disk Drive Carriage Lever Removable Hard Disk Drive Key in Lock Your Copy Tower Pro HS is equipped with a removable hard disk drive (HDD) for storing images of frequently copied discs. Storing an image of a disc you want to copy on an HDD improves duplication speed, and adds the convenience of not having to look around for the actual source disc you want to copy.
Introduction Removable Hard Disk Drive - continued To remove the HDD: 1. Unlock the HDD by inserting the key and turning it left (counterclockwise) 1/4 turn. The drive is now in the unlocked position. 2. Lift the HDD carriage lever upward and pull out. The HDD carriage will come out of the tower and a protective drive bay door will close. To replace the HDD: 1.
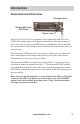
Introduction DVD/CD Copy Tower Pro HS Display Panel www.aleratec.com 3 2 1 ENT ESC 4 5 1 Display shows all functions and messages 2 ENT button is used to execute a selected function 3 ESC button is used to cancel a selected function 4 UP arrow is used to scroll up through functions or menus 5 DOWN arrow is used to scroll down through functions or menus www.aleratec.
Precautions Before installing your DVD/CD Copy Tower Pro HS, please read the following. Installation Avoid placing the DVD/CD Copy Tower Pro HS in a location subject to: • • • • • • High humidity High temperature Excessive dust Mechanical vibration Direct sunlight Electromagnetic radiation Power This product has a manually switchable power supply. Make sure that the power supply is set to the proper voltage for your region.
Overview Main Menu This section provides a listing of the functions on the DVD/CD Copy Tower Pro HS. Detailed descriptions of each function are given in the next section. The functions are numbered for easy reference; these numbers are also used in the next section. There are 12 main menu items that will display in the DVD/CD Duplicator Display Panel. These are: ENT ESC 7. Disc Info 1. Copy ENT ENT ESC 8. Select Source 2. Test ENT ENT ESC 9. Image ENT ENT ESC 10.
Overview Subfunctions The main menu “Image” function has 8 subfunctions. These are: 9.1 Load 9.2 Delete Image 9.3 Image Info 9.4 Compare Image 9. Image ENT ESC 9.5 Select Image 9.6 Select Src Drive 9.7 Image Format Info 9.8 Edit The main menu “Edit Track” function has 4 subfunctions. These are: 10.1 CD to CD Edit 10.2 (Not supported) 10. Edit Track ENT ESC 10.3 Play Audio Track 10.4 Close Session 8 www.aleratec.
Overview The main menu “Setup” function has 23 subfunctions. These are: 11.01 Language 11.02 CD Burn Speed 11.03 DVD Burn Speed 11.04 Read Speed (max.) 11.05 Auto Drive Start 11.06 Startup Menu 11.07 Auto Verify 11.08 Auto Compare 11.09 Auto Prescan 11.10 Eject Disc 11.11 Burn On The Fly 11. Setup ENT ESC 11.12 Burn Mode 11.13 Display Time 11.14 Button Sound 11.15 Device Info 11.16 System Info 11.17 Quick Erase Disc 11.18 Full Erase Disc 11.19 Auto Close Tray 11.20 Quick Compare 11.
Overview Subfunctions - continued The main menu “Adv Setup” (Advanced Setup) function has 18 subfunctions. These are: 12.01 UnderRun Protect 12.02 Overburn 12.03 Read Error Skip 12.04 Format HDD 12.05 Verify HDD 12.06 Burn-in 12.07 Update Firmware 12.08 Compare Firmware 12.09 Hardware Diagnostic 12. Adv Setup ENT ESC 12.10 Load Default 12.11 CD&G Format (Not Supported) 12.12 ISRC & MCN 12.13 Switch Link-Host (Not Supported) 12.14 CD Text 12.15 Password 12.16 Disc Counter 12.
Using the DVD/CD Copy Tower Pro HS Inserting Discs 1. Press the Eject button on each drive for which you’ll be inserting a disc. 2. Place the disc in the tray. The printed (non-shiny) surface of the disc should be up. 3. To close the tray, press the Eject button or lightly push the front center of the tray. Note: • Never place two discs in the tray at the same time. • Do not touch the surface of the disc where it has been recorded.
Using the DVD/CD Copy Tower Pro HS Power Up Sequence During the normal powering up sequence the DVD/CD Copy Tower Pro HS will preform a self-test sequence. Overview: Copies from Source DVD/CD • • • • • • Go to menu item 8 (Select Source) by pressing the arrow buttons; press ENT to select. You can scroll through the drives in your duplicator with the arrow keys. Press ENT to select any one of the DVD/CD recorders to be used as a reader for your source disc.
Using the DVD/CD Copy Tower Pro HS Main Menu Functions are selected with the arrow keys. The numbers correspond to the Function listing in the previous section. Copy During the duplication process, data will be simultaneously written to all blank discs loaded in the DVD/CD Copy Tower Pro HS. For fast copy from source DVD/CD master disc, before starting the duplication process, please make sure the source disc is placed in one of the DVD Recorders.
Using the DVD/CD Copy Tower Pro HS Main Menu Test This function is a test process that simulates data being written to the blank disc, without actually burning a DVD or CD. When the test process is complete, the discs will remain blank. For ±RW discs that contain data, “Test” will quick erase all old data before simulation. Therefore, never perform “Test” on ±RW discs that contain important data. Press the ENT button to start the disc simulation, or press ESC to exit.
Using the DVD/CD Copy Tower Pro HS Main Menu Test & Copy This function will run Test described above before automatically starting the Copy Function. Press the ENT button to start the test and copy process. Before starting the Copy function, the Test function as described above will be performed. 1. 3. Test & Copy ENT ESC Testing- DVD 0% 4213.4MB d:20:15 ENT Copying- DVD 0% 4213.4MB d:20:15 ENT ESC ESC When the process is completed, the LCD will display the status. 3.
Using the DVD/CD Copy Tower Pro HS Main Menu Verify This will verify that the disc copies can be read correctly in a DVD-ROM after duplication. Leave the source disc in the DVD Recorder, and the duplicate discs in the DVD Recorders will be verified simultaneously. Press the ENT button to start disc verifying, or press ESC to exit. 1. 4. Verify ENT ESC The LCD will display the status of the verification. Verify- DVD 4213.4MB ESC When the process is completed, the LCD will display the result.
Using the DVD/CD Copy Tower Pro HS Main Menu Compare This function will compare the data on the source disc to the target discs after disc copy. Press the ENT button to do the disc compare, or press ESC to exit. Press the ENT button again to show detailed “Compare” information. The LCD display shows information for the source. 1. 5. Compare ENT ESC OK: 3 Diff: 0 ENT ESC Press ENT again for the status of each copy. DVD-ROM 4213.
Using the DVD/CD Copy Tower Pro HS Main Menu Compare - continued If the comparison fails, the LCD will display the number of discs that failed and passed. Compare Fail: 1 ESC Press the ENT button again for the status of each copy. If the comparison fails, the LCD will display the reason for the failure. Src: 02 DVD-RW TOC not match 18 ENT 6. OK: 2 Diff: 0 5. ENT ESC www.aleratec.
Using the DVD/CD Copy Tower Pro HS Main Menu Prescan The function will scan the source disc and determine if it can be read correctly and test the reading speed. The reading speed of source disc should be higher than the writing speed for the target disc(s). Press the ENT button to prescan the disc, or press ESC to exit. 1. 6. Prescan ENT ESC The LCD will display the status of the prescan. Scanning- DVD 0% 4213.4MB 40:40 ENT ESC If a disc can be read correctly, the LCD will display OK.
Using the DVD/CD Copy Tower Pro HS Main Menu Disc Info This function will show the track information of the source disc. Press the ENT button to show the disc information, or press ESC to exit. 1. 7. Disc Info ENT ESC Disc type: DVD-ROM Capacity: 4213 MB ENT Total 02 Sessions Total 10 Tracks ENT ESC ENT ESC Press the ENT button again, and use the arrow keys to display information on the tracks.
Using the DVD/CD Copy Tower Pro HS Main Menu Select Source Select Source will change the drive position for the master/source disc or disk. The source can be selected from DVD Recorders or HDD (Hard Disk Drive). Press the ENT button and arrow button to select the source, or press ESC to exit. 1. 8. Select Source ENT ESC Use the arrow keys to select HDD or DVD Recorder as source drive. Src: 01 01 IDEO ENT ESC When the source is selected, press the ENT button again. HDD Selected! 3.
Using the DVD/CD Copy Tower Pro HS Main Menu Image This function includes 8 subfunctions. These are: 9.1 Load 9.2 Delete Image 9.3 Image Info 9.4 Compare Image 9. Image ENT ESC 9.5 Select Image 9.6 Select Src Drive 9.7 Image Format Info 9.8 Edit 22 www.aleratec.
Using the DVD/CD Copy Tower Pro HS Main Menu Image This function deals with loading data onto the hard disc, called an image file. 9.1 Load To load the image file to the Hard Drive, follow this procedure: Press ENT to enter Image mode, or press ESC to exit. 1. 9. Image ENT ESC Press ENT to load. 9-01. Image Load ESC The LCD shows loading information. Load-A-DVD 4213.4MB 0% 7:30 ENT ESC After the image file is successfully loaded, the LCD shows the results. Image Load OK 4.
Using the DVD/CD Copy Tower Pro HS Main Menu Image - continued 9.2 Delete Image If you want to empty an image file stored in a particular partition, you can use the function Delete Image to do so. Select the function by pressing the DOWN arrow. 9-02. Image Delete Image ENT ESC After the image file is deleted, the LCD will display the result as shown. Partition A: Image is deleted 24 ESC The system will ask if you are sure you wish to delete. Use the UP or DOWN arrow to confirm YES or NO.
Using the DVD/CD Copy Tower Pro HS 9.3 Image Info This function shows the basic information about an image file stored in a particular partition. Select the function by pressing the DOWN arrow. 9-03. Image Image Info ENT ESC Press ENT, and the LCD will display the information about the image file. Disc Type: DVD-ROM Capacity: 4213.4MB 2. P:A 1. ENT ESC www.aleratec.
Using the DVD/CD Copy Tower Pro HS Main Menu Image - continued 9.4 Compare Image This function will compare the contents of the source DVD with the image file in the partition. Select the function by pressing the DOWN arrow. 9-04. Image P:A Compare Image ENT ESC OK:1 Diff: 0 ENT ESC Press ENT to see the details of source 1 as shown here. DVD-ROM 4213.4MB Src: 01 Total: 26 0% 7:30 When the comparison comes to an end, the LCD will display the results as shown. Compare Fail: 0 4.
Using the DVD/CD Copy Tower Pro HS Press ENT to see the details of source 2. If the comparison is identical, the LCD will display the message as shown. Tgt: 00 HDD Identical ENT ESC If the comparison fails, the LCD will show the failure. By pressing ENT twice, the LCD will display the contents of source 1 and those of source 2 do not match as shown. Tgt: 00 HDD TOC not match P:A 6. P:A 5. ENT ESC www.aleratec.
Using the DVD/CD Copy Tower Pro HS Main Menu Image - continued 9.5 Select Image This function is used to select a partition on the Hard Disc. Select the function by pressing the DOWN arrow. 9-05. Image Select Image After installing a hard disc, your copy controller will format it automatically. Each partition occupies 5GB. The number of partitions is dependent on the drive’s capacity. The partitions are designated alphabetically in sequence.
Using the DVD/CD Copy Tower Pro HS 9.6 Select Src Drive This function selects any of the DVD-Recorders as the source from which you can load data into a particular partition as an image file. Select the function by pressing the DOWN arrow. 9-06. Image P:A Image Src Drive ESC Then, use the UP and DOWN arrows to select any of the DVD-Recorders as the source. Select Img Src: 01 IDE1 DVD-ROM ENT ESC After selecting the source, you can press ENT and the LCD will display the message showing the source.
Using the DVD/CD Copy Tower Pro HS Main Menu Image - continued 9.7 Image Format Info This function lets you see how you have formatted your hard drive. It is related to function 13.4 Format HDD. There are three choices of format: CD, DVD, and DL (double layer). Select the function by pressing the DOWN arrow. Then, use the UP and DOWN arrows to select any of the DVD-Recorders. 9-07. Image P:A Image Format Info ESC ENT ESC Press ENT to confirm YES, and you will see the display shown.
Using the DVD/CD Copy Tower Pro HS 9.8 Edit This function lets you name your partitions. Only when the partition contains an image can title editing be valid. Select the function by pressing the DOWN arrow. Press ENT. 9-08. Image Edit ENT ESC Sub1 Title lets you key in a subtitle 1. You can press ENT again to key in a subtitle 2. Edit Sub1 Title ? ENT ESC When title editing is completed, you will see the display at left. Edit Title OK! 4.
Using the DVD/CD Copy Tower Pro HS Main Menu Edit Track Edit Track is a function that allows you to create your own audio compilation CDs. Several tracks can be selected from different CDs and copied to one or more blank CDs. When copying audio CDs, it is highly recommended to copy at a speed of 16x or lower to ensure good quality audio reproduction. Go to “Setup” and then “Burning Speed” to change copy speed before selecting tracks. This function includes 4 subfunctions. These are: 10.1 CD to CD Edit 10.
Using the DVD/CD Copy Tower Pro HS Main Menu Edit Track 10.1 CD to CD Edit 1. Insert a Source CD into one of the DVD Recorders and the number of blanks you want to record in the DVD Recorders. 2. Use UP Arrow or DOWN Arrow to scroll through the menu until “Edit Track” is displayed on the LCD screen. Press the ENT button to select or press ESC to go to the next setting.) 10. Edit Track ENT ESC Select “CD to CD Edit” displayed on the LCD screen. 3. 10.
Using the DVD/CD Copy Tower Pro HS Main Menu Edit Track - continued Select Track: End 1Trk03:35 ENT End edit disc and burn? Yes ENT Edit ENT ESC Burn Complete! OK: 03 ENT ESC The system will display: “Continue Edit”, “Next Disc? Yes”. Use the arrow keys to make YES or NO selection. To continue, select YES to select tracks from the next disc. Repeat steps 1 - 7 above. If yes is selected, the source disc will be ejected. Insert another audio disc to be edited.
Using the DVD/CD Copy Tower Pro HS When you have finished and the display shows: “Continue Edit”, Next Disc? Yes”, use the arrow keys to make YES or NO selection. Select NO. 8. Continue edit next Disc? No ESC The system will ask to close the disc session. “Close all disc’s session? Yes”. Use the arrow keys to make YES or NO selection. Select YES. 9. ENT Close all disc’s session? Yes ENT ESC 10. LCD display will show the process of closing the session: “Closing Session Please Wait —”.
Using the DVD/CD Copy Tower Pro HS Main Menu Edit Track - continued 10.2 (Not supported) 10.3 Play Audio Track (CDs Only) By selecting “Play Audio” you can play music with your DVD/CD Copy Tower Pro. You can connect speakers to the headphone jack on any drive. Load the CD you want to play in that drive and press the ENT button to play music. Press ESC to index to the next setting.
Using the DVD/CD Copy Tower Pro HS 10.4 Close Session (CDs Only) Selecting “Close Session” will finalize the CD; no further data can be added. This function will make the disc readable on a normal CD player. Press the ENT button to enter the setting, or press ESC to index to the next setting. 10-04 Edit Track Close Session The system will ask to close the disc session. “Close all disc’s session? Yes”. Use the arrow keys to make YES or NO selection. Select YES.
Using the DVD/CD Copy Tower Pro HS Main Menu Setup You can change the original default settings using this setup menu. There are different settings to control the duplicator’s operation. In general, using the original default settings for optimal performance is suggested. This function includes 23 subfunctions. These are: 11.01 Language 11.02 CD Burn Speed 11.03 DVD Burn Speed 11.04 Read Speed (max.) 11.05 Auto Drive Start 11.06 Startup Menu 11.07 Auto Verify 11.08 Auto Compare 11.09 Auto Prescan 11.
Using the DVD/CD Copy Tower Pro HS Main Menu Setup 11.01 Language (Optional) This function selects the language shown on the display (English, Traditional Chinese, Simplified Chinese, and Japanese). To select, press the ENT button, or ESC to exit. 11-01. Setup Language 1. ENT ESC 11.02 CD Burn Speed This setting controls the writing speed of the DVD Recorders when burning CDs. The default setting is “Auto”, which will use the highest writing speed of the recorders for the blank media being used.
Using the DVD/CD Copy Tower Pro HS Main Menu Setup - continued 11.03 DVD Burn Speed This setting controls the writing speed of the DVD Recorders when burning DVDs. The default setting is “Auto”, which will use the highest writing speed of the recorders for the blank media being used. Sometimes “Maximum” writing speed causes a high failure rate due to poor DVD quality or unstable DVD writing due to high speed. Lowering the writing speed will increase the probability of making successful copies.
Using the DVD/CD Copy Tower Pro HS 11.05 Auto Start Drive The function of the Auto Start Drive is to copy or test automatically once blank DVDs are loaded into the DVD recorders. Default setting is OFF. Press ENT button to change, or ESC to exit. 11-05. Setup Auto Start Drive ENT Auto Start Drive Off ENT ESC 1. ESC 11.06 Startup Menu This function selects the menu item that will be the first item shown on the display when you turn on the duplicator. The default setting is Copy.
Using the DVD/CD Copy Tower Pro HS Main Menu Setup - continued 11.07 Auto Verify This setting controls auto verify on the target discs. Default setting is OFF; press the ENT button to change, or ESC to exit. 11-07. Setup Auto Verify ENT Auto Verify Off ENT ESC 1. ESC 11.08 Auto Compare This setting controls auto compare of data between source and target discs after copying. 11-08.
Using the DVD/CD Copy Tower Pro HS 11.09 Auto Prescan This setting controls auto prescan of the master to verify that it can be read properly, and also tests the reading speed. Default setting is OFF; press the ENT button to change, or ESC to exit. 11-09. Setup Auto Prescan ENT 11-09. Setup Auto Prescan Auto Prescan Off ENT ENT ESC 1. ESC ESC www.aleratec.
Using the DVD/CD Copy Tower Pro HS Main Menu Setup - continued 11.10 Eject Disc This setting controls the ejection of discs by the DVD Recorders. Three options are available: “Eject Good Only”, “Eject All Disc”, and “Do Not Eject”. 11-10. Setup Eject Disc ENT Eject Disc Eject Good Only ENT ENT ESC If you select “Do Not Eject”, the disc will remain in the DVD Recorders when the job is done and you will have to eject the disc from the DVD Recorders manually.
Using the DVD/CD Copy Tower Pro HS 11.11 Burn On The Fly This setting should always be ON. Data will copy directly from the source drive to the target drives. Default setting is ON; press the ENT button to change, or ESC to exit. 11-11. Setup Burn On The Fly ENT Burn On The Fly On ENT ESC 1. ESC 11.12 Burn Mode This setting is for CDs only, and controls the writing modes of the disc, including “Disc At Once” (DAO) or “Track At Once” (TAO). Default setting is “DAO”.
Using the DVD/CD Copy Tower Pro HS Main Menu Setup - continued 11.13 Display Time This setting controls the time display. Default setting is ON; press the ENT button to change, or ESC to exit. 11-13. Setup Display Time ENT Display Time On ENT ESC 1. ESC 11.14 Button Sound This setting controls the button sound. 11-14. Setup Button Sound ENT Button Sound On ENT ESC 46 Default setting is ON; press the ENT button to change, or ESC to exit. 1. ESC www.aleratec.
Using the DVD/CD Copy Tower Pro HS 11.15 Device Info This function will show information on the display. Press the ENT button to see Device Information, using the UP and DOWN arrows to scroll through the devices, or ESC to exit. 11-15. Setup System Info 1. ENT ESC 11.16 System Info This function will show the system information on the display. Press the ENT button to see the system information, or ESC to exit. System Info ENT ESC 11-16. Setup System Info 1. ENT ESC www.
Using the DVD/CD Copy Tower Pro HS Main Menu Setup - continued 11.17 Quick Erase Disc This function is used for quickly erasing discs. Note: The Quick Erase Disc simply deletes the directory track, rather than deleting all the data from the disc (contrast this with Full Erase Disc). 11-17. Setup Quick Erase Disc ENT All data will be lost, erase? Yes ENT Erasing disc 00:24 (Quick) ENT ESC ESC ESC When the process is finished the display will show the status. Quick Erase OK:01 2.
Using the DVD/CD Copy Tower Pro HS ENT All data will be lost, erase? Yes ENT Erasing Disc 00:24 (Full) ENT ESC ESC ESC When the process is finished the display will show the status. Full Erase OK:01 2. 11-18. Setup Full Erase Fail:00 ENT ESC 11.19 Auto Close Tray When copying is completed, the tray of the DVD Recorder(s) will open so the copy may be removed. This command allows setting the time delay before the tray (of each DVD Recorder) will close.
Using the DVD/CD Copy Tower Pro HS Main Menu Setup - continued 11.20 Quick Compare Quick Compare lets you set a certain byte. When the error of a target DVD is within the set byte, the comparison between the source DVD and the target DVD will stop. The comparison of the other 6 target DVDs will continue. Press the ENT button and the DOWN arrow to enter the following figure. 1. 11-20. Setup Quick Compare ESC Press the ENT button to enter the following figure. The default is OFF.
Using the DVD/CD Copy Tower Pro HS Main Menu Advanced Setup Some advanced setup functions allows users to change the system configuration. Modification should only be made when you are fully familiar with all the functions. To enter this function, press and hold the ESC button for about 2 seconds. The main menu “Adv Setup” (Advanced Setup) function has 18 subfunctions. These are: 12.01 UnderRun Protect 12.02 Overburn 12.03 Read Error Skip 12.04 Format HDD 12.05 Verify HDD 12.06 Burn-in 12.
Using the DVD/CD Copy Tower Pro HS Main Menu Advanced Setup - continued 12.01 UnderRun Protect This setting turns Buffer Under Run Protection (also known as “Burn Proof”, “SafeBurn”, “JustLink”, “Seamless Link”, etc.) ON or OFF. Default setting is ON; press the ENT button to change, or ESC to exit. 12-01. Adv Setup UnderRun Protect ENT UnderRun Protect On ENT ESC 1. ESC 12.
Using the DVD/CD Copy Tower Pro HS 12.03 Read Error Skip You can set error skipping function while reading discs with errors. The default setting is OFF. If an error is detected during source loading, the duplicator will stop loading and display the error message. If the setting is ON, there will be no message shown even if there is an error in reading. You can use this function to copy some DVDs with errors. Press the ENT button to change, or ESC to exit. 12-03.
Using the DVD/CD Copy Tower Pro HS Main Menu Advanced Setup - continued 12.04 Format HDD This function formats the Hard Disk Drive. Before formatting, all data on the hard disk will be deleted. Press the ENT button to change, or ESC to exit. 1. 12-04. Adv Setup Format HDD Use the UP and DOWN arrows to select DVD, CD, or DL. In “DVD”, a partition occupies 5GB, in “CD” 1 GB, and in “DL” 10 GB. If you format once more, the old data will be lost.
Using the DVD/CD Copy Tower Pro HS 12.05 Verify HDD This function checks to verify that the Hard Disk Drive or its partitions can work properly. Press the ENT button to change, or ESC to exit. 1. 12-05. Adv Setup Verify HDD Use the UP and DOWN arrows to select Disk or Partition. Verify Disk or Partition? Disk ENT ESC Press ENT to verify. After verification, the display will be as shown. Verify Hard Disk OK! 3. ESC 2. ENT ENT ESC www.aleratec.
Using the DVD/CD Copy Tower Pro HS Main Menu Advanced Setup - continued 12.06 Burn-in Burn-in is a test function. You can set up to test continuously or for a specified number of cycles. 1. Load the source disc in one of the DVD Recorders and blank media in one or more of the other DVD Recorders. The copy process will be simulated, but data will not be written to the target discs. 2. Go to Burn In and press the ENT button to enter.
Using the DVD/CD Copy Tower Pro HS 12.07 Update Firmware This function is to update your firmware. 1. Make sure there are no discs in the system. Insert the disc with the firmware into one of the DVD Recorders. Press ENT to update. Display will ask if you want to update. Select YES, then press the ENT button. Do not turn the power off until the update finishes and the machine resets to COPY. 2. Press ENT to update. Display will ask if you want to update. Select YES, then press the ENT button.
Using the DVD/CD Copy Tower Pro HS Main Menu Advanced Setup - continued 12.08 Compare Firmware This function compares the current version firmware with the latest version when the firmware disc is placed into one of the DVD Recorders. Place the disc that contains the latest firmware data into the DVD/CDROM. 12-08. Adv Setup Compare Firmware 1. ENT ESC 12.09 Hardware Diagnostic This function will detect the devices connected to the duplicator’s controller and display information on the hardware.
Using the DVD/CD Copy Tower Pro HS 12.10 Load Default This function resets the Duplicator’s settings back to their factory default values. By pressing the ENT button, the duplicator will be reset to it’s factory default settings. 12-10. Adv Setup Load Default ENT Load Default Config? Yes ENT Load Default OK ENT ESC ESC 1. ESC 12.11 CD+G (Not supported) 12.12 ISRC & MCN This function supports copying ISRC and MCN formats.
Using the DVD/CD Copy Tower Pro HS Main Menu Advanced Setup - continued 12.13 Switch Link-Host (Not supported) 12.14 CD-Text This function allows you to enter CD-Text. CD-Text is a kind of copying format that copies text that can be viewed by players that support this feature. Press ESC and the DOWN arrow to enter CD-Text mode. Then press ENT to enter the CD Text selection. 1. 12-14. Adv Setup CD-TEXT ESC The default is OFF. Press the DOWN arrow to select ON. 2.
Using the DVD/CD Copy Tower Pro HS 12.16 Disc Counter The disc counter can be set to count discs for each job. The LF counter shows the total number of discs produced in the life of the duplicator and cannot be reset. 12-16. Adv Setup Disc Counter ENT Disc Counter View ENT 000000001 000000000 ENT ESC Press the DOWN arrow. JB in the display below means Job; that is, each individual copying task. It records the number of discs you have copied, and it can be deleted when the job is finished.
Using the DVD/CD Copy Tower Pro HS Main Menu Advanced Setup - continued 12.16 Disc Counter Now press the UP arrow to return to the record of the job. Then press ENT to return to the display below. Disc Counter View Press the DOWN arrow to enter the display below to delete the record for the job. Use the arrow keys to confirm YES or NO. Disc Counter Del Job Counter ENT Press the DOWN arrow again to enter the display at below. Dev means Device (DVD writer) counter. Disc Counter Del Dev Counter 8.
Specifications Components • Removable Hard Disk Drive • Build-in Duplicator Controller • Three DVD/CD Recorders (1:3 DVD/CD Copy Tower Pro HS) • Seven DVD/CD Recorders (1:7 DVD/CD Copy Tower Pro HS) Loading Mechanisms • Tray Supported Media Types • • • • • • • • • Supported Formats • All popular CD and DVD formats Recording Modes • Disk-at-Once • Track-at-Once (CD only) Copy Speed • Selectable Maximum Speed Power Requirements • 90 - 240 VAC, 50/60 Hz, Switchable Dimensions (height x width x de
Troubleshooting If the DVD/CD Copy Tower HS is not performing as expected, refer to the symptoms in the following table, and follow the suggested corrective action. Symptom Corrective Action Fail (an issue was encountered during the operation) • Fail messages are usually caused by a problem recording onto the blank media. • Errors are more likely to occur with poor quality media; store brands, generic or bargain brands should be avoided.
Troubleshooting Symptom Corrective Action Target Overflow (the amount of data on the disc you wish to copy exceeds the capacity of the blank media) • Use the Disc Info option to determine the type of disc the source is, and its capacity (listed in MB). • To copy CDs that have slightly more information than the normal empty capacity, the Overburn option must be enabled from Advanced Setup menu. • A dual- (double-) layer disc would be required to copy a DVD containing more than 4,500 MB of data.
Troubleshooting Symptom Corrective Action Buttons do not function when pressed. • A momentary pause may occur while scrolling through menu options, as certain functions require a refresh of the source disc’s details. • The duplicator still may be busy with the last task. Check the display for messages that indicate an operation in progress. • Button mechanism may be malfunctioning. Switch the power off, wait 10 seconds, and then power on again to check for any improvement.
Technical Support After reading this User Guide, if you need additional assistance with this product, please contact Aleratec Technical Support. Our technical staff will be happy to assist you, but they may need your help to better assist you. Calling Aleratec Technical Support without all the necessary information can be both time consuming and frustrating. Therefore, please try to have the following information ready before calling: 1.
68 www.aleratec.
www.aleratec.
70 www.aleratec.
Technical Support FAX Back Form Aleratec, Inc. Technical Support Fax Back Form Please record the following information to help expedite any warranty claim: Model No.:_ _____________ Serial No.
Notes: www.aleratec.
Notes: www.aleratec.
Document Number: 9399035_ENG_Rev. C Specifications subject to change without notice. Copyright © 2013 Aleratec, Inc. 9851 Owensmouth Avenue Chatsworth, CA 91311 U.S.A. www.aleratec.