® USER GUIDE Aleratec 1:5 HDD Copy Cruiser IDE/SATA™ Hard Drive Duplicator and Sanitizer Part No.
Copyright/Model Identification The content of this manual is for informational purposes only and is subject to change without notice. This manual is copyright with all rights reserved. Under copyright laws, this manual and the software described within may not be copied, except in the normal use of the product(s) described within or to make a backup copy. Copyright© 2013 Aleratec, Inc. 9851 Owensmouth Avenue Chatsworth, CA 91311 U.S.A.
Radio/TV Interference Statement The equipment described in this guide emits radio frequency energy. If it is not installed in accordance with the manufacturer’s instructions, it may cause interference with radio or television reception. This equipment has been tested and found to comply with the limits for a Class B digital device, pursuant to Part 15 of the FCC Rules. These limits are designed to provide reasonable protection against harmful interference in a residential installation.
Safety Regulations WARNING To prevent fire or shock hazard, do not expose the unit to rain or moisture. To avoid electrical shock, do not open the cabinet. Refer servicing to authorized personnel only. Make sure that the manually switchable power supply is set to the proper voltage for your region. www.aleratec.
Table of Contents Introduction....................................................................................................1 Product Features....................................................................................................1 Key Items..............................................................................................................2 1:5 HDD Copy Cruiser IDE/SATA Front Panel...................................................
® www.aleratec.
Introduction Thank you for purchasing the 1:5 HDD Copy Cruiser IDE/SATA. Please read this User Guide thoroughly before using this product. Product Features The 1:5 HDD Copy Cruiser IDE/SATA is a Hard Disk Drive Duplicator and Hard Disk Drive Sanitizer. • Sanitizes/Wipes up to 6 drives clean with the choice of three Overwrite patterns: ▪▪ One Pass ▪▪ Three Pass with Verify ▪▪ Seven Pass per DoD 5220.22M • Secure Erase • Duplicates/Makes up to 5 HDD copies at once • Supports 2.5” and 3.
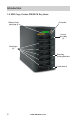
Introduction 1:5 HDD Copy Cruiser IDE/SATA Key Items Display Panel (see page 4) Controller Source Drive Bay (1) Drive Bays (5) Drive Bay Locking Switches Power Switch 2 www.aleratec.
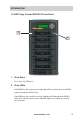
Introduction 1:5 HDD Copy Cruiser IDE/SATA Front Panel 1 2 1 Drive Bays Drive bays for HDD trays. 2 Drive LEDs Each HDD bay has a green power light that will be on when there is an HDD properly inserted n the drive bay. Each HDD bay has a red drive activity light that will light when the HDD is being used. Do not remove a drive when this light is on, otherwise you may lose your data. www.aleratec.
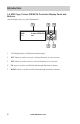
Introduction 1:5 HDD Copy Cruiser IDE/SATA Controller Display Panel and Buttons (Actual display may vary from illustration) HDD 1-5 Cruiser IDE/SATA ver: 3 2 1 ENT ESC 4 5 1. LCD display shows all functions and messages 2. ENT button is used to execute a selected function, or enter a menu 3. ESC button is used to cancel a selected function, or exit a menu 4. UP arrow is used to scroll backward through functions or menus 5.
Precautions Before installing your 1:5 HDD Copy Cruiser IDE/SATA, please read the following. Installation Avoid placing the 1:5 HDD Copy Cruiser IDE/SATA in a location subject to: • High humidity • High temperature • Excessive dust • Mechanical vibration • Direct sunlight • Electromagnetic radiation Power This product has a manually switchable power supply. Make sure that the power supply is set to the proper voltage for your region. Choose a Good Location 1.
Overview Power Up Sequence During the normal power-up sequence of the 1:5 HDD Copy Cruiser IDE/SATA, the following information will be displayed. Figure 1 shows the firmware version HDD Copy Cruiser IDE/SATA 2055PF ver:A.24Q ENT ESC Figure 2 shows the memory initialization • • Initialize SDRAM ENT ESC Figure 3 shows the scanning of the drives • Detect Drives Please wait... Figure 4 shows the number of drives loaded.
Overview Main Menu There are eleven main menu items that can be seen in the 1:5 HDD Copy Cruiser IDE/SATA Controller Display Panel. These are: 1. Copy HDD 6. ENT 6. Rescan BUS 1. ENT ESC 2. Async Copy HDD 7. 7. Source Size ESC ENT 2. 8. 8. Secure Erase ESC ENT 3. Compare HDD 9. 9. Overwrite ESC ENT 4. Async Compare ESC ENT 10. 10. Setup 5. PreScan Source ESC ENT ESC ENT 11. 11. Adv Setup 5. ESC ENT 4. ESC ENT 3.
Overview Subfunctions The “Setup” menu has 13 subfunctions. These are: Language Copy Size Startup Menu Auto Compare Button Sound Device Info 10. Setup System Info ESC ENT Fast Copy Auto Start Drive (Not Supported) Auto Start Timer (Not Supported) Tolerance Size BootTime Delay Quick Compare 8 www.aleratec.
Overview The “Advanced Setup” menu has nine subfunctions. These are: Read Error Skip Update Firmware Compare Firmware Quick Erase HDD 11. Adv Setup ESC ENT Full Erase HDD H/W Diagnostic Load Default Copy HPA Burn In www.aleratec.
Using the 1:5 HDD Copy Cruiser IDE/SATA Loading and Unloading Hard Drives A. Loading IDE Hard Drives 1. Remove the top cover of an included IDE HDD Tray by sliding it toward the rear of the tray. 2. Connect the tray’s Molex power connector to your IDE hard drive’s power port. 3. Connect the tray’s IDE (PATA) data connector to your IDE hard drive’s data (PATA) port. 4. Carefully fold the PATA ribbon cable underneath the hard drive and place the hard drive into the tray. 5.
Using the 1:5 HDD Copy Cruiser IDE/SATA Loading and Unloading Hard Drives B. Loading SATA Hard Drives 1. Remove the top cover of an included SATA HDD Tray by sliding it toward the rear of the tray. 2. Carefully place the hard drive into the tray with the top of the drive facing up and the drive’s SATA port facing the back of the tray. 3. Align the hard drive’s SATA port with the tray’s SATA connector. 4. Gently slide the hard drive toward the rear of the tray until the SATA connector is fully docked.
Using the 1:5 HDD Copy Cruiser IDE/SATA Loading and Unloading Hard Drives Source Drive Target Drives Note: If you are duplicating, the source hard disk drive goes in the top bay. 12 www.aleratec.
Using the 1:5 HDD Copy Cruiser IDE/SATA Main Menu Copy HDD The “Copy HDD” function performs an actual copy from a source HDD to one or more target HDDs. The target HDDs must be at least as large as the source. The 1:5 HDD Copy Cruiser IDE/SATA will copy every block of capacity on the source HDD. Load the source HDD and the target HDDs into the 1:5 HDD Copy Cruiser IDE/SATA. The system will auto-detect the hard drives. After the drives have been detected, a screen similar to the one below will be displayed.
Using the 1:5 HDD Copy Cruiser IDE/SATA Once duplication is complete, a job status screen will be displayed. 1. Copy HDD OK:1 14 4. Fail: 0 ENT ESC www.aleratec.
Using the 1:5 HDD Copy Cruiser IDE/SATA Main Menu Async Copy The function “Async Copy” allows you to insert target drives during the copying operation. During the process, you can insert another drive as a target of the Async Copy operation and the unit will automatically copy to this new drive as well. Load the source HDD and the target HDDs into the 1:5 HDD Cruiser. The system will auto-detect the hard drives. After the drives have been detected, a screen similar to the one below will be displayed. 1.
Using the 1:5 HDD Copy Cruiser IDE/SATA Main Menu Compare HDD The “Compare HDD” function performs a comparison of data from the source hard drive to the data on the target hard drives. With the source and target HDDs loaded use the arrow buttons (or) to select “Compare HDD”. The following screen will be displayed. 1. 3. Compare HDD ENT ESC Press ENT to begin the comparison. The system will auto-detect the hard drives. 2. Detect Drives Please wait...
Using the 1:5 HDD Copy Cruiser IDE/SATA Main Menu Async Compare The function “Async Compare” allows you to insert target drives for data comparing during the comparing operation. During the process, you can insert another drive as a target of the Async Compare operation and the unit will automatically compare this new drive as well. With the source and target HDDs loaded use the arrow buttons (or) to select “Async Compare”. The following screen will be displayed. 1. 4.
Using the 1:5 HDD Copy Cruiser IDE/SATA Main Menu PreScan Source The “PreScan Source” scans the source hard drive to determine if it can be read correctly. With the source HDD loaded, use the arrow buttons (or) to select “PreScan Source”. The following screen will be displayed. 1. 5. PreScan Source ENT ESC Press ENT to begin the scan. The system will auto-detect the hard drives. 2. Detect Drives Please wait...
Using the 1:5 HDD Copy Cruiser IDE/SATA Main Menu ReScan Bus The “ReScan Bus” function causes the 1:5 HDD Cruiser to redetect connected hard drives. This can be used when you change drives without restarting the system. Use the arrow buttons (or) to select “ReScan BUS”. The following screen will be displayed. 6. ReScan BUS 1. ENT ESC Press ENT to select. The system will prompt you to confirm that you wish to proceed.
Using the 1:5 HDD Copy Cruiser IDE/SATA Main Menu Source HDD Size The “Source size” function is used to display the capacity of the source hard drive. With the source HDD loaded, use the arrow buttons (or) to select “Source size”. The following screen will be displayed. 7. Source size 1. ENT ESC Press ENT to display the capacity of the source hard drive. Total: 232.5GB 2. ENT ESC 20 www.aleratec.
Using the 1:5 HDD Copy Cruiser IDE/SATA Main Menu Secure Erase The “Secure Erase” function will sanitize (wipe clean of all data) the hard disk drives connected to the 1:5 HDD Cruiser using algorithms programmed by the hard drive manufacturer. Since this function is native to the hard drive, it is very fast and reliable. Almost all modern SATA hard drives support this feature. In the rare case that Secure Erase is not supported, please use the “Overwrite” function to sanitize your hard drives.
Using the 1:5 HDD Copy Cruiser IDE/SATA You can now scroll up and down for the individual status of each drive. 1 HDD CH:0 Wipe successful 22 5. ENT ESC www.aleratec.
Using the 1:5 HDD Copy Cruiser IDE/SATA Main Menu Overwrite The “Overwrite” function will sanitize (wipe clean of all data) the hard disk drives connected to the 1:5 HDD Cruiser. Load up to 6 HDDs into the 1:5 HDD Cruiser. The system will auto-detect the hard drives. Using the arrow buttons (or) select “Overwrite”. The following screen will be displayed. 1. 9. Overwrite ENT ESC Note: Overwriting the entire capacity of all connected hard drives can take an extended period of time.
Using the 1:5 HDD Copy Cruiser IDE/SATA To perform a “Three Pass Overwrite”, scroll to “3 Pass” and press ENT. This method will write one pass of 1’s, one pass of zeros, and one pass of randomly generated data. b. Overwrite 3 Pass ENT ESC The next screen allows you to choose whether you wish to verify the random overwrite. Overwrite Verify Off ENT ESC Use the arrow buttons to toggle between “On” and “Off”. Press ENT to select.
Using the 1:5 HDD Copy Cruiser IDE/SATA Main Menu Setup The “Setup” menu contains configuration options for the 1:5 HDD Cruiser. It is suggested to use the factory defaults for optimum performance. Use the arrow buttons (or) to select “Setup”. Press ENT to select. The following screen will be displayed. 10. Setup 1. ENT ESC Note: After changing any of the configuration options, you must press ENT to accept the change. Once all changes are complete, press ESC to exit the Setup menu.
Using the 1:5 HDD Copy Cruiser IDE/SATA Main Menu Setup Setup: Language This option allows you to select the language that is used for the display. Use the arrow buttons (or) select “Setup”. The following screen will be displayed. 10. Setup 1. ENT ESC Use the arrow buttons () to scroll to “Language”. The following screen will be displayed. 10-01. Setup Language 26 ESC Press ENT to display the current language selection (the default language is English). Language English 4. ENT 3.
Using the 1:5 HDD Copy Cruiser IDE/SATA Main Menu Setup Setup: Copy Size This function is used to specify the amount of source disk data to copy to the target drives. Use the arrow buttons (or) select “Setup”, then press ENT. The following screen will be displayed. 1. 10. Setup ENT ESC Use the arrow buttons () to scroll to “Copy Size”. The following screen will be displayed. 10-02. Setup Copy Size Press ENT to display the current configuration setting. 10. Setup ALL 4. ESC 3.
Using the 1:5 HDD Copy Cruiser IDE/SATA Main Menu Setup Setup: Startup Menu This option lets you select any of the functions (except “Setup”) as the initial function that appears when the 1:5 HDD Cruiser is powered on. Use the arrow buttons (or) select “Setup”. The following screen will be displayed. 10. Setup 1. ENT ESC Use the arrow buttons () to toggle between the subfunctions. Press ENT to select “Startup Menu”. The following screen will be displayed. 10-03.
Using the 1:5 HDD Copy Cruiser IDE/SATA Main Menu Setup Setup: Auto Compare This option allows you to choose whether or not to automatically compare the source and target hard drives after every copy operation. Use the arrow buttons (or) select “Setup”. The following screen will be displayed. 10. Setup 1. ENT ESC Use the arrow buttons () to scroll to “Auto Compare”. The following screen will be displayed. 10-04. Setup Auto Compare ESC Press ENT to display he current configuration setting.
Using the 1:5 HDD Copy Cruiser IDE/SATA Main Menu Setup Setup: Button Sound This option allows you to enable or disable the beeping sound heard when you press a button. Use the arrow buttons (or) select “Setup”. The following screen will be displayed. 10. Setup 1. ENT ESC Use the arrow buttons () to scroll to “Button Sound”. The following screen will be displayed. 10-05. Setup Button Sound 30 ESC Press ENT to display the current configuration setting. The default is “On”.
Using the 1:5 HDD Copy Cruiser IDE/SATA Main Menu Setup Setup: Device Info This option displays information about any hard drives connected to the 1:5 HDD Copy Cruiser IDE/SATA. Use the arrow buttons (or) to scroll to “Setup”. The following screen will be displayed. 1. 10. Setup ENT ESC Use the arrow buttons () to scroll to “Device Info”. The following screen will be displayed. 10-06. Setup Device Info Press ENT to display information about the first device. 0 Source Hitachi 4.
Using the 1:5 HDD Copy Cruiser IDE/SATA Main Menu Setup Setup: System Info This function displays information about the 1:5 HDD Cruiser, including the current firmware version. Use the arrow buttons (or) to select “Setup”. The following screen will be displayed. 1. 10. Setup ENT ESC After selecting “Setup” use the arrow keys () to toggle between the subfunctions. Press ENT to select. “System Info”. The following information will be displayed. 10-07. Setup System Info 3.
Using the 1:5 HDD Copy Cruiser IDE/SATA Main Menu Setup Setup: Fast Copy The “Fast Copy” option allows you to choose whether to copy the entire source hard disk, or only the used space. Use the arrow buttons (or) to select “Setup”. The following screen will be displayed. 10. Setup 1. ENT ESC Press the arrow buttons () to scroll to “Fast Copy”. The following screen will be displayed. 10-08. Setup Fast Copy ESC Press ENT to display the current configuration setting.
Using the 1:5 HDD Copy Cruiser IDE/SATA Main Menu Setup Setup: Auto Start Drive - (Not Supported) Setup: Auto Start Timer - (Not Supported) Setup: Tolerance Size This function is to set the HDD capacity tolerance between the source and target. Use the arrow buttons (or) to select “Setup”. The following screen will be displayed. 10. Setup 1. ENT ESC Press the arrow buttons () to scroll to “Tolerance Size”. The following screen will be displayed. 10-11.
Using the 1:5 HDD Copy Cruiser IDE/SATA Main Menu Setup Setup: Boot Time Delay If HDD can not be detected during duplicate controller boot up, this function can adjust the timer. Use the arrow buttons (or) to select “Setup”. The following screen will be displayed. 10. Setup 1. ENT ESC Press the arrow buttons () to scroll to “Boot Time Delay”. The following screen will be displayed. 10-12. Setup Boot Time Delay ESC Press ENT to display the current configuration setting (0-99 sec).
Using the 1:5 HDD Copy Cruiser IDE/SATA Main Menu Setup Setup: Quick Compare If target HDD has too many errors, the duplicate controller will ignore it and keep comparing other target HDDs. Use the arrow buttons (or) to select “Setup”. The following screen will be displayed. 10. Setup 1. ENT ESC Press the arrow buttons () to scroll to “Quick Compare”. The following screen will be displayed. 10-13. Setup Quick Compare 3. 2.
Using the 1:5 HDD Copy Cruiser IDE/SATA Main Menu Advanced Setup The “Adv Setup” menu contains additional configuration options for the 1:5 HDD Cruiser. Press and hold the ESC button for 3 seconds to enter Adv Setup. The following screen will be displayed. 11. Adv Setup 1. ENT ESC Note: After changing any of the configuration options, you must press ENT to accept the change. Once all changes are complete, press ESC to exit the Adv Setup menu. The following screen will be displayed.
Using the 1:5 HDD Copy Cruiser IDE/SATA Main Menu Adv Setup Adv Setup: Read Error Skip This function can be enabled to ignore any error that occurs during copying. By default, the 1:5 HDD Cruiser will halt the copy operation when it encounters an unreadable area of the source hard disk and display an error. Enabling this option will ignore any bad sectors on the source hard drive by skipping over them. Warning: Setting this function to “On” may result in corrupt data on copied hard drives.
Using the 1:11 HDD Copy Cruiser IDE/SATA Main Menu Adv Setup Adv Setup: Update Firmware This function is used to update the 1:5 HDD Cruiser firmware to a later version. Note: Firmware updates are available from Aleratec technical support. 1.a CD method Open the case of the 1:5 HDD Cruiser . Disconnect the SATA cable from the blue connector on the controller board. Connect a SATA DVD/CD drive (not included) to the blue connector. Place the firmware CD in the DVD/CD drive. 1.
Using the 1:5 HDD Copy Cruiser IDE/SATA Main Menu Adv Setup Adv Setup: Compare Firmware This function is used to compare the firmware version currently installed with one on a DVD/CD disc. Note: Use “Compare Firmware” after updating the firmware from e-mail or from the Aleratec web site. This function is used after performing a firmware update on the 1:5 HDD Cruiser. Press and hold ESC for about three seconds to access the “Adv Setup” menu. The following screen will be displayed. 1. 11.
Using the 1:5 HDD Copy Cruiser IDE/SATA Main Menu Adv Setup Adv Setup: Quick Erase HDD This function is used to erase the data of a hard drive quickly. Warning: Backup any important data before using this function. Press and hold ESC for about three seconds to access the “Adv Setup” menu. The following screen will be displayed. 1. 11. Adv Setup ESC ENT Use the arrow buttons (or) to select “Quick Erase HDD”. The following screen will be displayed. 11-04. Adv Setup Quick Erase HDD 3.
Using the 1:5 HDD Copy Cruiser IDE/SATA Main Menu Adv Setup Adv Setup: Full Erase HDD This function is used to fully erase all data on the HDD. Warning: Backup any important data before using this function. Press and hold ESC for about three seconds to access the “Adv Setup” menu. The following screen will be displayed. 11. Adv Setup 1. ESC ENT Use the arrow buttons (or) to select “Full Erase HDD”. The following screen will be displayed. 11-05.
Using the 1:5 HDD Copy Cruiser IDE/SATA Main Menu Adv Setup Adv Setup: H/W Diagnostic This function is used to test various components of the 1:5 HDD Cruiser. Press and hold ESC for about three seconds to access the “Adv Setup” menu. The following screen will be displayed. 1. 11. Adv Setup ESC ENT Use the arrow buttons (or) to select “H/W Diagnostic”. The following screen will be displayed. 2. 11-06. Adv Setup H/W Diagnostic 4. Press ENT to begin the diagnostic tests.
Using the 1:5 HDD Copy Cruiser IDE/SATA Main Menu Adv Setup Adv Setup: Load Default This function is used to restore all factory settings of the 1:5 HDD Cruiser back to their original defaults. Press and hold ESC for about three seconds to access the “Adv Setup” menu. The following screen will be displayed. 11. Adv Setup 1. ESC ENT Use the arrow buttons (or) to select “Load Default”. The following screen will be displayed. 11-07.
Using the 1:5 HDD Copy Cruiser IDE/SATA Main Menu Adv Setup Adv Setup: Copy HPA If the source hard disk contains a Host Protected Area (HPA), this option allows you to choose whether or not to copy data within the HPA. Press and hold ESC for about three seconds to access the “Adv Setup” menu. The following screen will be displayed. 11. Adv Setup 1. ESC ENT Use the arrow buttons (or) to select “Copy HPA”. The following information will be displayed. 11-08.
Using the 1:11 HDD Copy Cruiser IDE/SATA Main Menu Adv Setup Adv Setup: Burn In This function is used to burn in all HDD Press and hold ESC for about three seconds to access the “Adv Setup” menu. The following screen will be displayed. 1. 11. Adv Setup ESC ENT Use the arrow buttons (or) to select “Burn In”. You will have four Burn In options. 11-09. Adv Setup Burn In Press ENT to display the current configuration setting. A screen similar to the following will be displayed. 3.
Specifications Power Requirements 115 - 230 VAC Switchable Dimensions (length x width x height) D: 430mm W: 190mm H: 355mm Weight 9.4 Kilograms Note: Specifications subject to change without notice. Troubleshooting If your 1:5 HDD Copy Cruiser IDE/SATA is not performing as expected, refer to the symptoms below, and follow the suggested corrective action.
Technical Support After reading this User Guide, if you need additional assistance with this product, please contact Aleratec Technical Support. Our technical staff will be happy to assist you, but they may need your help to better assist you. Contacting support without all the necessary information can be both time consuming and frustrating. Therefore, please try to have the following information ready before calling: 1.
www.aleratec.
50 www.aleratec.
www.aleratec.
Technical Support FAX Back Form Aleratec, Inc. Technical Support Fax Back Form Please record the following information to help expedite any warranty claim: Model No.:_ _________________ Serial No.
Document Number: 350112_ENG_Rev. B Specifications subject to change without notice. Copyright © 2013 Aleratec, Inc. 9851 Owensmouth Avenue Chatsworth, CA 91311 U.S.A. www.aleratec.