
User Manual


2
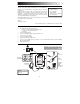
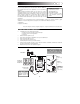
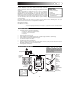
TOP PANEL FEATURES
1. DOCK – Connect your iPod here. Gently rock the iPod back
and forth over the connector when attaching or removing it.
2. DOCK ADJUSTER – Turn this knob accordingly so your
docked iPod rests against the support.
3. MASTER VOLUME – Adjusts the volume of the OUTPUTS on
the rear panel and the HEADPHONE OUTPUT on the front
panel. This master output includes iPod playback plus any
other devices connected to the INPUTS on the rear panel.
4. POWER LED – Indicates the JamDock is on when lit.
5. HEADPHONE OUTPUT – Connect your headphones using a
1/4” stereo connector to this output. You can adjust level of this
output with the MASTER VOLUME knob.
6. iPod LED – Indicates an iPod is docked when lit.
7. INPUT VOLUME – Adjusts the input level of the devices
connected to the INPUTS on the rear panel.
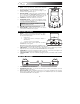
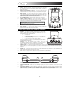
REAR PANEL FEATURES
1. INPUTS – Connect your external sound sources to these
inputs. Each input can accept a 1/4” connection. This allows
for several connection options:
a. 2 microphones
b. 1 stereo source (such as a CD player, sampler, or
drum machine).
c. 1 or 2 mono sources (such as guitars).
You can adjust the level of these inputs with the INPUT
VOLUME knob on the top panel.
Note: When using a guitar, plug it into the “GTR/LEFT” input
and select “GUITAR” with the INPUT SELECTOR on the side panel.
2. LINE OUTPUTS – Connect a PA system or other output device to these outputs using 1/4” cables.
Adjust the level of these outputs with the MASTER VOLUME knob on the top panel.
3. POWER INPUT –Connect the included power adapter to this jack. Connect the power adapter to the
JamDock before you plug the power adapter into an electrical outlet
4. CABLE RESTRAINT – To prevent accidentally unplugging, wrap the power adapter cable around this
restraint.
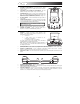
SIDE PANEL FEATURES
2
31
1. POWER SWITCH – Turns the JamDock on and off.
2. KENSINGTON LOCK SLOT – Use an authorized Kensington lock device (not included) to secure the
JamDock to a table or other surface.
3. INPUT SELECTOR – When a standard line-level device is connected to the INPUTS on the rear panel,
flip this switch to “LINE.” When using a guitar, plug it into the “GTR/LEFT” input and select “GUITAR”
with the INPUT SELECTOR on the side panel.
WARNING: Turn the MASTER VOLUME all the way
d
own before turnin
g
on the uni
t
.
1
2
3 4 6 7
5
+15V DC/1A
+15V DC/1A
1
4
2 3