Setup Guide
Contents Introduction . . . . . . . . . . . . . . . . . . . . . . . . . . . . . . . . . . . . . . . . . . . . . . . . . . . . . . . . . .1 How to Use This Manual . . . . . . . . . . . . . . . . . . . . . . . . . . . . . . . . . . . . . . . . . . .1 Before You Begin: Check DM Pro Kit Component List Rack and Mounting Hardware Checklist . . . . . . . . . . . . . . . . . . . . . . . . . . . . .2 Trigger Pad Checklist . . . . . . . . . . . . . . . . . . . . . . . . . . . . . . . . . . . . . . . . . . . .
Introduction Thank you for purchasing the Alesis DM Pro Kit. It’s a complete electronic percussion system that combines Alesis’ top-of-the-line DM Pro drum module with state-of-the-art drum pads, mounting hardware and connecting cables. Flexible, powerful and durable, the DM Pro Kit is an all-in-one solution for everyone from hobbyists to pro drummers.
Rack and Mounting Hardware Checklist -(Figure 1) Qty. Part Description 2 2 1 1 1 4 Qty.
Cable Checklist DM Pro Drum Module Checklist Qty. Part Description Qty. 6 1/4" Mono Cables 3 1/4" Stereo Cables 1 1 1 Part Description DM Pro Drum Module Power Supply DM Pro Module Reference Manual Documentation/Miscellaneous Checklist Qty. 1 1 1 Part Description DM Pro Kit Setup Guide Color-coded cable stickers DM Pro Addendum Items You Will Need In addition to the drum keys that come with DM Pro Kit, you will need a phillips head screwdriver and flat head screwdriver.
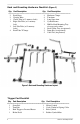
Center Tube Left Side Tube Right Side Tube Upright Tubes Rack Bases Figure 2: Mounting Rack Components 1. Attach One Upright Tube to each of the Rack Bases. a) Loosen the wing nuts and drum key bolts on each clamp attached to the two Rack Bases. b) Place rack bases side by side and make sure clamps are aligned. If not, slide the memory lock and clamps until aligned. c) Insert the Upright Tube into clamp. Make sure the Upright Tube is fully seated inside the clamp. Loosely tighten wing nuts.
e) Firmly tighten the memory lock’s bolt with drum key. f) Select either of the two Upright Tube / Rack Base assemblies built in Step 1. g) Slide the Right Side Tube’s T-Clamp onto the Upright Tube. Position it approximately one foot from the top of the Upright Tube. Loosely tighten all wing nuts. h) Set aside the completed Right Side Tube /Upright Tube / Rack Base assembly until Step 4 below. 3. Attach Left Side Tube to Upright Tube a) Choose a T-Clamp and loosen all wing nuts.
You’ve now assembled the DM Pro Kit’s Mounting Rack. Before moving on, make sure that the mounting rack is standing upright and stable, with all wing nuts securely tightened. Attaching Pads and Cymbals Your next step is to attach pads and cymbals to the DM Pro Kit Mounting Rack. J Remember: all assembly instructions are phrased from the drummer’s point of view – that is, "right" and "left" are used to describe procedures as you sit on your drum throne facing the kit.
Note: for even more flexible positioning of your Snare Pad, you can choose to use your favorite snare drum stand. The Snare Pad will easily fit any basket-style snare drum stand. Attach High Tom a) Choose a Hardware Clamp and loosen large wing nut until clamp’s large opening releases. Attach clamp to the Center Tube just to the right of the Snare, making sure that the clamp’s large wing nut is facing you. Tighten large wing nut. b) Loosen small wing nut and hex nut on Hardware Clamp.
Attach Low/Floor Tom a) Choose a Hardware Clamp and loosen large wing nut until clamp’s large opening releases. Attach clamp to far right end of Right Side Tube. Make sure that the clamp’s large wing nut is facing you. Tighten large wing nut. b) Loosen small wing nut and hex nut on Hardware Clamp. c) Identify Tom Arm and attach it to Right Side Tube by inserting its open tube end into the Hardware Clamp. Evenly tighten the hex nut and wing nut, providing equal pressure on both sides of Tom Arm.
d) Identify Crash Cymbal Pad and assemble spring collar by inserting screw end of spring collar through bottom of cymbal. Screw top piece of collar onto threading. e) Attach Crash Cymbal to Cymbal Boom by inserting Cymbal Boom’s splined L-Mount into base of Crash Cymbal spring collar. Tighten using straightblade screwdriver. f ) Position Crash Cymbal at a comfortable height and angle. Firmly tighten all wing nuts.
Prepare and Position Kick Drum Trigger J Make sure your kickdrum pedal accepts an inverted beater a) Place Kick Drum Trigger Block behind pedal. Attach your pedal’s clamp to the metal L-Bracket on the Trigger Block, as you would attach it to the rim of your bass drum. b) Locate Inverted Beater that comes with your DM Pro Kit and attach it to your favorite kick drum pedal as follows: Loosen the beater clamp. Remove beater. Insert inverted beater to underside of beater mount. Tighten beater clamp.
Figure 3: Mono Cable Plug Figure 4: Stereo Cable Plug Begin by identifying and attaching the three Stereo Cables.
Adjust Trigger Parameters The DM Pro’s trigger defaults were developed for a typical setup and drummer. Depending on your style and preferences, you may want to modify some of the trigger parameters. These parameters are global (they apply to all kits), but each trigger has a completely independent set of parameters. Following is a brief description of the parameters, but for more details, refer to pages 83-90 in the DM Pro Reference Manual.
Advanced User Tips and Tricks Hi-Hat Pedal The DM Pro Kit Hi-Hat pedal features an advanced design that allows full variable capabilities from tightly closed to wide open. There are two mechanical adjustments on the pedal itself. 1) You can adjust the height of the foot board by unscrewing the clip at the top of the pedal which holds the strap. Shorten the length of the strap by folding and aligning holes for shorter distance. Replace screw and tighten securely.
Ride Cymbal The DM Pro Kit’s Ride Cymbal is adjusted in much the same way as the Snare Drum. Adjust the sensitivity of the ride and bell to your playing style. This varies from player to player, and depends on how hard you play and what size sticks you use. Hit the ride and raise the threshold parameter on the bell until the bell no longer plays when you hit the ride. For this setting the crosstalk should be very low and only used to isolate the Ride Cymbal from other drums on the rack.
Alesis Limited Warranty (Rack & Mounting Hardware) ALESIS CORPORATION ("ALESIS") warrants this product to be free of defects in material and workmanship for a period of one year from the date of original retail purchase. This warranty is enforceable only by the original retail purchaser. To be protected by this warranty, the purchaser must complete and return the enclosed warranty card within 14 days of purchase.