MicLink AudioLink Series XLR-to-USB Cable QUICKSTART GUIDE ENGLISH ( 1 – 3 ) GUÍA DE INICIO RÁPIDO ESPAÑOL ( 4 – 6 ) GUIDE D’UTILISATION RAPIDE FRANÇAIS ( 7 – 9 ) GUIDA RAPIDA ITALIANO ( 10 – 13 ) KURZANLEITUNG DEUTSCH ( 13 – 15 ) SNELSTARTGIDS NEDERLANDS ( 16 – 18 )
CONNECTING THE MICROPHONE Alesis MicLink is a plug-and-play device, which means that there are no drivers to install. The first time you connect it to your computer, it will automatically install all the necessary driver components and be ready to use. SYSTEM REQUIREMENTS: y PC: Windows XP, Vista or 7 y Mac: OS 9 or higher y USB Port ABOUT AUDIO LATENCY “Latency” is the time it takes for your computer’s soundcard to process incoming data and output a sound.
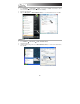
WINDOWS VISTA 1. Go to Start Menu f Control Panel f Sound. (If you don’t see Sound, select “Switch to Classic View,” and the Sound Control Panel should become available.) 2. Select the “Recording” tab. 3. Make sure Microphone – C-Media USB Audio Device is set as the default device, then click “OK.” WINDOWS XP 1. Go to Start Menu f Control Panel f Sounds and Audio Devices. 2. Click the “Audio” tab. 3.
MAC 1. Go to System Preferences f Sound. 2. Click the “Input” tab. 3. Make sure C-Media USB Audio Device is selected, then close the window. 4. Go to Applications f Utilities f Audio MIDI Setup. 5. In the “Audio Devices” tab under “System Settings,” select C-Media USB Audio Device as your Default Input, then close the window.
CÓMO CONECTAR EL MICRÓFONO Alesis MicLink es un dispositivo Plug and Play, lo que significa que no es necesario instalar drivers. La primera vez que lo conecte a su computadora, se instalarán automáticamente todos los componentes de drivers necesario y estará listo para usar inmediatamente.
WINDOWS VISTA 1. Vaya a Start f Control Panel f Sound (Inicio > Panel de control > Sonido). (Si no ve Sound, seleccione “Switch to Classic View” (Cambiar a vista clásica) —el panel de control Sound debe aparecer.) 2. Seleccione la pestaña “Recording” (Grabación). 3. Asegúrese de que Microphone – C-Media USB Audio Device (Micrófono – Dispositivo de audio USB C-Media) esté configurado como dispositivo predeterminado y haga clic en “OK” (Aceptar). WINDOWS XP 1.
MAC 1. Vaya a System Preferences f Sound (Preferencias del sistema > Sonido). 2. Haga clic en la pestaña “Input” (Entrada). 3. Asegúrese de que esté seleccionado C-Media USB Audio Device (Dispositivo de audio USB C-Media) y cierre la ventana. 4. Vaya a Applications f Utilities f Audio MIDI Setup (Aplicaciones -> Utilidades -> Configuración de audio MIDI). 5.
BRANCHEMENT DU MICROPHONE Le Alesis MicLink est un appareil prêt à l’utilisation, c.-à-d. qu’il n’y a aucun pilote à installer. Lorsque vous le branchez à votre ordinateur la première fois, il installe automatiquement tous les pilotes nécessaires, puis est prêt à être utilisé. Configuration requise : y PC : Windows XP, Vista ou 7 y Mac : OS 9 ou supérieur y Port USB LATENCE AUDIO La latence est le temps que met l’ordinateur à traiter les données entrantes et à produire un son.
WINDOWS VISTA 1. Cliquez sur Démarrer f Panneau de configuration f Son. (Si vous ne voyez pas Son, sélectionnez « Basculer vers l'affichage classique » et le panneau de configuration Son devrait s'afficher.) 2. Cliquez sur l’onglet « Enregistrement ». 3. Assurez-vous que Microphone – C-Media USB Audio Device (Périphérique audio USB C-Media) est le paramètre par défaut, puis cliquez sur « OK ». WINDOWS XP 1. Cliquez sur Démarrer f Panneau de configuration f Sons et périphériques audio. 2.
MAC 1. Cliquez sur Préférence système f Sons. 2. Cliquez sur l’onglet « Entrée ». 3. Assurez-vous que C-Media USB Audio Device (Périphérique audio USB C-Media) est sélectionné, puis fermez la fenêtre. 4. Allez à Applications f Utilitaires f Configuration audio et MIDI. 5. Dans l’onglet « Périphériques audio » sous « Réglages du système », sélectionnez C-Media USB Audio Device (Périphérique audio USB C-Media) comme Entrée par défaut, puis fermez la fenêtre.
COLLEGAMENTO DEL MICROFONO Alesis MicLink è un dispositivo plug-and-play, dunque non è necessario installare driver. La prima volta che viene collegato al computer installerà automaticamente tutti i componenti driver necessari e sarà pronto per l’uso. REQUISITI DI SISTEMA: y PC: Windows XP, Vista o 7 y Mac: OS 9 o successivi y Porta USB LA LATENZA AUDIO La “latenza” è il tempo che occorre alla scheda audio del vostro computer per elaborare i dati in arrivo ed emettere un suono.
WINDOWS VISTA 1. 2. 3. Recarsi su Start f Pannello di controllo f Audio. (Se non viene visualizzato Audio, selezionare “Visualizzazione classica” ed il Pannello di controllo Audio dovrebbe diventare disponibile.) Selezionare la linguetta “Registrazione”. Assicurarsi che Microfono – C-Media USB Audio Device sia selezionato quale periferica predefinita, quindi cliccare su “OK”. WINDOWS XP 1. Recarsi su Start f Pannello di controllo f Suoni e periferiche audio. 2. Fare clic sulla linguetta “Audio”. 3.
MAC 1. Recarsi su Preferenze di sistema f Audio. 2. Fare clic sulla linguetta “Ingresso”. 3. Assicurarsi che C-Media USB Audio Device sia selezionato, quindi chiudere la finestra. 4. Recarsi su Applicazioni f Utilità f Audio MIDI Setup. 5. Nella linguetta “Periferiche audio” sotto “Configurazione di sistema”, selezionare C-Media USB Audio Device come ingresso predefinito, quindi chiudere la finestra.
ANSCHLUSS DES MIKROFONS Das Alesis MicLink arbeitet nach dem Plug-and-Play Standard, was bedeutet, dass Sie keine Treiber installieren müssen. Wenn Sie MicLink das erste Mal an den Computer anschließen, werden automatisch die notwendigen Treiberkomponenten geladen und es ist sofort einsatzbereit.
WINDOWS VISTA 1. Klicken Sie auf Start f Systemsteuerung f Sound. (Falls Sie Sound nicht sehenm wählen Sie “Zur klassichen Ansicht umschalten,” wodurch das Sound Control Panel sichtbar werden sollte.) 2. Wählen Sie den “Aufnahme” Tab. 3. Überprüfen Sie, dass Microphone – C-Media USB Audio Device als Standardgerät eingestellt ist und klicken Sie auf “OK.” WINDOWS XP 1. Gehen Sie in Start f Systemsteuerung f Sounds und Audiogeräte. 2. Klicken Sie auf den “Audio” Tab. 3.
MAC 1. Gehen Sie in Systemeinstellungen f Sound. 2. Löicken Sie auf den “Eingabe” Tab. 3. Achten Sie darauf, dass C-Media USB Audio Device ausgewählt ist und schließen Sie danach das Fenster. 4. Gehen Sie in Programme f Dienstprogramme f Audio MIDI Setup. 5. Stellen Sie im “Audio Geräte” Tab unter “Systemeinstellungen” das C-Media USB Audio Device als Standard-Input ein und schließen Sie dann das Fenster.
AANSLUITEN VAN DE MICROFOON Alesis MicLink is een plug-en-playapparaat, wat betekent dat er geen stuurprogramma's worden geïnstalleerd. De eerste keer dat u de MicLink aansluit op de PC worden alle benodigde componenten automatisch geïnstalleerd en is het apparaat klaar voor gebruik.
WINDOWS VISTA 1. Ga naar Start menu f Configuratiescherm f Geluid. (Als u Geluid niet ziet, selecteer dan “Klassieke weergave” en in het configuratiescherm komt Geluid weer beschikbaar.) 2. Selecteer tab "Opnemen". 3. Zorg ervoor dat Microfoon – C-Media USB Geluidsapparaat is ingesteld als standaard apparaat en klik dan op “OK.” WINDOWS XP 1. Ga naar Start menu f Configuratiescherm f Geluiden en geluidsapparaten. 2. Klik op tab "Geluid". 3.
MAC 1. Ga naar Systeemvoorkeuren f Geluid. 2. Klik op tab "Input". 3. Zorg ervoor dat C-Media USB Geluidsapparaat is geselecteerd en sluit het venster. 4. Ga naar Toepassingen f Hulpmiddelen f Geluid MIDI Set-up. 5. In tab "Geluidsapparaten" onder "Systeeminstellingen" selecteert u C-Media USB Geluidsapparaat als standaard ingang en sluit het venster.
Alesis, LLC Tel: (U.S.) 401.658.5760 Email: support@alesis.com MANUAL VERSION 1.
www.alesis.