
Specifications


Hooking It Up
Studio 32 Reference Manual 37
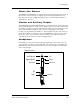
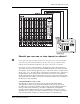
Connecting to a Control Room amplifier
Connect the Studio 32’s Control Room L & R Outs to the inputs of the amplifier used
for the control room monitor speakers. The CONTROL ROOM knob on the Studio 32
controls the level of the control room monitor speakers.
Note: These jacks are also TRS balanced. You may use unbalanced 2-conductor
cables if the power amp doesn’t have balanced inputs. If the amp features XLR
inputs, use a TRS 3-conductor phone-to-XLR-male cable.
Connecting to a Headphone Amp
Monitor 1 and 2 may be used to set up a separate cue mix for musicians to overdub to
while listening to headphones. Connect the AUXILIARY OUTPUTS MON 1 and 2
to a suitable headphone amplifier, if you will use the monitor section separately.
Tip: If you’d like your studio headphones to switch between MONITOR 1/2 and
the Control Room mix, the HEADPHONE OUTS may be connected to an amplifier’s
inputs using a tip-ring-sleeve stereo splitter cable (the same type used for Insert
cables). This also may be used for a second set of Control Room or studio playback
monitors. Just keep the PHONES level control at 2 o’clock or less.
Connecting to a Patchbay
It may be easier in some installations to access everything by the use of a patchbay,
which is several rows of jacks that are permanently connected to both the inputs
and the outputs of the Studio 32, the multitrack tape machine, and all of the
outboard equipment. This is much more convenient, but a more expensive method
than described in the last section, and is not absolutely necessary for operation. In
this case, the patching is the same as in the previous example except that it is now
done on the patchbay instead of at the rear of the console and multitrack tape
machine.
With a patchbay, it is also easier to make use of the AUX SENDS and RETURNS
of the Studio 32. Different effects may be repatched to receive signal from
whatever Aux Send the session requires.
For information on connecting to effects, see the next chapter.