ALESIS SR-16 Reference Manual
TABLE OF CONTENTS CHAPTER 1: INTRODUCTION ........................................................1 1.1 WELCOME TO THE SR-16 DRUM MACHINE!................................................................1 1.1A If You Just Can't Wait…...................................................................................1 1.1B SR-16 Quick Description................................................................................1 1.1C About this Manual...............................................................
.1J Select New Patterns and Fills While in Compose (Record) Mode........................22 3.1K Using Fill to Create Repetitive Drum Hits..........................................................23 3.2 ERASE FUNCTIONS....................................................................................................24 3.2A Erase Mistakes While Recording.....................................................................24 3.2B Erase an Entire Pattern........................................................
6.5 6.6 6.7 6.8 6.9 PAGE 5: ACCEPT EXTERNAL CLOCK DATA (CLOCK IN)..............................................44 PAGE 6: SEND CLOCK DATA TO OTHER DEVICES (CLOCKOUT)................................44 PAGE 7: MERGE MIDI IN WITH MIDI OUT (MIDITHRU)......................................................45 PAGE 8: SELECT DRUM SETS VIA MIDI PROGRAM CHANGES (PRG CHNG).................46 PAGE 9: MAP DRUM NOTES (NOTE MAP)....................................................................46 CHAPTER 7: BACKUP......
CHAPTER 1: INTRODUCTION 1.1 WELCOME TO THE SR-16 DRUM MACHINE! 1.1A If You Just Can't Wait… Turn to section 1.4, 10 Steps to Instant Gratification, and start making sounds. Some of the terms in that section may not make sense, but just follow the instructions, and get ready to hear some great grooves and have a good time. When you're ready to learn more, return to the beginning to learn SR-16 basics.
8. Applications: This additional information will help you get the most out of the SR-16. 9. MIDI Supplement: This brief, entry-level explanation of MIDI explains the basic theory behind the MIDI protocol. Feel free to cover topics in a different order. For example, if creating a whacked-out Drum Set is important to you, read the Drum Set section before you start recording. If you come up with a great tune, skip ahead to the Backup section so that you don't accidentally erase the tune or otherwise lose it.
After perfecting these Patterns, Song mode offers two ways to create a song: • Program a list of Patterns, in the order in which they are to be played. • Select Patterns in real time, and the SR-16 will remember your performance. The SR-16 stores up to 100 User-programmable Songs. Breaking a song into Patterns saves time since elements of a song often repeat. Example: The second verse might have the same drum pattern as the first verse.
1.2C How "Looping" Simplifies Recording To simplify recording in Compose mode, a Pattern will "loop" over and over again. Example: Suppose you want to record an 8-beat pattern. While recording, the pattern will record through all 8 beats, then immediately jump back to the beginning and continue recording through all 8 beats again. The SR-16 will remain in record mode, and continue to loop, until you press STOP or switch over to Perform mode. You will hear any previously-played parts as you record new parts.
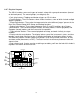
1.2F Physical Layout The SR-16 includes seven main types of controls, along with a group of connectors (located on the back panel). The control groups (see diagram) are: • Pads (play buttons). Tapping each button triggers an SR-16 voice. • Function buttons. These six buttons select various functions, some of which include multiple "pages" of options. • Tempo/Page buttons. These alter the tempo and also select different "pages" present in the Drum Set, Record Setup, MIDI Setup, and Backup functions.
1.2G Display Layout The LCD is divided into several "windows." Each window contains information that helps you monitor the SR-16's status, and/or indicates what type of data should be entered. • Name, "dialog" box, real time Song/Pattern readout, beat counter. This is the most commonly-used area of the display. It shows Pattern and Song names, the beat counter if a Pattern or Song is playing, and the Pattern (including A/B/Fill/Preset or User designators) that is currently playing in Song mode.
number will be in parenthesis—for example, step (4)—to prevent confusion with Song steps or step edit mode. 1.3 IMPORTANT: HOW TO COMMUNICATE WITH THE SR-16 1.3A Entering Numbers The SR-16 identifies Patterns and Songs, as well as many other parameters, with numbers. You need to type in (enter) these numbers in a specific way (as described below). 1.
These buttons, and the TEMPO/PAGE buttons, also have a "scroll" feature. If you press and hold a button, after a short pause the display will either increment or decrement at a rapid rate. 1.3F Buttons that Toggle The Mode buttons, FILL button, and several function buttons (DRUM SET, RECORD SETUP, MIDI SETUP, and BACKUP) "toggle" between two states. Each button press sets the switch to its alternate state.
7. To hear the built-in demo, hold down the PATTERN/SONG button and press PLAY. To stop the demo, press STOP. If you want to play along with the demo, feel free to bash away on the pads. 8. Press PLAY, and you'll hear a Preset Pattern. (In case the SR-16 has already been played with, make sure that the display shows PERFORM and does not show USER before continuing. To choose Perform mode, press the PERFORM/COMPOSE button until the Perform/Compose section of the display shows PERFORM).
CHAPTER 2: RECORD SETUP Several parameters are often adjusted prior to recording a Pattern, such as metronome, Pattern length, etc. General instructions are: 1. Press the RECORD SETUP button. 2. Use the PAGE (up and down) buttons to select different "pages" of functions; the display's lower right window shows the page number. These pages are described below. 3. Adjust values on pages, if necessary, as described for each page. 4.
Quantization shifts your playing to the specified beat while you play, so choose the desired value before tapping out your rhythms. Remember that you can also change quantization while recording if, for example, you want to record snare with eighth note quantization but high-hats with 16th note quantization. Note: The quantize value also sets the step length in Step Edit mode (section 2.9).
2.3 PAGE 3: ENABLE CLICK (METRONOME) AND SET RHYTHM (CLICK SELECT) The display shows CLICK SELECT; the Click window shows the click's rhythmic value. CLICK SELECT SETUP RECORD PAGE CLICK Enter the click value with the INC/DEC or number buttons (1 = quarter note, 2 = quarter note triplet, 3 = 8th note, 4 = 8th note triplet, 5 = 16th note, 6 = 16th note triplet, 7-0 = Click Off). The click is audible only in Compose mode. 2.
2.5 PAGE 5: ADJUST VELOCITY RESPONSE (VELOCITY) There are 11 ways in which a pad's output level can respond to the force with which you tap it: soft, medium, loud, and eight fixed responses. VELOCITY LOUD SETUP RECORD PAGE PERFORM The display says VELOCITY. To select the desired dynamic response, use the INC/DEC or number buttons (1 = Fixed 1, 2 = Fixed 2, 3 = Fixed 3, 4 = Fixed 4, 5 = Fixed 5, 6 = Fixed 6, 7 = Fixed 7, 8 = Fixed 8, 9 = Soft, and 0 = Loud).
2.6 PAGE 6: ADD/REMOVE BEATS FROM PATTERN END (LENGTH) This option either adds beats to, or subtracts beats from, the end of the Pattern. The Pattern length can be set prior to, or after, recording. Shortening a Pattern's end point erases any drum events that fall outside the remaining part of the Pattern; lengthening a Pattern's end point adds silence at the end of a Pattern. It is also important to note that changing a Pattern's length also changes the length of the associated Fill Pattern.
The display says ### BEAT and ➔START. This indicates a Pattern's length in beats (quarter notes). Enter the desired length with the INC/DEC or number buttons (this must be a three digit number; enter leading zeroes if necessary). A smaller value compared to the original length will remove the difference, in beats, from the beginning of the Pattern. A larger value will add the difference, in beats, to the beginning of the Pattern.
than one drum event occurs on the same sub-beat, the PAGE UP/DOWN buttons step forward or backward respectively through each drum one at a time. 001/00 VOL 8 DRUM STEP EDIT SWING OFF QUANTIZE If no drum event exists on this beat/sub-beat, the display will show no pad number, and EMPTY in place of volume data. To navigate through the steps at the current quantization rate, use the PAGE UP button to move forward or PAGE DOWN to move backward.
The following page summarizes the step edit options.
2.9A Add a New Drum to a Step Use the PAGE buttons to select the step where the drum is to be added. Press the pad that corresponds to the sound you want to add. That drum, along with its volume (how hard the pad was hit), will be recorded into the displayed step. If you play a pad and there is already a drum event played by that pad on the displayed step, you will edit the volume rather than add another event.
CHAPTER 3: PLAYING BACK/RECORDING PATTERNS 3.1 PLAYBACK/RECORD BASICS Please make sure you've read section 1.2B, which explains the different types of SR-16 Patterns. It is important to understand the differences between these Pattern types. The PATTERN/SONG button chooses between Pattern and Song modes. For all of the following Pattern operations, Pattern mode must be selected, as confirmed by the display. ROCK 1 PATTERN A PRESS PLAY TEMPO PERFORM 3.
To listen, choose Perform (this de-activates the click). You can drop in and out of these two modes as you record. While the SR-16 is in either mode, you can change Pattern quantization, swing, click rhythm and volume, pad velocity response, name, drumset, drumset parameters, and MIDI parameters. You can therefore keep the groove going at all times, even while you make adjustments prior to recording another part.
3.1F Using the Start/Stop Footswitch When the SR-16 is stopped, pressing a footswitch plugged into the Start/Stop footswitch jack is equivalent to pressing PLAY. When the SR-16 is running, pressing the footswitch is equivalent to pressing STOP. Background The rear panel Start/Stop footswitch jack accepts a momentary, normally open or normally closed footswitch (available at most music stores) for remote or foot control of the stop and start functions.
3.1H Select Fill Patterns in Perform (Playback) Mode Fill Patterns are the key to creating expressive drum parts. However, Fill is a sophisticated feature that requires some explanation. Remember that Fills are always the same length, and use the same Drum Set, as the associated Main Pattern. This lets you "drop in" a Fill at any time. As soon as you press the FILL button, the Fill takes over from the Main Pattern and starts playing until the end of the Fill. Generally, Fills are transitional Patterns.
3.1I Record a Pattern An empty Pattern defaults to an 8 beat length, with 16th note quantization and swing off (50%). If you need to change the length, it's best (though not essential) to do so before recording. Other parameters can be changed while you're recording. To record, select the desired User Pattern. Select Compose mode and press PLAY. Remember that you can switch between Compose and Perform while recording.
3.1K Using Fill to Create Repetitive Drum Hits As mentioned earlier, the FILL button performs two different functions. We've already covered how to use the FILL button for Pattern selection, however, it can also trigger a drum sound at the current quantization rate (e.g., eighth notes, 16th notes, etc.; if quantization is off, though, this function is inactive) and swing value.
3.2 ERASE FUNCTIONS 3.2A Erase Mistakes While Recording While the SR-16 is recording, you can erase any individual drum event or series of events in real time to fix up errors. Erasure occurs only on those beats that coincide with the current quantization and swing values; turn quantization off to erase a drum wherever it occurs. 1. The SR-16 should be in Compose mode and recording. 2. Press and hold ERASE. 3.
3.3 COPY FUNCTIONS The following Copy functions assume that you are copying a Main Pattern to a Main Pattern (remember, copying a Main Pattern to another Main Pattern copies the Fill along with it). Other combinations take the following rules into account. • Copying a Main Pattern to a non-empty Pattern or to itself appends the Fill to the existing Fill, as well as appends the Main Pattern to the existing Main Pattern.
1. The SR-16 should be in Pattern mode and stopped. 2. Select the Pattern containing the drum part to be copied. 3. Press and hold the COPY button, and keep holding it down until step (7). The display says COPY TO PATT. 4. Tap the pad to be copied. The display shows the pad number (e.g., D 8 if you hit pad 8). 5. Tap the destination pad that should hold the copied part. As long as COPY is held down, the destination pad can still be changed by selecting another drum pad. 6. Press PLAY.
5. Release the COPY and PLAY buttons. 3.3E Copy a Single Drum Pad's Part to a Drum Pad in Another SR-16 Via MIDI The SR-16 can send system exclusive information for a drum part to another SR-16 via MIDI. If you have only one SR-16, you can skip this section. This copy function merges the source drum pad rhythm with the destination drum pad rhythm in another SR-16. To replace the destination rhythm with the source rhythm, first erase the destination pad rhythm to be replaced (section 3.2C). 1.
CHAPTER 4: CREATING DRUM SETS The SR-16's 12 pads can be assigned to various drum sounds, with different levels, tuning, panning, triggering mode, and output jack assignment. Each set of pad parameters is given a number and collectively are called a Drum Set; each A and B user Pattern can have its own Drum Set assignment. There are 50 preset Drum Sets and 50 user-programmable Drum Sets.
4.2 PAGE 2: ASSIGN SOUNDS TO PADS The display shows the currently selected pad number and the sound assigned to that pad. FATSNARE 001 DRUM SET DRUM PAGE You can assign any of the SR-16's sounds to any of the pads, or to more than one pad. Each individual Drum Set can have its own drum sound assignment. To assign a sound to a pad: 1. Press the pad (the display will show the pad number). 2. Enter the desired drum sound number with the number or INC/DEC buttons.
To change the volume associated with a given pad: 1. Press the pad (the display will show the pad number). 2. Enter the desired volume, from 00 (full off) to 99 (maximum volume), with the number or INC/DEC buttons. 3.When the display confirms your choice, either store the edits you've made (see section 4.8) or do more assignments by tapping another pad to select it, then assigning the pad volume. 4.
4.5 PAGE 5: SET PAD TUNING (TUNING) The display shows TUNING, the currently selected pad number, and the tuning assigned to that pad. TUNING +3 DRUM SET DRUM PAGE To change the tuning associated with a given pad: 1. Press the pad (the display will show the pad number). 2. Enter the desired tuning with the INC/DEC buttons. The range is from +3 (most sharp) to 0 (normal pitch) to -4 (most flat). 3. When the display confirms your choice, either store the edits (see section 4.
Background Each mode affects triggering in a different way: Multi: When hitting a pad repeatedly, each hit will cause the sound to go through its entire decay. This is useful with cymbals, since early strikes will continue to decay as you play later strikes. Single: When hitting a pad repeatedly, a new hit will automatically terminate any sound that is still decaying. This is useful with many percussion sounds (such as tambourine, agogo, etc.).
Stereo with Fixed Placement: Plug the left Main output into the left channel of your amp (or mixer), and the right Main output into the right channel. The default voice mix for the preset Drum Sets pans the drums between the Main output jacks in a way that works well for most applications. Stereo with Variable Placement: Plug the left Main output into the left channel of your amp (or mixer), and the right Main output into the right channel.
copy one Drum Set to a different Drum Set. Also, remember that if you change Patterns before saving your Drum Set, all of your edits will be lost. 4.9 PAGE 9: MANUAL DRUM SET OVERRIDE (SET MODE) The display says SET MODE. Use the INC/DEC buttons to select PATT (each Pattern uses its assigned Drum Set) or MANUAL (the SR-16 will retain the currently selected drum assignments regardless of which Pattern is chosen).
CHAPTER 5: SONG MODE 5.1 SONG MODE BASICS After creating the Patterns that make up a Song, it's time to string those Patterns together in a musically useful way. You can incorporate Preset Patterns, or a combination of Preset and User Patterns. There are three ways to create Songs: • In real time. As the SR-16 plays in Song Mode (with Compose mode selected), it will remember the Patterns and Fills you select. • Manually.
5.1C Continue, Re-start, or Jump to Next Song Step • In Compose mode, if you stop a Song and then press PLAY, the Song will continue from the first beat of the Pattern that was playing when STOP was pressed. • In Perform mode, if you stop a Song and then press PLAY, the Song will re-start from the beginning. • In either Compose or Perform mode, press PLAY while the Song is playing to immediately jump ahead to the next Song step. Its associated Pattern will begin on the downbeat.
5.1G Change Song Tempo as the SR-16 Plays To change the Song tempo as it plays, press the TEMPO/PAGE UP button to increase the tempo, and the TEMPO/PAGE DOWN button to decrease the tempo. 5.2 REAL TIME SONG CREATION To create a Song in real time (this assumes an empty song): 1. (Optional) In Pattern mode, select the Pattern you want for the first Song step. 2. Select Song mode and the desired Song number. 3. Select Compose mode.
5.3 MANUAL SONG CREATION 5.3A Enter a Pattern 1. Select Song mode and the desired Song number. 2. Select Compose mode. The display will show STEP 01 and the contents of the step, which is currently E N D (if the first step says E N D , that indicates that the Song is empty since it contains no data. If the first step shows a PATTern number, then the Song is not empty). 3. Enter a two-digit Pattern number with the number buttons. If desired, choose between the A/B variations and Preset/User options. 4.
5.3E Delete a Step 1. 2. 3. 4. The SR-16 should be in Song and Compose modes. Use the INC/DEC buttons to select the step number to be deleted. Press and hold ERASE. The display says ERASE STEP? While continuing to hold ERASE, press PLAY. The step is deleted, and all subsequent steps are automatically re-numbered to reflect the deletion of the inserted step (e.g., what used to be step 06 is now step 05, what used to be step 07 is now step 06, etc.).
4. While continuing to hold the COPY button, enter the destination Song number to which the source Song should be copied using the number or INC/DEC buttons. 5. While you continue to hold the COPY button down, press PLAY. The copy is complete, and the display says COPY DONE. 6. Release the COPY and PLAY buttons. Notes • If the destination Song was empty, the copy is identical to the source Song. • If the destination Song was not empty, then the source Song is appended to the end of the destination Song.
CHAPTER 6: MIDI SETUP This menu accesses important MIDI functions. General instructions are: 1. Press the MIDI SETUP button. 2. Use the Page (up and down) buttons to select different "pages" of functions; the display's lower right window shows the page number. These pages are described below. 3. Adjust values on pages, if necessary, as described for each page. 4. After making all needed changes, press MIDI SETUP again to exit, or choose another page.
6.2 PAGE 2: RECEIVE MIDI DRUM NOTES (DRUM IN) DRUM IN ON V1 SETUPMIDI PAGE PERFORM The display shows DRUM IN. This page features two different MIDI input velocity curves (ON V1 and ON V2). To have the SR-16 receive note messages at its MIDI input, use the INC/DEC buttons to select ON V1 or ON V2. Select OFF to have the SR-16 ignore note messages. ON V1 is a normal linear velocity curve, and will not affect MIDI velocity data being sent by the controller.
6.4 PAGE 4: ASSIGN MIDI NOTE NUMBERS TO DRUM PADS (NOTE) This page determines which MIDI in NOTE will trigger a pad, or MIDI out note will be produced if you play a pad. The display shows the note number/name in the upper left, and the drum pad number in the upper right window. NOTE 049 C#2 DRUM SETUPMIDI PAGE MIDI Note Number/Name Drum Pad Number Play the drum pad to be assigned to a MIDI note, as confirmed by the Drum Pad Number display. Enter the note number/name with the number or INC/DEC buttons.
6.5 PAGE 5: ACCEPT EXTERNAL CLOCK DATA (CLOCK IN) CLOCK IN ON SETUPMIDI PAGE PERFORM The display shows CLOCK IN. To have the SR-16 recognize clock (timing) messages present at its MIDI input, use the INC/DEC buttons to select ON (if no clock messages are present, the SR-16 will follow its internal clock tempo). Select OFF to have the SR-16 ignore clock messages and follow its internal clock tempo regardless of what timing data appears at the MIDI in.
• The external device (sequencer, drum machine, etc.) can respond to MIDI timing signals. • These signals go from the SR-16's MIDI out to the external device's MIDI in. • CLOCKOUT is ON. When slaving the SR-16 to other devices, CLOCKOUT should be O F F and CLOCK IN should be ON. 6.7 PAGE 7: MERGE MIDI IN WITH MIDI OUT (MIDITHRU) MIDITHRU OFF SETUPMIDI PAGE PERFORM The display shows MIDITHRU.
6.8 PAGE 8: SELECT DRUM SETS VIA MIDI PROGRAM CHANGES (PRG CHNG) PRG CHNG OFF SETUPMIDI PAGE PERFORM The display shows PRG CHNG. Program Change commands can change Drum Sets numbers at any time, including while the SR-16 is playing. To have the SR-16 receive Program Changes, use the INC/DEC buttons to select ON. Select OFF to have the SR-16 ignore Program Changes. Background Program Change (PC) 00 selects User Drum Set 00; PC 01 selects User Drum Set 01; PC 02 selects User Drum Set 02; etc.
Drum Set 00 00 00 00 00 00 00 00 00 00 00 00 01 01 01 01 01 01 01 01 01 01 01 01 02 02 02 02 02 02 02 02 02 02 02 02 03 03 03 03 Pad # 1 2 3 4 5 6 7 8 9 10 11 12 1 2 3 4 5 6 7 8 9 10 11 12 1 2 3 4 5 6 7 8 9 10 11 12 1 2 3 4 MIDI Note 000 001 002 003 004 005 006 007 008 009 010 011 012 013 014 015 016 017 018 019 020 021 022 023 024 025 026 027 028 029 030 031 032 033 034 035 036 037 038 039 Drum Set 03 03 03 03 03 03 03 03 04 04 04 04 04 04 04 04 04 04 04 04 05 05 05 05 05 05 05 05 05 05 05 05 06 06 06 0
CHAPTER 7: BACKUP 7.1 BACKUP BASICS This function allows you to save the SR-16 Pattern, Song, and Drum Kit data to cassette tapes or MIDI system exclusive storage devices. General instructions are: 1. Press the BACKUP button. 2. Use the Page (up and down) buttons to select different "pages" of functions; the display's lower right window shows the page number. These pages are described below. 3. Adjust values on pages, if necessary, as described for each page. 4.
7.2 TAPE INTERFACE HOOKUP To save to tape: Connect a mini phone plug cable (male-to-male) from the SR-16 tape in/out to the recorder's tape in. If you are using a standard cassette recorder rather than a data recorder, plug into the recorder's Aux or Line Level input. If your only option is to plug into the microphone input, you may still be able to achieve satisfactory results.
1. Connect the SR-16 MIDI out to the DataDisk (DD) MIDI in. 2 . Insert a formatted disk into the DD and proceed to the next step. If the disk is not formatted, insert it in the drive and press the DD Format switch. When the DD display says FORMAT DISK?, press DO/YES. When the display says ARE YOU SURE? press DO/YES again. 3 . Press the DD RECEIVE button. The display says RECV ONE SYSEX: WAITING FOR DATA. 4 . Press the SR-16 BACKUP button (if you are not already in the backup function) and select Page 1. 5 .
7.5 PAGE 2: SAVE ALL MEMORY CONTENTS TO TAPE (STORE TO TAPE?) STORE TO TAPE? BACKUP PRESS PLAY PAGE This function saves all Patterns, Songs, and Drum Kits to tape. The display shows STORE TO TAPE? Put the cassette recorder into record mode. After the tape has gone past the leader (if present), press PLAY on the SR-16. The SR-16 display will increment through the A/B Patterns and Songs; the operation is finished when the display says DONE.
To cancel the verifying operation at any time, press STOP. The display says TAPE IN CANCEL. Background Although cassette interfaces are quite reliable, problems can occur due to incorrect tape levels, defective tape, bad luck, etc. Do not consider your work as saved until you have verified the data recorded on tape, thus insuring that it can be loaded back into the SR-16 in the future.
7.8 PAGE 5: LOAD ONE PATTERN FROM TAPE (LOAD IN PATT) LOAD IN PATT01 A BACKUP PRESS PLAY PAGE This loads a single Pattern from a tape dump. The display says LOAD IN PATT00. Enter the desired Pattern number with the number or INC/DEC buttons, press the A or B button to specify the desired variation, then press PLAY; the display says START TAPE… Press the recorder's Play button. While loading, the display shows the Pattern being loaded. Upon completion the display says DONE.
Background You may just want to load one Song from tape rather than all data. A Song being loaded from tape will take its original position in memory (e.g., SONG 32 will reload back into SONG 32) and will overwrite any data currently stored in that location. 7.10 PAGE 7: CHECK AVAILABLE MEMORY (FREE MEM) FREE MEM 100% BACKUP PAGE When you select Page 7, the display will show the approximate amount of free memory available (expressed as a percentage of the total amount).
7.11 CLEAR MEMORY/RE-INITIALIZE PARAMETERS After saving a bank of data, you may want to start programming new Patterns from scratch so you don't mix up new Patterns with old ones. This operation clears the memory and reinitializes all parameters. It can also be a useful service technique to restore the SR-16 to normal operation if it "locks up" due to some unforeseen event like a static electricity jolt or power supply interruption.
CHAPTER 8: APPLICATIONS 8.1 MIDI SYNC APPLICATIONS 8.1A SR-16 As MIDI Timing Master The SR-16 can control several other slave MIDI drum machines or sequencers by turning on MIDI Clock Out, which sends SR-16 timing information down the MIDI line. 1. Turn on MIDI Clock Out (section 6.6). 2. Program the slave units to not follow their internal clocks, but to accept external MIDI Clock and Start/Stop data. Refer to each device's manual to find out how to do this.
3. Press PLAY on the system master. The SR-16 should start at the same time, and progress at the same tempo. If the master generates Song Position Pointer, you can start the master at any point, and both units will synchronize from that point on. The following diagram shows an SR-16 slaved to the MIDI system master clock, provided in this case by a keyboard "workstation" on-board sequencer. MIDI In MIDI Clock In = On VOLUME MIDI Out Keyboard "workstation" 8.
8.2 STRATEGIES FOR ASSEMBLING PATTERNS AND SONGS Ideally, you should be able to translate your inspirations into tangible form with a minimum amount of effort. The following tips and techniques help speed up the process of creating Patterns and Songs. 8.2A Create Fills Quickly with the Copy Function Many times a Fill will simply be a variation on another Pattern, but with a few minor differences to add variety or serve different musical purposes.
8.3 SOUND STACKING™ 8.3A Basics Sound Stacking™ was introduced by Alesis on its two earlier drum machines, the HR-16 and HR-16:B. It is a quick and efficient way of layering drum sounds to create thicker drum textures and gives the user wide capabilities for experimenting with new, personalized drum sounds. Through some intelligent software manipulation, a drum sound's rhythm pattern can be copied to any other drum pad thereby simultaneously triggering the drum sounds assigned to both pads.
8.4 UNDERSTANDING RHYTHMIC NOTATION Measures A piece of music is divided into smaller units called measures (also called bars), and each measure is divided into beats. In the SR-16, each beat is further sub-divided into 96 sub-beats. Rhythmic Values for Notes With a measure written in a 4/4 time signature, there are 4 beats per measure, and each beat represents a quarter (1/4) note. Thus, there are 4 quarter notes per measure of 4/4 music.
CHAPTER 9: MIDI SUPPLEMENT (This chapter is adapted with permission from Power Sequencing with Master Tracks Pro/Pro 4 and The Complete Guide to the Alesis HR-16 and MMT-8, copyright 1990 and 1989 respectively by AMSCO Publications.) 9.1 MIDI BASICS Most current electronic instruments, including the SR-16, contain an internal computer.
16's MIDI out jack can be switched to a thru function that merges MIDI in data with SR-16 MIDI data. 9.1B About Sequencing Sequencing, the computerized equivalent of tape recording, is a very common and popular MIDI application. The SR-16 is a special-purpose sequencer optimized for drum machine applications. Sequencing takes advantage of the fact that MIDI data can be time-stamped with rhythmic data and recorded in computer memory.
9.2B Mode Messages There are two messages that determine the MIDI mode (i.e., how devices will receive MIDI data). The "omni" message determines how many channels will be recognized. Omni on means that data from all channels will be received; Omni off limits the number of channels, usually to one. The "mono/poly" message deals with voice assignment within the synthesizer.
MIDI For Musicians and The Electronic Musician's Dictionary by Craig Anderton; AMSCO Publications. The former was written specifically for musicians with no background in MIDI, and the latter defines terms related to musical electronics. Music Through MIDI by Michael Boom; Microsoft Press. An excellent text for those getting started with MIDI, synthesis, and related topics. The Murphy's Law MIDI Book by Jeff Burger; Alexander Publishing. Emphasizes applications and problem-solving.
ALESIS SR-16 TROUBLESHOOTING CHART Symptom What’s Wrong What To Do No display. Power switch not on. Power supply not connected. Bad power supply. Improper supply. Push power switch in. Check Power supply connections. Try known good power supply. Try known good power supply. Power supply must be 912V A.C. A 9 volt D.C. supply won’t work, but it won’t harm the unit. Buttons have no effect. LCD reads “Software Error”. LCD shows nonsense, all lights on, or unit has lost all memory.
Other sequencers won't slave... (cont'd) Sequencer not set to receive MIDI (external) clock. Set slave’s clock in accordingly. SR-16 won’t slave to other sequencer. SR-16 “Clock In” turned off. Master sequencer not sending clock information. Unit in MIDI chain not passing on clock information. Turn SR-16’s “Clock In” on. Set master sequencer clock source accordingly. Turn MIDI echo on on each individual unit in the chain. SR-16 not responding to Program Changes. “PRG CHNG” turned off.