
User manual

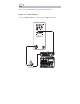
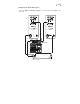

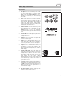
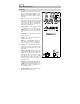
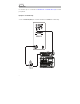
Table Of Contents

8
Strike Amp 8 Features
Rear Panel
1. AC Input: Use the included power cable
to connect this input to a power outlet.
Make sure the Power Switch is set to
off when connecting or discon necting
the cable.
2. Fuse: If the unit’s fuse is broken, lift this
tab to replace the fuse. Replace it with a
fuse with an appropriate rating (printed
under the unit’s power cable input).
Using a fuse with an incorrect rating can
damage the unit and/or fuse.
3. Power Switch: Use this switch to power
the loudspeaker on or off. Make sure the
Volume knob is set to its minimum
(counterclockwise) position before turning
it on.
4. Power LED: This LED lights up when the
loudspeaker is on.
5. Volume: Turn each knob to adjust the
volume of each input.
6. Input: Use a standard XLR cable or 1/4”
(6.35 mm) TRS cable (not included) to
connect your audio source to this input.
7. Output: Use a standard XLR cable (not
included) to connect this output to the
input of another loudspeaker (i.e., another
Strike Amp).
8. Signal Limit LED: This LED lights up
green when an audio signal is sent to the
loudspeaker—it flashes at lower levels
and lights solidly at higher levels. The
LED lights up red when output
limit/protection is active—if the LED is lit
red continuously, reduce the volume of
your audio source.
9. Contour: Engage (depress) this button to
emphasize low and high frequencies by
+3 dB. Disengage (raise) the switch for a
flatter response for live performance or
for maximum output.
10. Ground Switch: Engage (depress) this
switch to reduce hum or noise.
1
5
2
6
5
6
7
8
4
10
9
3